# About Us

## <mark style="color:purple;">Fueling Adgebra’s Innovation and Growth</mark>

Founded in 2013 in Pune, India, Inuxu Digital Media Technologies Pvt. Ltd. was established by industry veterans with a vision to empower digitally-driven businesses.

Since its inception, Inuxu has been the catalyst behind countless success stories, providing innovative solutions that fuel growth and transformation in the digital space.

As the backbone of Adgebra, Inuxu’s expertise, forward-thinking approach, and relentless pursuit of excellence continue to drive Adgebra’s success, shaping the future of digital advertising.

The Team Inuxu will continue to innovate in the adtech space, leveraging AI and ML to launch pathbreaking products that drive greater success for clients and partners alike.

## <mark style="color:purple;">**Omni-channel, Multi-format Adtech Platform**</mark>

Adgebra leverages a diverse range of channels to empower brands, enabling connection and engagement with target audiences across digital devices. Through varied, high-impact ad formats, memorable experiences are created, thereby winning consumers’ trust.

With its omnichannel advertising solutions, Adgebra ensures that brands can engage with their audience across a variety of touchpoints, maximizing impact and delivering targeted, meaningful experiences at scale.

[<br>](https://idmt.co/team-inuxu/)Omnichannel solutions enable brands to meet all their advertising needs on a single platform, expanding reach across multiple digital touchpoints

\
Brands can leverage Adgebra’s multiple ad formats to cater to various marketing needs, including branding, performance, and distribution

\
Adgebra’s data-first approach provides brands with the tools to optimize campaigns in real-time, delivering the right ad to the right users for faster results

\
Combining omnichannel reach with multiformat content ensures broader visibility and higher impact, driving better conversion rates and maximizing ROI

<table data-view="cards"><thead><tr><th></th><th></th><th data-hidden data-card-cover data-type="files"></th><th data-hidden></th><th data-hidden data-card-target data-type="content-ref"></th></tr></thead><tbody><tr><td><mark style="color:orange;"><strong>People</strong></mark></td><td>We talk, have fun, and celebrate after we have strived hard to achieve the victories! We build supportive and inspiring Inuxuites and succeed together.</td><td></td><td></td><td></td></tr><tr><td><mark style="color:orange;"><strong>Process</strong></mark></td><td>We focus on commitment to excel with a reverberating service. Our process is all about ‘NOW’. We are an on-the-feet and agile-process inclusive workforce.</td><td></td><td></td><td></td></tr><tr><td><mark style="color:orange;"><strong>Technology</strong></mark></td><td>With continuous incremental advancement and innovative thinking in our tech stacks, we stay busy in our labs, transforming and pioneering our field.</td><td></td><td></td><td></td></tr></tbody></table>

## <mark style="color:purple;">**Our Story**</mark>

**VISION**

**What we do?**

Adgebra leverages a diverse range of channels to empower brands, enabling connection and engagement with target audiences across digital devices. Through varied, high-impact ad formats, memorable experiences are created, thereby winning consumers’ trust.

**Why we do it?**

At Adgebra, we’re driven by a belief that omnichannel, high-impact ads can revolutionize brand marketing. Our passion is crafting innovative, moment-based solutions that drive real-time engagement, boost brand loyalty, and deliver unmatched results for our clients.

**How we do it?**

Adgebra’s self-serve platform allows brands to target their audience precisely, from 500 M+ users across 3000+ partner publishers. With AI and predictive analytics, we optimize moment-based campaigns in real time. Our expert analysts provide actionable insights, ensuring brands achieve exceptional success.

## <mark style="color:purple;">Our Belief</mark>

**People, Process & Technology**

\
At Inuxu, we believe that success stems from a strong foundation built on **People, Process,** and **Technology**. By fostering a culture that values talent, optimizing efficient processes, and leveraging cutting-edge technology, Inuxu empowers its team to drive innovation and deliver exceptional results in the ever-evolving digital landscape.

<figure><img src="/files/4ypqgZvDjVCeMVVh32WE" alt=""><figcaption></figcaption></figure>

<figure><img src="/files/xDsvYwvs2ePsDdI36OCh" alt=""><figcaption></figcaption></figure>


# General

<mark style="color:orange;">**Our Story**</mark>

**VISION**

With continuous incremental advancement and innovative thinking in our tech stacks, we stay busy in our labs, transforming and pioneering our field

![](https://demo.adgebra.in/custom/html/Adgebra_Help_Center/HelpCenter/images/rightIcon.png) **Why**

With continuous incremental advancement and innovative thinking in our tech stacks, we stay busy in our labs, transforming and pioneering our field

![](https://demo.adgebra.in/custom/html/Adgebra_Help_Center/HelpCenter/images/rightIcon.png) **How**

Building ad tech solutions and services that will equip brands to execute digital campaigns reaching target consumers, at moments when consumers are most open to receiving communication in the media and language that consumers prefer

![](https://demo.adgebra.in/custom/html/Adgebra_Help_Center/HelpCenter/images/rightIcon.png) **What**

With a robust, self-serve ad tech platform, Adgebra empowers brands to precisely target their desired audience. It enables a reach of over 500 million users via its network of 2000+ partner publishers managing 30 billion+ monthly ad serving opportunities. Adgebra's expert campaign analysts offer valuable insights to brands to execute their campaigns effectively and achieve the desired campaign ROI


# Why Advertise with Adgebra

**Advertise with Adgebra**\
*Fuel Your Brand's Growth with Seamless Customer Connections*

Adgebra delivers powerful native advertising solutions to foster meaningful connections between brands and their audiences. By leveraging **multilingual targeting**, Adgebra empowers brands to communicate in the languages their customers understand best, allowing for genuine engagement that resonates.

* **Audience Intent**

  * Select a target audience based on click affinity and 10+ intent types. Custom remarketing audience targeting is also available.

* **Geo & Device**

  * Include or exclude country, state, and city. Target device types and operating system of choice.

* **Language & Keyword**

  * Target any keyword in any or all of the 11 languages supported, including English.

* **Extensive Publisher Network**

  * With a vast network of premium **2000+** publishers, Adgebra helps your brand achieve a greater reach across various digital media platforms.
  * This diverse inventory provides access to audiences across demographics, interests, and languages.

* **Adgebra Ad Formats**
  * **Native ads:** Crafted to match the style, tone, and feel of the platform they appear on, offering a **non-intrusive experience** that consumers are more likely to engage with. This leads to higher engagement rates and positive interactions as ads become a part of the user’s browsing journey rather than a distraction.
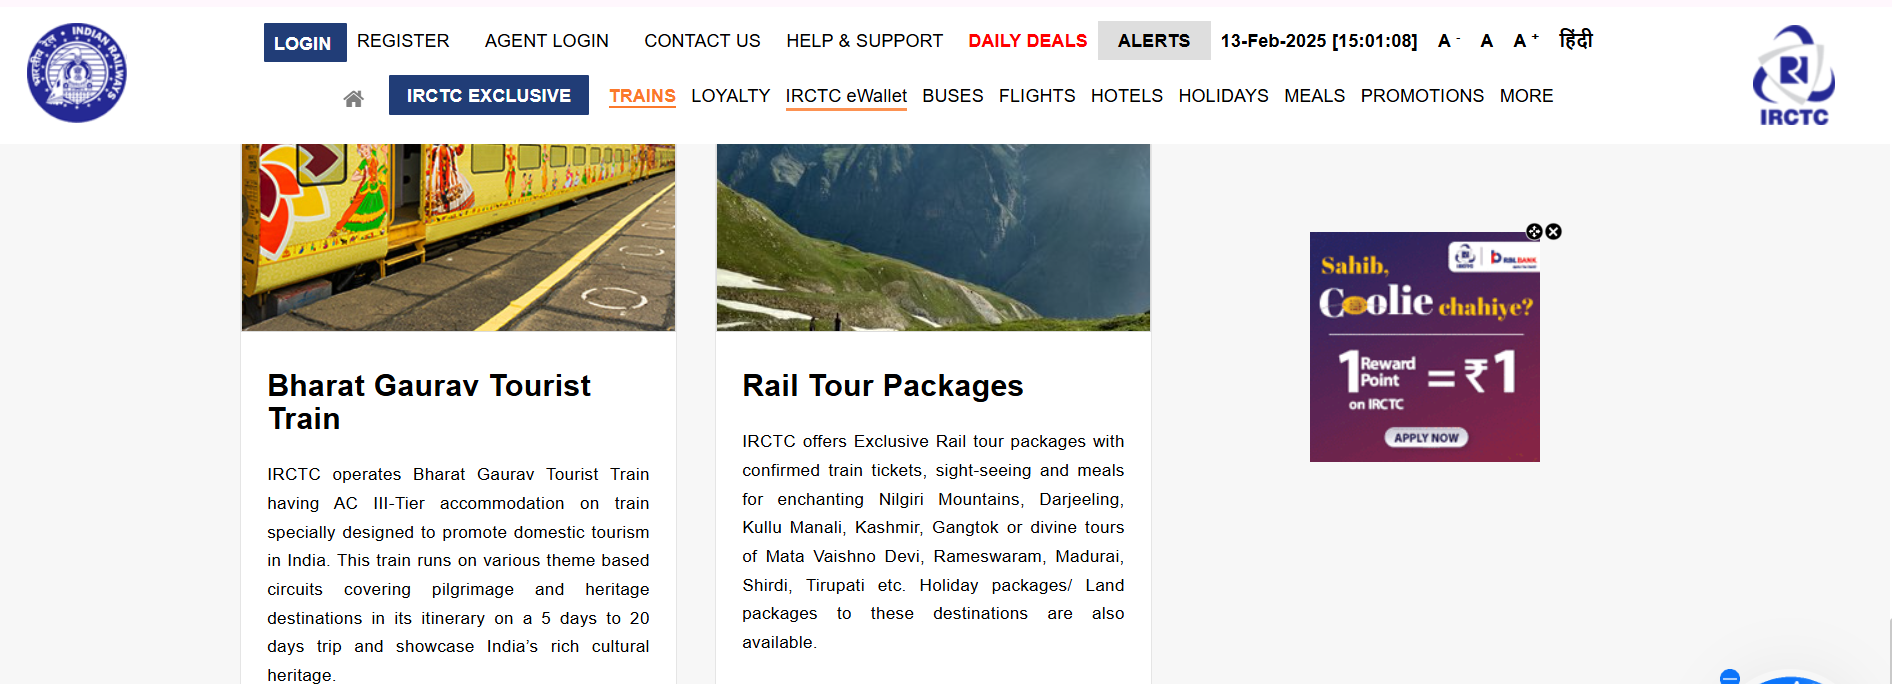
  * **Rich Media ads:** Adgebra’s **Rich Media** solutions offer an innovative approach to digital advertising with **In-Image Ads, In-Footer, and In-Screen Ads**—dynamic, interactive ad formats that appear directly over article images on websites. These ads capture attention and foster engagement in a non-disruptive, visually appealing way.
  * **In-read Video ads**: Engaging video ads for web and wap traffic
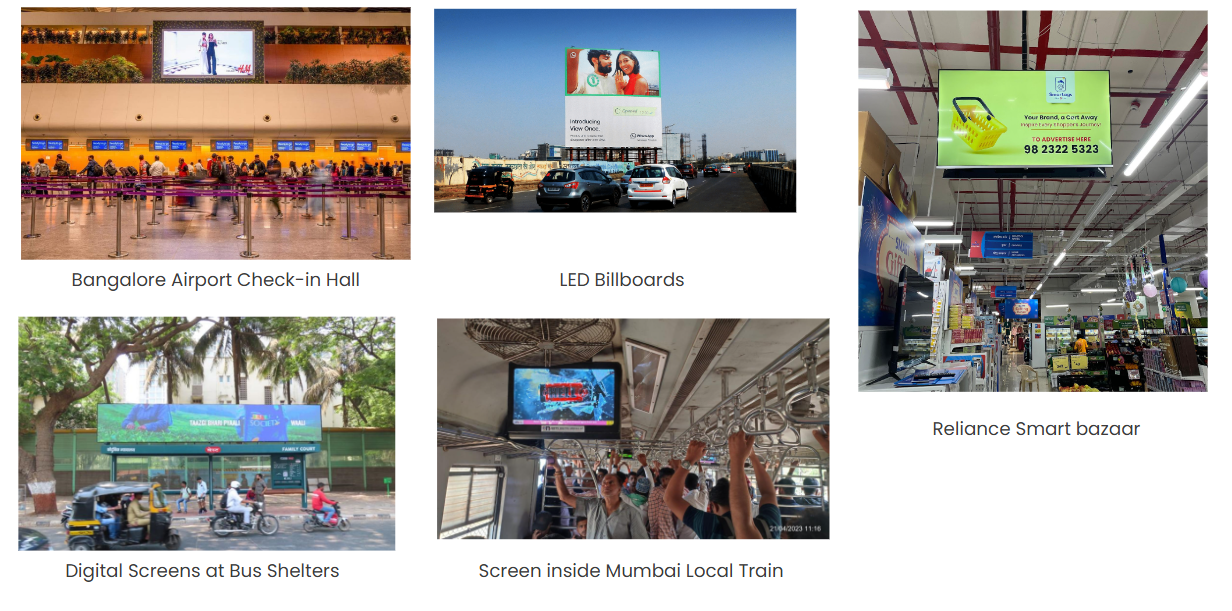
  * **DOOH Ads**: Adgebra’s **Digital Out-of-Home (DOOH)** advertising solutions offer brands a powerful way to reach audiences in physical, and public spaces through dynamic, high-impact digital displays. From bustling urban centers to popular retail locations, DOOH ads make it possible to engage audiences on the go with visually captivating, contextually relevant content.

* **Multilingual Precision**

  * Adgebra allows you to reach audiences in their **native language**, making your ads more relatable and accessible.
  * Multilingual targeting increases trust and engagement, especially in diverse regions where audiences prefer content in their local language.

* **Higher Brand Visibility**

  * With regional language native advertising, brands get an opportunity to reach maximum audiences at a comparatively lesser cost. Data showcases the multifold growth potential of regional content consumption and advertising.
  * **85%** of Indians find local language digital content more reliable.
  * **90%** Responded to the digital ads in local language vs. English.
  * **90%** of New internet users consume non-English content.

* **Top Publisher that choose Adgebra**

<figure><img src="/files/I77418zUMFw3j2UCM4f0" alt=""><figcaption></figcaption></figure>


# Type of Accounts

Below are the type of Accounts that Adgebra Offers

**Adgebra primarily provides two types of accounts:**

**1) DIY (Do It Yourself):** The account refers to a self-serve account where the account owner can create campaigns and align creatives independently. In this type of account, the user takes full control of the advertising process, from campaign creation to the selection and placement of creatives. This hands-on approach allows brands to manage their campaigns directly, making adjustments as needed to meet their specific objectives and preference

**2) Managed**: Account with Adgebra entails having the ad operations team manage the account on behalf of the account owner. In this arrangement, the account owner provides detailed instructions regarding the ads that need to go live, and the ad operations team takes care of the entire campaign setup and optimization process. This includes tasks such as setting up targeting parameters, selecting appropriate ad formats, optimizing campaign performance, and ensuring that the ads reach the desired audience effectively. With a Managed Account, brands can rely on the expertise of the ad operations team to handle the technical aspects of their campaigns, allowing them to focus on other aspects of their business.


# Registration

Below is the process to register on the Adgebra Platform.

To register for a DIY self-serve account, follow the steps outlined below.\
\
**Indian Entity**: [Click Here](https://forms.gle/6nK1MxfNrPXH42z57)\
\
**Non-Indian Entity**: [Click Here](https://forms.gle/vsi7eHJy5K2vEVza9) \
\
For inquiries about Adgebra-managed accounts, please don't hesitate to reach out to us at: <sales@inuxu.media>


# Ad Formats

Adgebra Ad Formats

Adgebra provides diverse ad formats to cater to different advertising needs and preferences. These formats include:

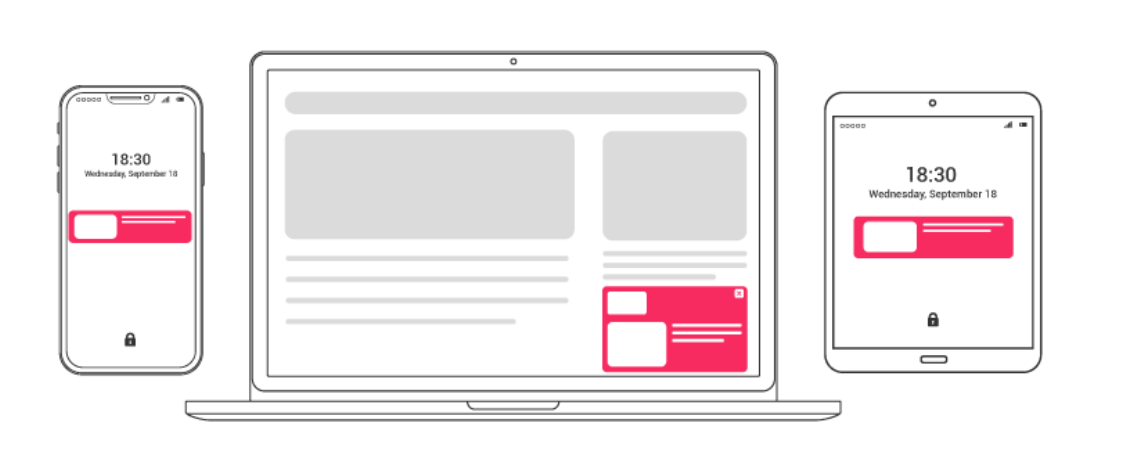
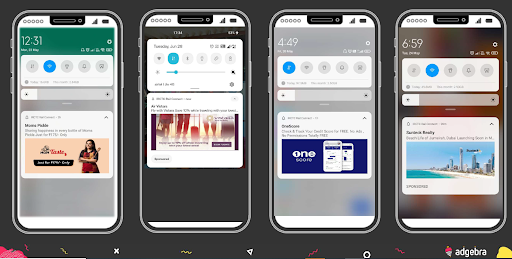
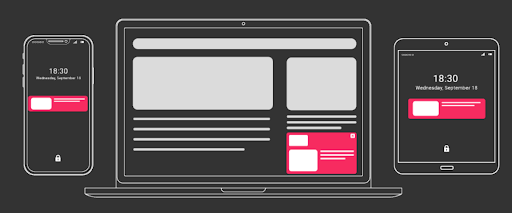
* **Push Notification Ads**: Seamlessly integrated advertisements that blend with the platform's content, ensuring a non-intrusive and engaging user experience.

<figure><img src="/files/JoptWCHWVwkkd8QlSYBZ" alt=""><figcaption></figcaption></figure>

<figure><img src="https://demo.adgebra.in/custom/html/Adgebra_Help_Center/Site/images/13.png" alt="" width="563"><figcaption></figcaption></figure>

* **Native Ads**: Native Ads: Seamlessly integrated advertisements that blend with the platform's content, ensuring a non-intrusive and engaging user experience.
  * **IBN (Iframe-Based Native) Ads:** Static ad slots that can be customized and placed below articles or pages on your site. These ads help optimize ad revenue by utilizing empty ad slot spaces effectively.

    <figure><img src="https://demo.adgebra.in/custom/html/Adgebra_Help_Center/Site/images/single_ads_1.png" alt=""><figcaption></figcaption></figure>

    <figure><img src="https://demo.adgebra.in/custom/html/Adgebra_Help_Center/Site/images/IBN_image.png" alt=""><figcaption></figcaption></figure>

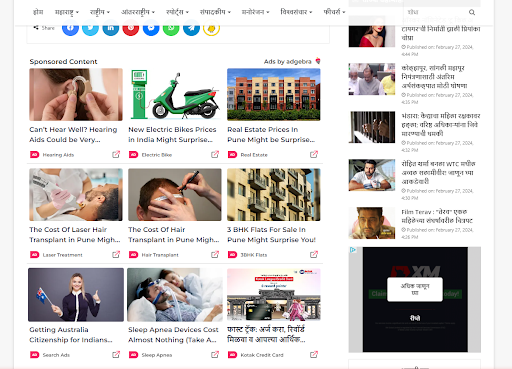
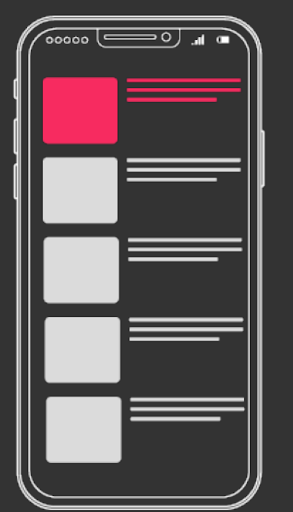
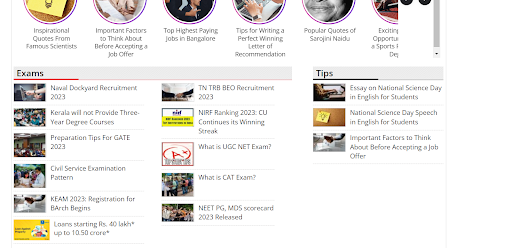
  * **Nano Native Ads:** Nano Ads are a type of ad widget that blends seamlessly within the list of articles on a website, resembling the surrounding content. These ads are designed to mimic the appearance of articles to provide a non-disruptive advertising experience for users.

    <figure><img src="https://demo.adgebra.in/custom/html/Adgebra_Help_Center/Site/images/4.png" alt=""><figcaption></figcaption></figure>

    <figure><img src="https://demo.adgebra.in/custom/html/Adgebra_Help_Center/Site/images/3.png" alt=""><figcaption></figcaption></figure>

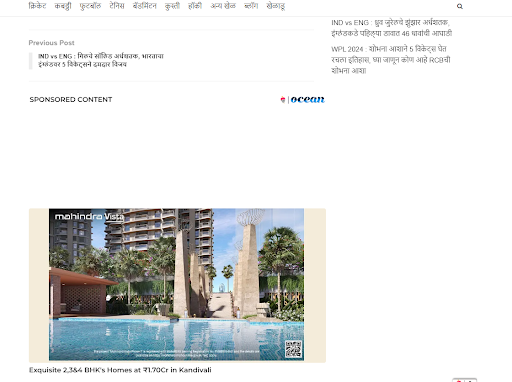
  * **Ocean Native Ads:** Ad widgets typically placed at the end of articles, featuring unlimited scroll functionality to continuously load ads as users scroll through the content.

    <figure><img src="https://demo.adgebra.in/custom/html/Adgebra_Help_Center/Site/images/5.png" alt=""><figcaption></figcaption></figure>

* **Rich Media Ads:** Interactive and visually compelling advertisements beyond static images, allowing for dynamic content such as animations, videos, and interactive elements.

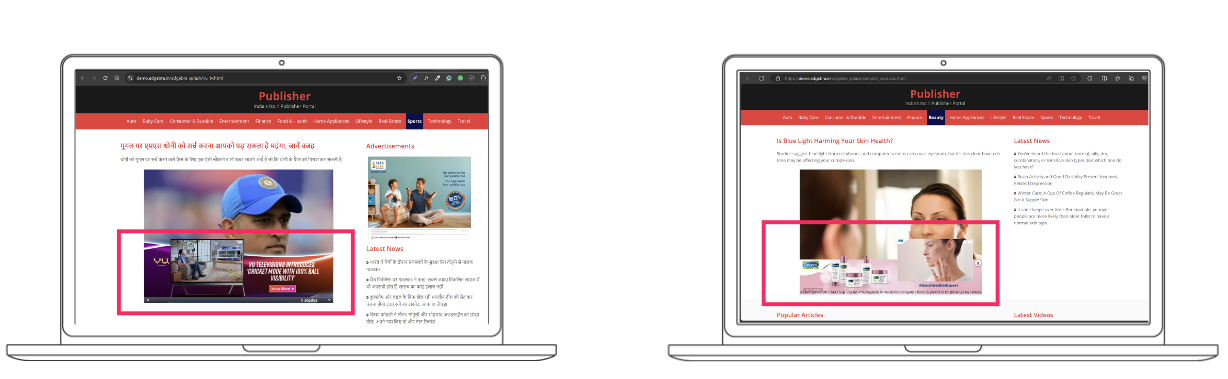
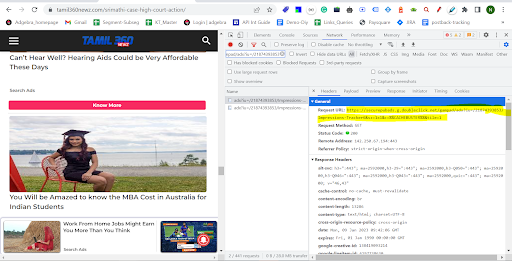
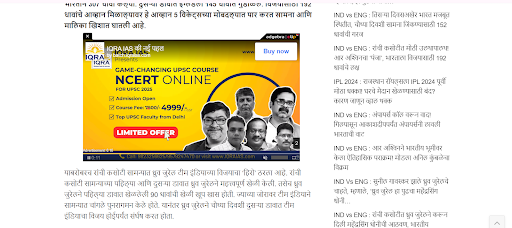
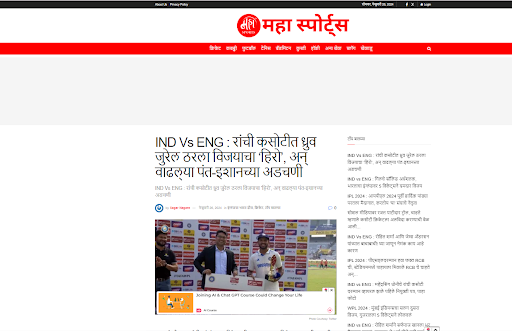
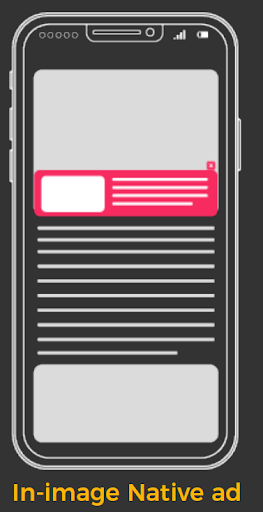
  * **In-Image Desktop/Mobile Ads**: In-image advertising, is a form of native advertising in which ads are placed at the base of static, editorial images on web pages as an overlay. These ads can also be video or rich media ad units that appear when users hover over or click on an image.

  <figure><img src="/files/KpJi66BSsrFZUqXGcPCu" alt=""><figcaption></figcaption></figure>

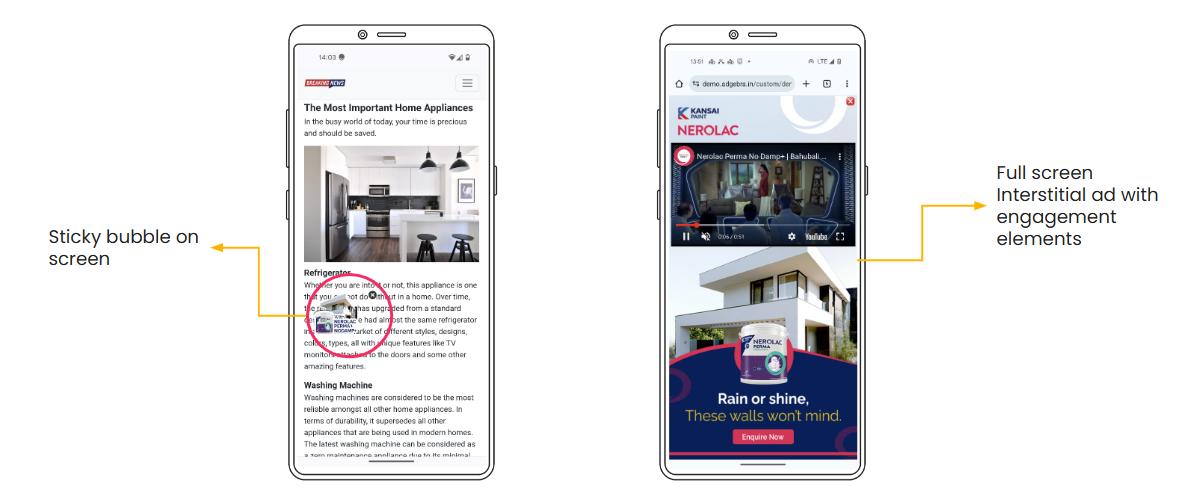
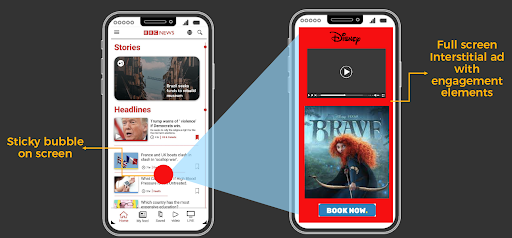
  * **In-Screen Mobile Ads**: In-screen advertising is a form of rich media advertising where a mini sticky teaser ad is placed on a mobile WAP site page. Upon user initiation, the mini ad expands to a full-screen rich media ad. These ads can also utilize mobile elements like Shake and Scratch to enhance user engagement.

    <br>

    <figure><img src="/files/jhtSmwirlENCGV6Vny9O" alt=""><figcaption></figcaption></figure>

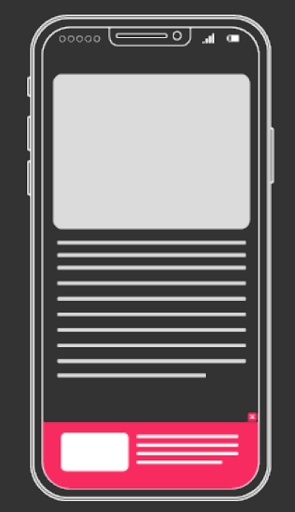
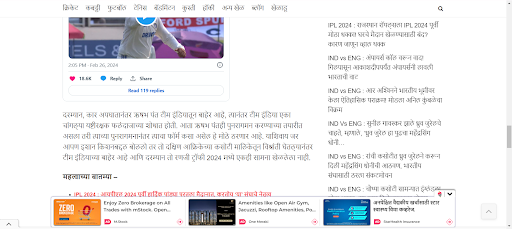
  * **In-Footer desktop/mobile Ads:** Ads positioned at the very bottom of your website, are customizable in terms of size, number of ads, and placement.

  <figure><img src="https://demo.adgebra.in/custom/html/Adgebra_Help_Center/Site/images/9.png" alt=""><figcaption></figcaption></figure>

  <figure><img src="https://demo.adgebra.in/custom/html/Adgebra_Help_Center/Site/images/10.png" alt=""><figcaption></figcaption></figure>

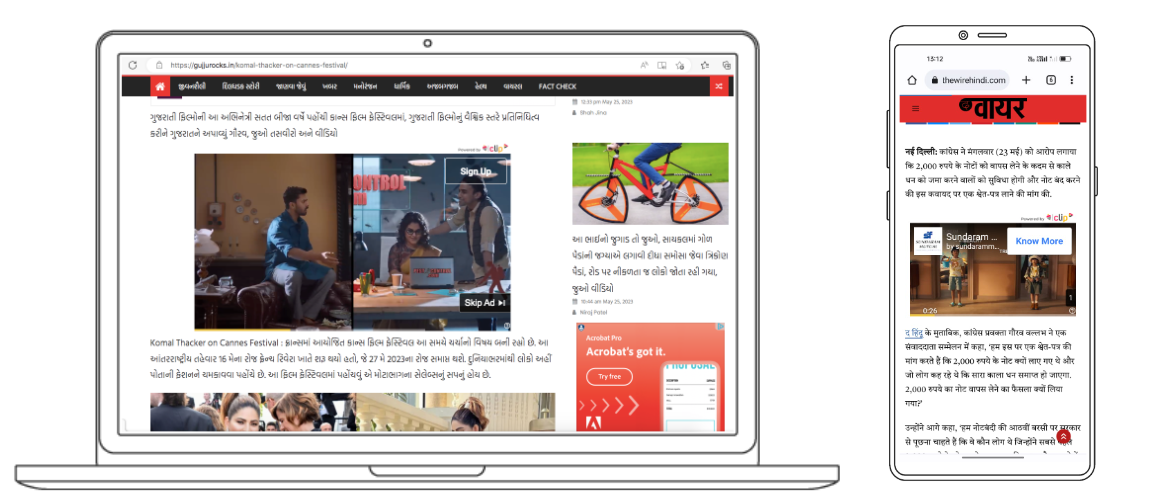
* **Video Ads**: Engaging video advertisements that capture users' attention and deliver messages effectively through sight, sound, and motion. An engaging, viewable, brand-safe environment that respects user experience, with multilingual subtitles matching content language.<br>

  <figure><img src="/files/duRqHwmztBcK3MudYWLJ" alt=""><figcaption></figcaption></figure>

* **DOOH**: DOOH stands for "Digital Out-of-Home" advertising. It refers to digital media used for marketing purposes in public spaces, such as digital billboards, electronic screens, and interactive displays found in places like shopping centers, airports, and public transportation hubs. If you have specific questions about DOOH, feel free to ask us at <sales@inuxu.media>\
  \
  By offering these varied ad formats, Adgebra ensures brands have the flexibility to choose the most suitable format for their campaigns, maximizing impact and engagement with their target audience.

<figure><img src="/files/6fUjYtrjAC4wDovnP2Ut" alt=""><figcaption></figcaption></figure>

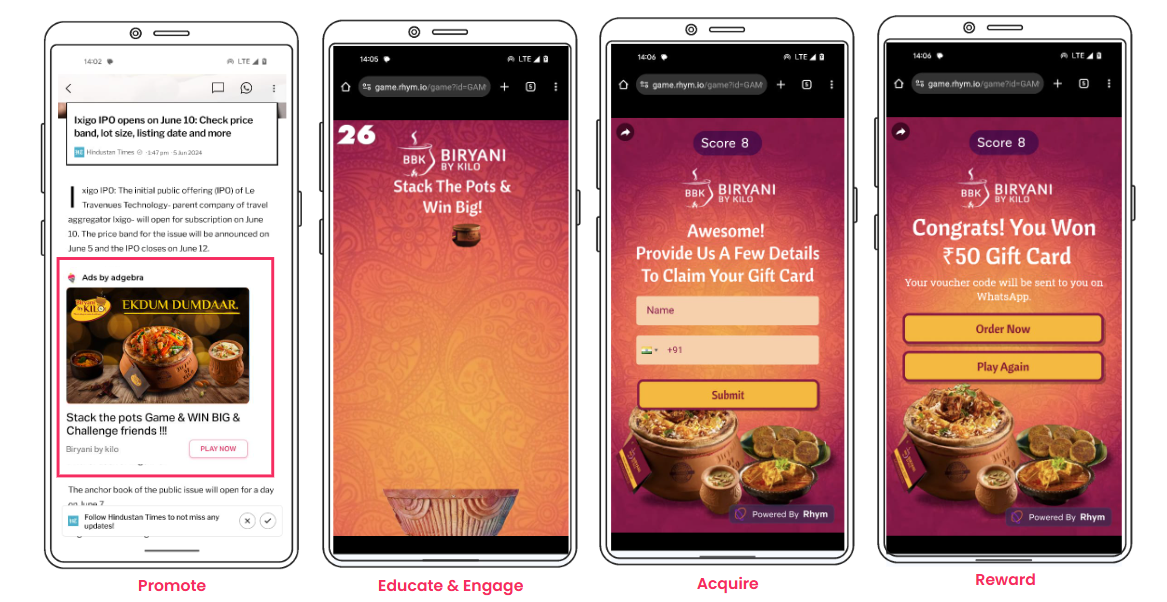
* **Game On**: Adgebra's Game-on (Gamification + Coupon) ads seamlessly combine leisure games and online coupons to engage users, reinforcing brand recall and driving conversions for maximum sales.

<figure><img src="/files/bQNen2SJ9jp8VIFGFvJT" alt=""><figcaption></figcaption></figure>

<figure><img src="/files/gyBnBh7zCHWSLZFS9Gm7" alt=""><figcaption></figcaption></figure>

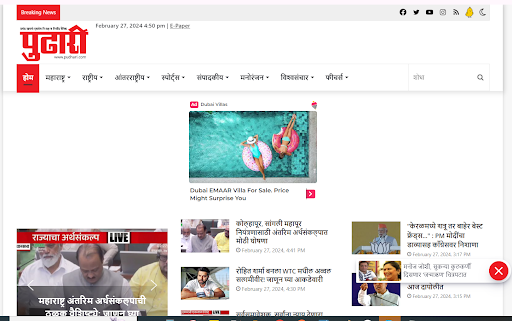
* **CUBOID Ads**: Cuboid Ads are 3-D rotational cubes designed to display commercial/informative high-definition media content such as news, cricket scores, promotional ad campaigns, user info, alerts, etc. The Cuboid Widget is a floating cube that users can drag and move anywhere on the screen. It includes a cross/move/close button for user convenience. Clicking on the cube will redirect users to a specified URL. Below is a sample reference&#x20;

<figure><img src="/files/tREj4zddEVIZvtt2uQcf" alt=""><figcaption></figcaption></figure>


# Adgebra Audience

## Adgebra Audience insights

Here are some insights commonly used to understand and optimize audience targeting on a platform like Adgebra:<br>

<figure><img src="/files/MOZlEiW3jqCRsNXePPk4" alt=""><figcaption></figcaption></figure>

<figure><img src="/files/HySZz7h9Mw74IhjQHaZD" alt=""><figcaption></figcaption></figure>

## <mark style="color:orange;">Adgebra Audience Content Consumption</mark>

<figure><img src="/files/t5cJdnXyxlr7sh08IfP0" alt=""><figcaption></figcaption></figure>


# Prepaid/Postpaid Accounts

What is Adgebra prepaid/postpaid?

The terms "prepaid" and "postpaid" in the context of advertising generally refer to how the payment for advertising services is handled:\
\
**Prepaid**: This means that advertisers pay for their advertising services upfront before the ads are run. Advertisers allocate a budget, and their campaigns run until the prepaid amount is exhausted. This can be a way to control spending and ensure that the budget is adhered to strictly. This service is mandatory for DIY accounts.\
\
**Postpaid**: In this model, advertisers are billed after their ads have been run. They receive an invoice for the advertising services provided, typically based on the actual performance of their ads, such as the number of impressions, clicks, or conversions based on the signed agreement. This allows for more flexibility and can be convenient for businesses that prefer to pay after seeing the results.

Note: This is only applicable to agency accounts.

Adgebra likely offers these options to accommodate different budgeting preferences and needs of advertisers. For precise details you may contact us at <sales@inuxu.media>


# Training & Support

Training\&Support

Adgebra offers detailed and concise instructional videos to assist users in navigating and utilizing the platform effectively. These videos provide step-by-step guidance on various features and functionalities, ensuring that users can make the most out of their experience. Link here!

In addition to the instructional videos, Adgebra provides dedicated support from a knowledgeable and responsive support team. Whether users encounter challenges or have questions about the platform, our support team is readily available to provide assistance and guidance, ensuring a smooth and seamless experience for all users. Together, our instructional videos and dedicated support team ensure that users have the resources and assistance they need to leverage the full potential of the Adgebra platform and achieve their advertising goals.

Yes, Adgebra offers real-time support to users, allowing them to reach out to their respective account managers whenever assistance is needed. Whether users have questions, encounter issues, or require guidance with their campaigns, our account managers are readily available to provide personalized support and address any concerns promptly. This direct line of communication ensures that users receive timely assistance and can make the most out of their experience with the Adgebra platform.


# Adgebra Wallet

Payment Methods

Adgebra accepts payments in Indian Rupees (INR) through various methods including NEFT, credit cards, net banking, wallets, UPI, and debit cards. It's important to note that international cards are not accepted currently. However, if you need to make international payments, you can contact your account manager for assistance. Here the user will find multiple payment methods based on your convivence, You can access anyone.


# Payment Methods

Payment Methods

Adgebra accepts payments in Indian Rupees (INR) through various methods including NEFT, credit cards, net banking, wallets, UPI, and debit cards. It's important to note that international cards are not accepted currently. However, if you need to make international payments, you can contact your account manager for assistance.\
\
For DIY Accounts: Brands/Advertiser  can add their payment by accessing as below Go to&#x20;

**Financials > Add funds > Enter the amount**\
\
Below is a screenshot of how to add payment in adgebra UI.

<figure><img src="https://demo.adgebra.in/custom/html/Adgebra_Help_Center/Wallet/images/img1.png" alt=""><figcaption></figcaption></figure>

Below is a screenshot after entering the amount it will redirect to a payment gateway, where the advertiser will find multiple payment methods based on your convivence, You can access anyone.

<figure><img src="https://demo.adgebra.in/custom/html/Adgebra_Help_Center/Wallet/images/img2.png" alt=""><figcaption></figcaption></figure>


# Payments T\&C

Payment Terms & Conditions

**What is the minimum amount to recharge the account?**

> The minimum amount required to recharge your account is ₹10,000/-

**Convenience fee for online payments?**

> Adgebra utilizes multiple online payment gateways for processing online payments. For any payments made through these gateways, a convenience fee of 1% is levied.

**Does Adgebra charge GST for online payments?**

> We apply an 18% GST for online payments made through payment gateways

**Does Adgebra charge GST for online payments?**

> We apply an 18% GST for online payments made through payment gateways

**Is there a minimum spend requirement to use Adgebra Ads?**

> The minimum spend requirement for native/rich media ads depends solely on the type of strategies being used for the campaign. You can find out the minimum daily/overall budget based on your specific campaign strategies. [Click Here!](https://docs.google.com/presentation/d/1qwYzgcVpykA_LZx9opQ2NW6wERAmbnObEwq7It6N3kg/edit#slide=id.g1c1e64a7455_0_13)

**How to receive invoices or statements for my advertising expenses?**

> We apply an 18% GST for online payments made through payment gateways

**What happens if payment fails, and how can I resolve payment issues?**

> Adgebra identifies the causes of every failed transaction, and you can always find the reason for the failure in the transaction history. If your payment amount is debited and still not reflected in your adgebra wallet account, you can always reach to our finance team at <finance@inuxu.media>

**Are there any promotional codes or coupons to offset advertising costs?**

> Adgebra sends out email and dashboard notifications to its end users for any promotional offers or discounts aimed at offsetting advertising costs. You may benefit from these offers by taking advantage of them.

**What taxes are associated with Adgebra Ads spending?**

> Adgebra applies an 18% GST and a 1% convenience fee for online payments processed through our payment gateways.

**How can I view and download my billing and payment history?**

> You can always access and download your transaction history, payments history, and invoices from the financials tab.

**How to get a postpaid account?**

> For inquiries about postpaid accounts, please don't hesitate to reach out to us at: <mark style="color:blue;"><sales@inuxu.media></mark>

**Where can to see previous invoices?**

> You can always access and download your past transaction history, payments history, and invoices from the financials tab.

**When do invoices get generated?**

> Invoices will be generated and uploaded in the respective accounts by the **7th** of every month.


# Account

**How to register with Adgerba for a DIY Account?**

> Join as an Adgebra Brand Today! Please check the below form.
>
> **Indian Entity**: [Click Here ](https://forms.gle/6nK1MxfNrPXH42z57)
>
> **Non-Indian Entity:** [Click Here](https://forms.gle/vsi7eHJy5K2vEVza9)
>
> Please fill out the appended form and get a call back from our team. We are glad to clarify all your doubts and get you on board.


# Details

**Can multiple users access one Adgebra account?**

> Yes, You have the option to grant multiple users access to a single account, enabling them to view the dashboard and reports. You can always connect to your sales/account manager.

**Is there a unique account ID associated with the account?**

> The Adgebra account ID is unique and linked to each account, and you can locate it on the account view screen.

**Is it possible to create multiple brands/campaigns in a single account?**

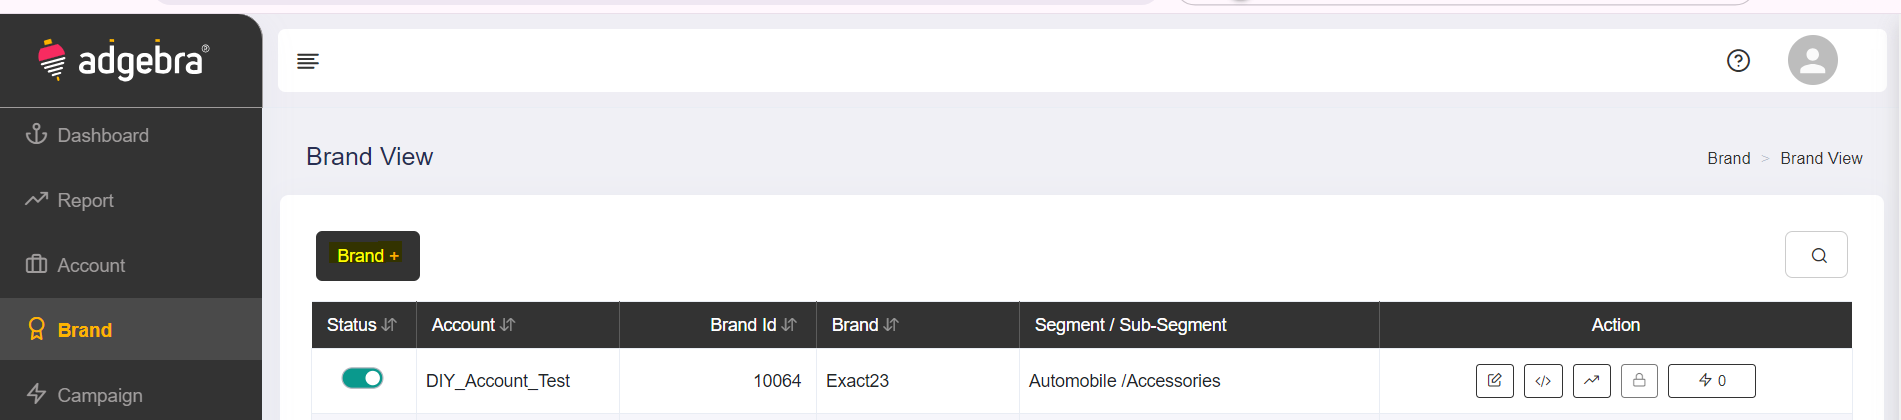
> Yes, Adgebra allows to creation of multiple brands or campaigns within a single account.\
> \
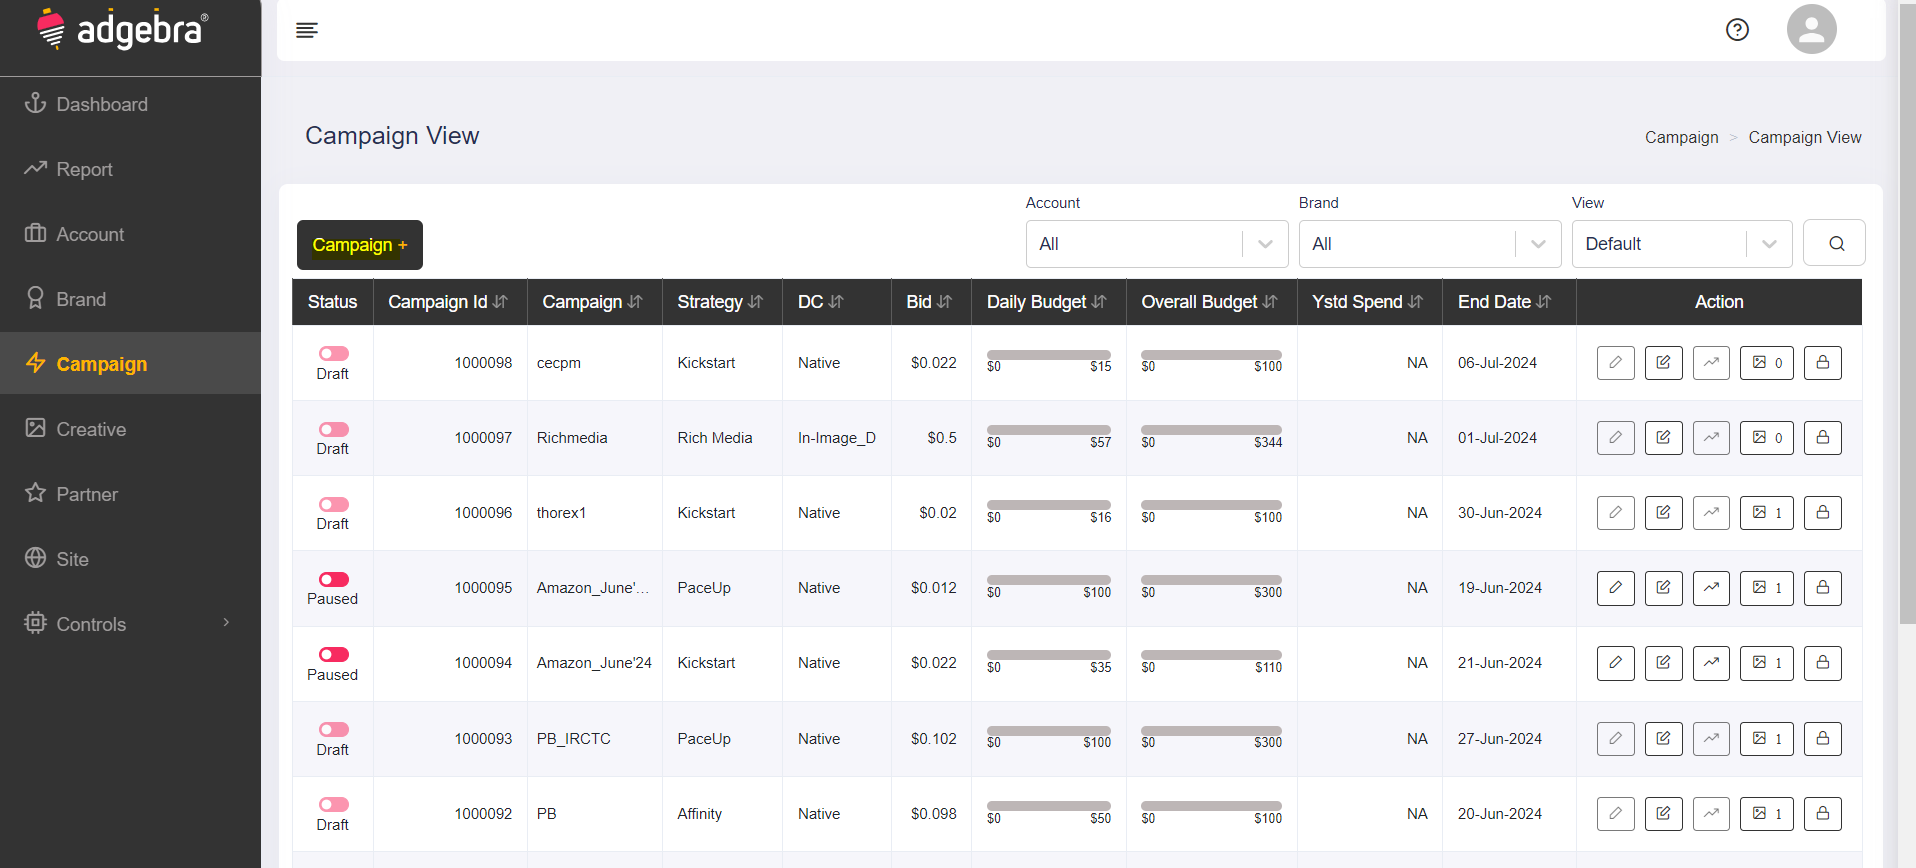
> You can create multiple brand under single account by clicking on **brand+** button above the brand view screen. For multiple campaign creation you can click on **campaign+** button \
> \
> Screenshot for reference

<figure><img src="https://demo.adgebra.in/custom/html/Adgebra_Help_Center/Account/images/img3.png" alt=""><figcaption></figcaption></figure>

<figure><img src="https://demo.adgebra.in/custom/html/Adgebra_Help_Center/Account/images/img4.png" alt=""><figcaption></figcaption></figure>

**Does Adgebra delete any account that is not active?**

> Adgebra does not delete any associated accounts. If you wish to stop using your account, you can send a request to your account manager to deactivate it. Adgebra retains all your past data, ensuring it remains accessible.


# Brand

A brand is a unique identity or persona that distinguishes a product, service, or company from its competitors in the minds of consumers. It encompasses various elements such as a company's name, logo, slogan, design, and overall image.

Branding is essential for several reasons:

**Differentiation**: In a crowded marketplace, a strong brand helps a company stand out from competitors and creates a distinct identity that resonates with consumers.

**Trust and Credibility**: A well-established brand builds trust and credibility with customers. Consistency in delivering quality products or services strengthens this trust over time.

**Customer Loyalty**: Brands that effectively communicate their values and connect with their target audience foster loyalty among customers, leading to repeat business and advocacy.

**Perceived Value:** A strong brand commands higher prices and creates a perception of value among consumers. People are often willing to pay more for products or services associated with reputable brands.

**Emotional Connection**: Brands have the power to evoke emotions and create meaningful connections with customers. Emotional branding can lead to stronger customer relationships and brand loyalty.

Overall, a brand serves as a powerful tool for businesses to communicate their identity, values, and offerings to consumers, ultimately driving growth and success in the marketplace.


# Brand Specifications

**What size brand logo is needed?**

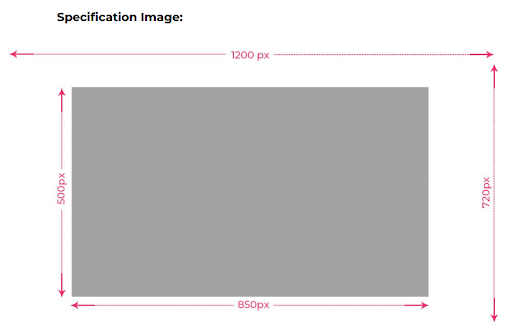
> Adgebra accepts brand logos with specific size and format requirements. The brand logo should be in dimensions of 200x200 pixels with a maximum file size of 300kb. Accepted file formats include jpg, png, and gif.

**My brand name does not fit the character limit, what shall I do?**

> Adgebra limits a max 20-character limit for the brand names, if your brand name limit exceeds 20 characters, you must always use short words for the brand name.

**Is it possible to create multiple brands with the same name?**

> Adgebra imposes a maximum limit of 20 characters for brand names. If your brand name exceeds this limit, you can use shorter words or abbreviations to fit within the character constraint.

**Is it possible to give multiple users access to a single brand?**

> Yes, You have the option to grant multiple users access to a single brand, enabling them to view the dashboard and reports. Below is screenshow where you can find the access stepper from the brand edit screen. \
> Go to brand > Edit brand> Access> Add user details<br>

<figure><img src="/files/Xv7r0AITpvVxZNgxJzcl" alt=""><figcaption></figcaption></figure>


# Pixel Types

Payment Terms & Conditions

**Different conversion pixels that adgebra supports?**

> Adgebra primarily supports two types of conversion pixels:
>
> 1.) Standard pixels which include script, iframe, and imgsrc
>
> 2.) Postback tracking.
>
> You can access our pixel generation feature by clicking on the PIXEL stepper button located in the brand tab. For detailed instructions on how to implement Postback tracking, refer to the provided documentation. [Click here!](https://sites.google.com/inuxu.media/adgebrapostbacktracking/home)

**What are the different types of third-party tracking platforms that adgebra is integrated with for app performance tracking?**

> Adgebra has integrated with various performance tracking platforms such as Affise, Trackier, HasOffers, Singular, Branch.IO, Offers18, Keitaro, Voluum, and many others. For more details and instructions, please refer to the provided documentation. [Click here!](https://sites.google.com/inuxu.media/adgebrapostbacktracking/home)

How to generate pixels from adgebra UI

> Go to brand view screen> View Pixel&#x20;

<figure><img src="/files/qwfiFKKMMx1bbXujoR2S" alt=""><figcaption></figcaption></figure>

<figure><img src="/files/0K3be48dWcyFwDpT0DQw" alt=""><figcaption></figcaption></figure>

Select the conversion pixel type that you need> Click on the generate button. The system will auto-generate the pixel based on the pixel type selected. The system generates 3 types of standard pixels in the script, iframe, and image formats. You can also download the pixel as well&#x20;

&#x20;

<figure><img src="/files/MNP0QVdUR1bljdrHloYf" alt=""><figcaption></figcaption></figure>

**Postback pixel generation from UI**

<figure><img src="/files/GN6Wxuc4l3JgQgYrD0TA" alt=""><figcaption></figcaption></figure>


# Postback Tracking

Postback Tracking

A "postback" in the context of digital marketing and web development refers to the process where a server sends data back to another server (or itself) to inform it about a specific event or action that has occurred. Here are the different contexts in which "postback" is used:.

#### How Postback Conversion Works <a href="#h.1ye7twrtfhe6_l" id="h.1ye7twrtfhe6_l"></a>

1. User Clicks an Ad: When a user clicks on an ad, a click ID (a unique identifier) is generated and associated with that click. This click ID is tracked by the advertiser's system.
2. User Completes a Conversion Event: After clicking the ad, if the user completes a desired action (like making a purchase or installing an app), this event is tracked by the advertiser's system.
3. Server-to-Server Communication: The advertiser's server sends a postback to the affiliate network's or partner's server. This postback contains the click ID and information about the conversion event.
4. Attribution: The affiliate network or partner uses the click ID to match the conversion event with the original click, thus attributing the conversion to the correct source.

Multiple clients use different third-party platforms and the configuration changes for each of these. The most important thing when working with a tracking platform is to map the click ID token with the Adgebra conversion ID.

Implementation Steps for various third-party platforms with Adgebra

**Affise:  In this case, the brands/advertisers need to map the click ID token i.e (sub1) in the Affise to Adgebra’s conversion tracking ID (convId).**

{% tabs %}
{% tab title="Postback URL Setup" %}
`https://adgebra.co.in/clicktracker/conversion?p2=order_Id&p3=product_Id&p4=cartvalue&p5=flag~custom_values&convId={sub1}`
{% endtab %}

{% tab title="Sample Landing Page:" %}
`https://testingpostback.com/click?sub1=${convId}`
{% endtab %}
{% endtabs %}

Landing Page URL: To ensure that the click ID (sub1) gets mapped correctly upon the user’s click, the landing page URL should pass the conversion ID (convId) as follows:

**Trackier: In this case, the brands/advertisers need to map the click ID token i.e (p1) in the Trackier platform to Adgebra’s conversion tracking ID (convId).**

{% tabs %}
{% tab title="Postback URL Setup" %}
`https://adgebra.co.in/clicktracker/conversion?p2=order_Id&p3=product_Id&p4=cartvalue&p5=flag~custom_values&convId={sub1}`
{% endtab %}

{% tab title="Sample Landing Page" %}
`https://testingpostback.com/click?p1=${convId}`
{% endtab %}
{% endtabs %}

Landing Page URL: To ensure that the click ID (p1) gets mapped correctly upon the user’s click, the landing page URL should pass the conversion ID (convId) as follows:

**Hasoffers:  In this case, the brands/advertisers need to map the click ID token i.e. (aff\_click\_id) in the Hasoffer platform to Adgebra’s conversion tracking ID (convId).**

{% tabs %}
{% tab title="Postback URL Setup" %}
`https://adgebra.co.in/clicktracker/conversion?p2=order_Id&p3=product_Id&p4=cartvalue&p5=flag~custom_values&convId={aff_click_id}`
{% endtab %}

{% tab title="Sample Landing Page" %}
`https://testingpostback.com/click?aff_click_id=${convId`}
{% endtab %}
{% endtabs %}

Landing Page URL: To ensure that the click ID (aff\_click\_id) gets mapped correctly upon the user’s click, the landing page URL should pass the conversion ID (convId) as follows:

\
**Singular: In this case, the brands/advertisers need to map the click ID token i.e (convid) in the Singular platform to Adgebra’s conversion tracking ID (convId).**

{% tabs %}
{% tab title="Postback URL Setup" %}
`https://adgebra.co.in/clicktracker/conversion?p2=order_Id&p3=product_Id&p4=cartvalue&p5=flag~custom_values&convId={convid}`
{% endtab %}

{% tab title="Sample Landing Page" %}
`https://testingpostback.com/click?convId=${convId}`
{% endtab %}
{% endtabs %}

Landing Page URL: To ensure that the click ID (convid) gets mapped correctly upon the user’s click, the landing page URL should pass the conversion ID (convId) as follows:

**Branch.IO this case, the brands/advertisers need to map the click ID token i.e  (click\_id) in the Branch.IO platform to Adgebra’s conversion tracking ID (convId).**

{% tabs %}
{% tab title="Postback URL Setup" %}
`https://adgebra.co.in/clicktracker/conversion?p2=order_Id&p3=product_Id&p4=cartvalue&p5=flag~custom_values&convId={click_id}`
{% endtab %}

{% tab title="Sample Landing Page" %}
`https://testingpostback.com/click?click_id=${convId}`
{% endtab %}
{% endtabs %}

Landing Page URL: To ensure that the click ID (click\_id) gets mapped correctly upon the user’s click, the landing page URL should pass the conversion ID (convId) as follows:

Additional Placeholders: \~campaign\_id=${campaignId}  &\~secondary\_publisher=${siteId}&#x20;

**Offers18: In this case, the brands/advertisers need to map the click ID token i.e (aff\_click\_id) in the Offers18 platform to Adgebra’s conversion tracking ID (convId).**

{% tabs %}
{% tab title="Postback URL Setup" %}
`https://adgebra.co.in/clicktracker/conversion?p2=order_Id&p3=product_Id&p4=cartvalue&p5=flag~custom_values&convId={aff_click_id}`
{% endtab %}

{% tab title="Sample Landing Page" %}
`https://testingpostback.com/click?aff_click_id=${convId}`
{% endtab %}
{% endtabs %}

Landing Page URL: To ensure that the click ID (aff\_click\_id) gets mapped correctly upon the user’s click, the landing page URL should pass the conversion ID (convId) as follows:

Additional Placeholders: \&aff\_sub1=${siteId}  \&aff\_sub2=${campaignId}

\
**Keitaro: In this case, the brands/advertisers need to map the click ID token i.e (subid) in the Keitaro platform to Adgebra’s conversion tracking ID (convId).**

{% tabs %}
{% tab title="Postback URL Setup" %}
`https://adgebra.co.in/clicktracker/conversion?p2=order_Id&p3=product_Id&p4=cartvalue&p5=flag~custom_values&convId={subid}`
{% endtab %}

{% tab title="Sample Landing Page" %}
`https://testingpostback.com/click?subid=${convId}`
{% endtab %}
{% endtabs %}

Landing Page URL: To ensure that the click ID (subid) gets mapped correctly upon the user’s click, the landing page URL should pass the conversion ID (convId) as follows:

**Voluum: In this case, the brands/advertisers need to map the click ID token i.e (clickid) in the Voluum platform to Adgebra’s conversion tracking ID (convId).**

{% tabs %}
{% tab title="Postback URL Setup" %}
`https://adgebra.co.in/clicktracker/conversion?p2=order_Id&p3=product_Id&p4=cartvalue&p5=flag~custom_values&convId={clickid}`
{% endtab %}

{% tab title="Sample Landing Page" %}
`https://testingpostback.com/click?clickid=${convId}`
{% endtab %}
{% endtabs %}

Landing Page URL: To ensure that the click ID (clickid) gets mapped correctly upon the user’s click, the landing page URL should pass the conversion ID (convId) as follows:

**Trackier MMP: In this case, the brands/advertisers need to map the click ID token i.e (click\_id) in the Trackier MMP platform to Adgebra’s conversion tracking ID (convId).**

{% tabs %}
{% tab title="Postback URL Setup" %}
`https://adgebra.co.in/clicktracker/conversion?p2=order_Id&p3=product_Id&p4=cartvalue&p5=flag~custom_values&convId={click_id}`
{% endtab %}

{% tab title="Sample Landing Page" %}
`https://testingpostback.com/click?click_id=${convId}`
{% endtab %}
{% endtabs %}

Landing Page URL: To ensure that the click ID  (click\_id)  gets mapped correctly upon the user’s click, the landing page URL should pass the conversion ID (convId) as follows:

**Offerborn**: In this case, the brands/advertisers need to map the click ID token i.e (externalid) in the Offerborn platform to Adgebra’s conversion tracking ID (convId).

{% tabs %}
{% tab title="Postback URL Setup" %}
`https://adgebra.co.in/clicktracker/conversion?p2=order_Id&p3=product_Id&p4=cartvalue&p5=flag~custom_values&convId={externalid}`
{% endtab %}

{% tab title="Sample Landing Page" %}
`https://testingpostback.com/click?externalid=${convId}`
{% endtab %}
{% endtabs %}

Landing Page URL: To ensure that the click ID (clickid) gets mapped correctly upon the user’s click, the landing page URL should pass the conversion ID (convId) as follows:

\
**Adjust**:  All partners integrated with Adjust can be found under Campaign Lab > Partners. From there, clients should:

1. Select + New partner
2. Search for Adgebra in the search bar
3. Select the Adgebra tile
4. Click Next
5. Follow the wizard to enable the integration and generate an Adjust link for Adgebra
6. Get the adjust link from the client and use as LP in the creative ad copy. Here before you use the link you need to pass the token as mentioned below

Landing Page URL: To ensure that the click ID (click\_id) gets mapped correctly upon the user’s click, the landing page URL should pass the conversion ID (ConvId) as follows:  Please note here you need to pass the token before the install\_callback&#x20;

Landing Page Sample - <https://app.adjust.com/1mbeh5l7?campaign=vb-acquisition\\_cpr-programmaticmobupps-TabunganU\\&adgroup=7796\\_218\\&creative=Mobupps\\_CO\\&idfa={ios\\_ifa}\\&gps\\_adid={google\\_aid}\\&language={aff\\_sub4}\\&android\\_id={android\\_id}\\&ip\\_address={ip}\\&user\\_agent={user\\_agent}**\\&click\\_id=${ConvId}**\\&install\\_callback=https%3A%2F%2Fadgebra.co.in%2Fclicktracker%2Fconversion%3Fp2%3Dorder\\_Id%26p3%3Dproduct\\_Id%26p4%3Dcartvalue%26p5%3Dflag\\_custom\\_values%26convId%3D{click\\_id}\\>
\
If any client wants custom integration and doesn't want above step to follow, please follow the detailed document for custom adjust integration: [https://docs.google.com/document/d/10izxU6dc2Zvo5-9zAkZzo7VqmtM-mHCDd2l-Or7lDCU/edit?usp=sharing\ <br>](https://docs.google.com/document/d/10izxU6dc2Zvo5-9zAkZzo7VqmtM-mHCDd2l-Or7lDCU/edit?usp=sharing)More detailed instructions can be found in the [Adjust Help Centre](https://help.adjust.com/en/article/campaign-setup).

\
**Appsflyer**:  If any client wants to integrate via Appsflyer just follow this step

**Steps** :&#x20;

\- For AppsFlyer, handshake must be done with the client, you ask the client to share their af\_part i.e, agency ID, and inform the product team to whitelist the agency id. Then, only the agency would be able to integrate with us.&#x20;

\- Next is we are directly integrated with AppsFlyer, so please search Partner: INUXUDMT

\- Integrate with our partner id & generate a attribution link( LP).

\- Get the attribution link (LP) from the client, and you can add the same in the creative LP.

-Get the attribution link from the client and use it as LP in the creative ad copy. Here before you use the link, you need to pass the token as mentioned below

-Landing Page URL: To ensure that the click ID token  (clickid) gets mapped correctly upon the user’s click, the landing page URL should pass the conversion ID (ConvId) as follows:

Landing Page Sample : <https://navi.onelink.me/Nerp?pid=inuxudmt\\_int\\&c=PL\\_edge\\_Adgebra\\&af\\_siteid=${siteId}\\&af\\_cost\\_model=cpc\\&af\\_cost\\_value=5\\&af\\_cost\\_currency=INR\\&af\\_ad\\_type=native\\&af\\_c\\_id=${campaignId}\\&url=HOME-DASHBOARD-Loans\\&af\\_click\\_lookback=7d\\&deep\\_link\\_value=HOME-DASHBOARD-Loan&#x73;**\\&clickid=${ConvId}>\*\*

\
***Note—If the client's platform is the existing one from the above, check if the value remains the same or needs to be changed and mapped accordingly.***&#x20;

<details>

<summary>Postback Implementation with direct client thank you page</summary>

**Step 1**: Generate conversion post-back URL from UI (same screen where conversion pixel can be generated)

**Step 2**: In Creative LP, add a token ${convId} &#x20;

**Step 3**: On click of the ad, the token will get replaced with the actual conversion Id.

Example: <https://landingpage.com/checkout?convId=1100\\_67472\\_2\\_0\\_0\\_2405:205:8383:2aab:8f62:57a7:27ff:527f\\_3\\_184&#x20>;

**Step 4**: On conversion, the client needs to call the post-back URL generated in step 3 with the actual conversion ID against the convId parameter sent on the landing page by Adgebra

Example: `http://adgebra.co.in/clicktracker/Conversion?p2=order_Id&p3=product_Id&p4=cartvalue&p5=flag~custom_values&convId=100_67472_2_0_0_2405:205:8383:2aab:8f62:57a7:27ff:527f_3_1841`&#x20;

</details>

<details>

<summary>Postback Implementation with direct client thank you page</summary>

**Step 1**: Generate conversion post-back URL from UI (same screen where conversion pixel can be generated)

**Step 2**: In Creative LP, add a token ${convId} but it should be placed against s2 parameter. So, manually convert “convId=${convId}” to “s2=${convId}” in the landing page URL. In case of any confusion, talk to Cake support team.

Example : <https://caketracker..com/redirect?s2=${convId}&#x20>;

**Step 3**: On click of ad, the token will get replaced with actual conversion ID in the cake tracker.

Example:<https://caketracker.com/redirect?s2=100_67472_2_0_0_2405:205:8383:2aab:8f62:57a7:27ff:527f_3_1841>

**Step 4**: On conversion, client needs to call the post-back URL of Cake and Cake should further give a call to adgebra’s postback URL with actual conversion ID generated in step 3.

Example:`http://adgebra.co.in/clicktracker/Conversion?&p2=order_Id&p3=product_Id&p4=cartvalue&p5=flag~custom_values&convId=100_67472_2_0_0_2405:205:8383:2aab:8f62:57a7:27ff:527f_3_1841`

</details>

<details>

<summary>Postback implementation with an intermediate platform: Hasoffers</summary>

**Step 1**: Generate conversion post-back URL from UI (same screen where conversion pixel can be generated)

**Step 2**: In Creative LP, add a token ${convId} but it should be placed against the “trans” parameter. So, manually convert “convId=${convId}” to “trans=${convId}” in the landing page URL. In case of any confusion, talk to Hasoffers support team.

Example: <https://hastracker..com/redirect?trans=${convId}&#x20>;

**Step 3**: On click of ad, the token will get replaced with actual conversion ID in the Hasoffers tracker.

Example: <https://hastracker.com/redirect?trans=100\\_67472\\_2\\_0\\_0\\_2405:205:8383:2aab:8f62:57a7:27ff:527f\\_3\\_1841>

**Step 4:** On conversion, client needs to call the post-back URL of Hasoffers and Hasoffers should further give a call to adgebra’s postback URL with actual conversion ID generated in step 3.

Example:`http://adgebra.co.in/clicktracker/Conversion?p2=order_Id&p3=product_Id&p4=cartvalue&p5=flag~custom_values&convId=100_67472_2_0_0_2405:205:8383:2aab:8f62:57a7:27ff:527f_3_1841`

</details>

#### Note: <a href="#h.m5bbmd3tgotb_l" id="h.m5bbmd3tgotb_l"></a>

1. Conversion ID is in the form of a “string” (alphanumeric)
2. The token ${convId} needs to be implemented for all language LPs of all creatives.
3. In case of multiple hops in the redirection of the trackers to landing page URLs, the settings need to be done in the intermediate tools/platforms in such a way that the conversion ID generated from Adgebra gets forwarded till the ultimate landing page URL. Likewise, the same conversion ID should be passed to Adgebra’s postback URL.

Feel free to reach out to your account manager for any clarifications or assistance.&#x20;


# Adgebra Pixel using GTM

Step-by-Step Guide to place Adgebra Pixel using Google Tag Manager

**1. Set Up Your GTM Account and Container**

* If you haven't already, sign up for[ Google Tag Manager](https://tagmanager.google.com/).
* Create a new account and container for your website.

**2. Install GTM on Your Website**

* Once your container is created, GTM will provide you with a snippet of code to place on your website. This code should be added to every page of your site, just below the opening \<head> tag and immediately after the opening \<body> tag.

**3. Access Your Container**

* Log in to your GTM account and select the container for the website where you want to place the custom HTML tag.

**4. Create a New Tag**

* Click on "Tags" in the left-hand navigation menu.
* Click on the "New" button to create a new tag.
* Click on the "Tag Configuration" box to choose the tag type.

<figure><img src="https://lh7-rt.googleusercontent.com/docsz/AD_4nXdEfQONEhmMsSLvduqJJLryfselHYhYg_03hGDxgHN65AdWYoeDFWfL5xhonQitepa_c1PuEef5dKKvZ5dkai4ZszuvqEa-YZCu1TR1_IRZj_6-VZBrQmL-8lQGc_aoiCS12Q8AZW5pmnF1HN4c5C90kUc?key=43-PFPFH2RbABYdcM9-r8w" alt=""><figcaption></figcaption></figure>

**5. Select Tag Type**

* In the list of tag types, select "Custom HTML."

<figure><img src="https://lh7-rt.googleusercontent.com/docsz/AD_4nXdYWyH1QeLvUlHZRNs_pA1dvz-gP_FLK-plPd5Pvcvo2deBOHWpPVCmJ9a6QJ1LCNf6N-gm6ISv4zdP4kbgO-NcUvgv7CKPjXhespowTG1-Tl8bCxmErCF66tlTW2aDot6twD9px026JkRSxF4Sm56QhO_R?key=43-PFPFH2RbABYdcM9-r8w" alt=""><figcaption></figcaption></figure>

**6. Add Adgebra Pixel in Custom HTML**

* In the "Custom HTML" text box, paste your adgebra script/img/iframe HTML code. Note: certain sites may not trigger img/iframe or script based on the site structure, you need to choose any one out of it.

<figure><img src="https://lh7-rt.googleusercontent.com/docsz/AD_4nXe7KL8OemKJtreF8bLGYHabYosd-VJzni8d2HResLwCPFAZ7QtitPnXHOV0a3hBpBhCu0Dz7nex37GpsldP2NvDVSZk9X_7UZgPE8u6u4QWUnnb77bWgr7TBC8m8wI7t-iEfjPr86XzHlbYdJLZaH5iFp_1?key=43-PFPFH2RbABYdcM9-r8w" alt=""><figcaption></figcaption></figure>

* Select the checkbox document.&#x20;

**7. Set Up Triggers**

* Click on the "Triggering" section to set up when this tag should be fired.
* Choose an existing trigger or create a new one. For example, you can set the trigger to fire on all pages (Page View) or specific conditions (e.g., when a form is submitted).This is solely based on the client.

<figure><img src="https://lh7-rt.googleusercontent.com/docsz/AD_4nXfPOcLmYl_MJ8-81Fk1Lo6ko5JMLPzIXOv2PEr6bziOvQFRvfWkRon9bJU3gHyW3uGe2_1YxlV-1kE5-_QlreLNmrKIHpHPuG0xMWchlRKz9E8yEGb4_n59nNV0mmufwArTzykzmyguRDNilS68sSRgGem0?key=43-PFPFH2RbABYdcM9-r8w" alt=""><figcaption></figcaption></figure>

**8. Save Your Tag**

* After configuring the trigger, click on the "Save" button.

**9. Publish Your Changes**

* After saving your tag, click on the "Submit" button in the top-right corner of the GTM interface.
* Describe the changes you’ve made (optional) and click on "Publish" to make the tag live on your website.

**10. Testing and Debugging**

* Use the "Preview" mode in GTM to test your tag before publishing it. Click on the "Preview" button and enter your website URL to start a debug session.
* Check that your custom HTML tag is firing as expected by interacting with your website and monitoring the GTM debug console.

#### Additional Tips

* Tag Naming: Use descriptive names for your tags to make them easier to manage.
* Version Control: GTM automatically creates versions of your container every time you publish changes. Use this feature to roll back to a previous version if something goes wrong.
* Custom Variables: If your custom HTML requires dynamic data, consider using GTM’s variables feature to pass data into your HTML.

<br>


# Blocking

Payment Terms & Conditions

**How to block/unblock non-performing placements at the brand level?**

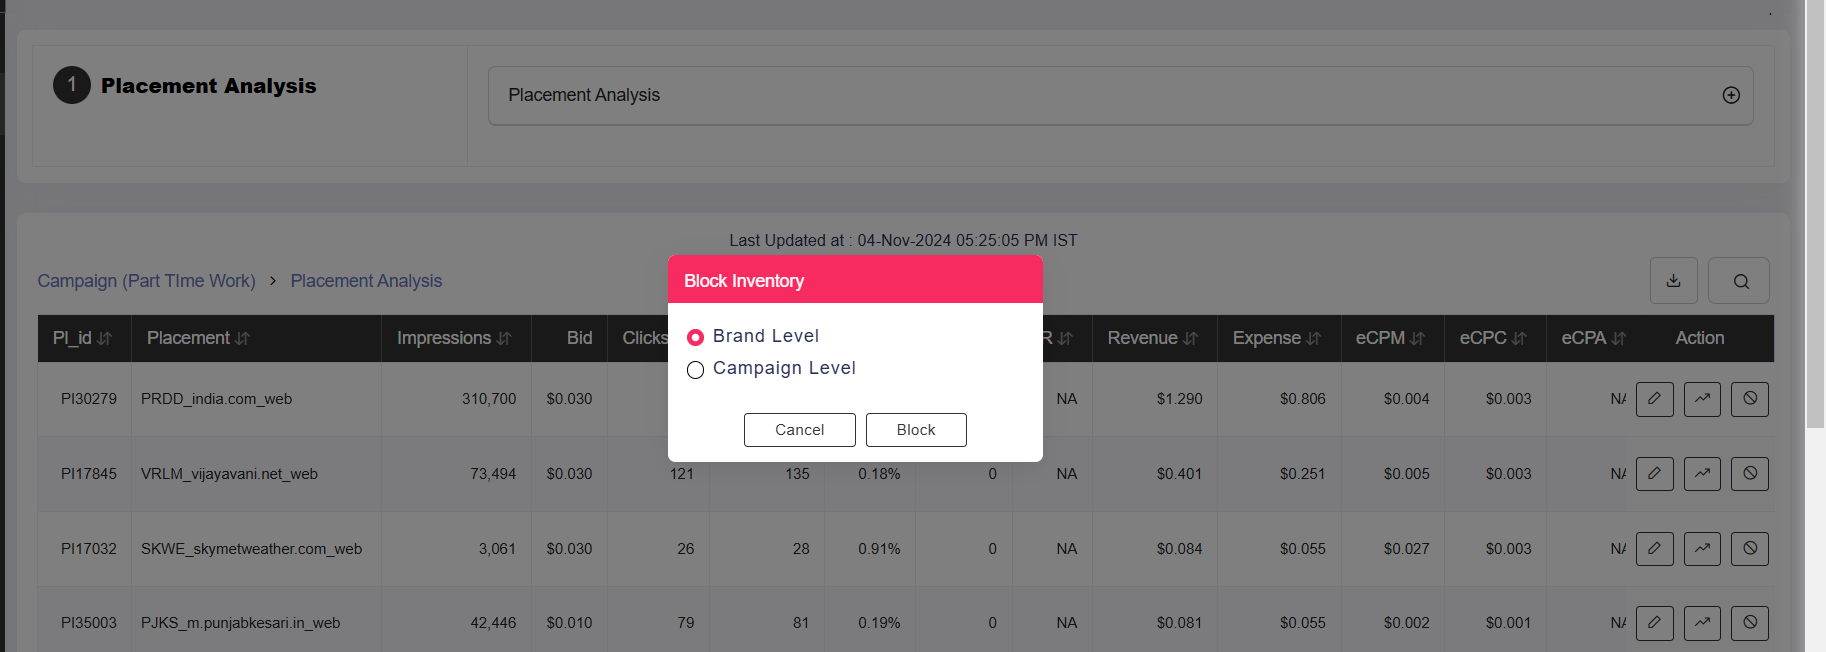
> In Adgebra, you have the option to block non-performing placements directly from the Placement Analysis report, which you can generate from the campaign view screen. Additionally, you can manage blocking and unblocking at the placement, device, or specific geographic levels as well.

Blocking of placement/device or geo(state or city level) all are possible from the campaign analysis from the dashboard or from the campaign view screen&#x20;

<figure><img src="/files/uqctdwIuNnODttsmOV0X" alt=""><figcaption><p>On click of report icon in the action button from campaign analysis or campaign view screen will redirect to the beloe placement analysis report where you can block the placement/device/geo.</p></figcaption></figure>

<figure><img src="/files/WjpZGxE7XbbpovkQTnSt" alt=""><figcaption><p>On click of the action button here you can block placement</p></figcaption></figure>

<figure><img src="/files/8Rz7td7IsDpIYoQghlKh" alt=""><figcaption><p>Here you can block placement/device/geo with these combination from placement analysis report.</p></figcaption></figure>

**How to unblock the placement/device or geo from the brand level?**

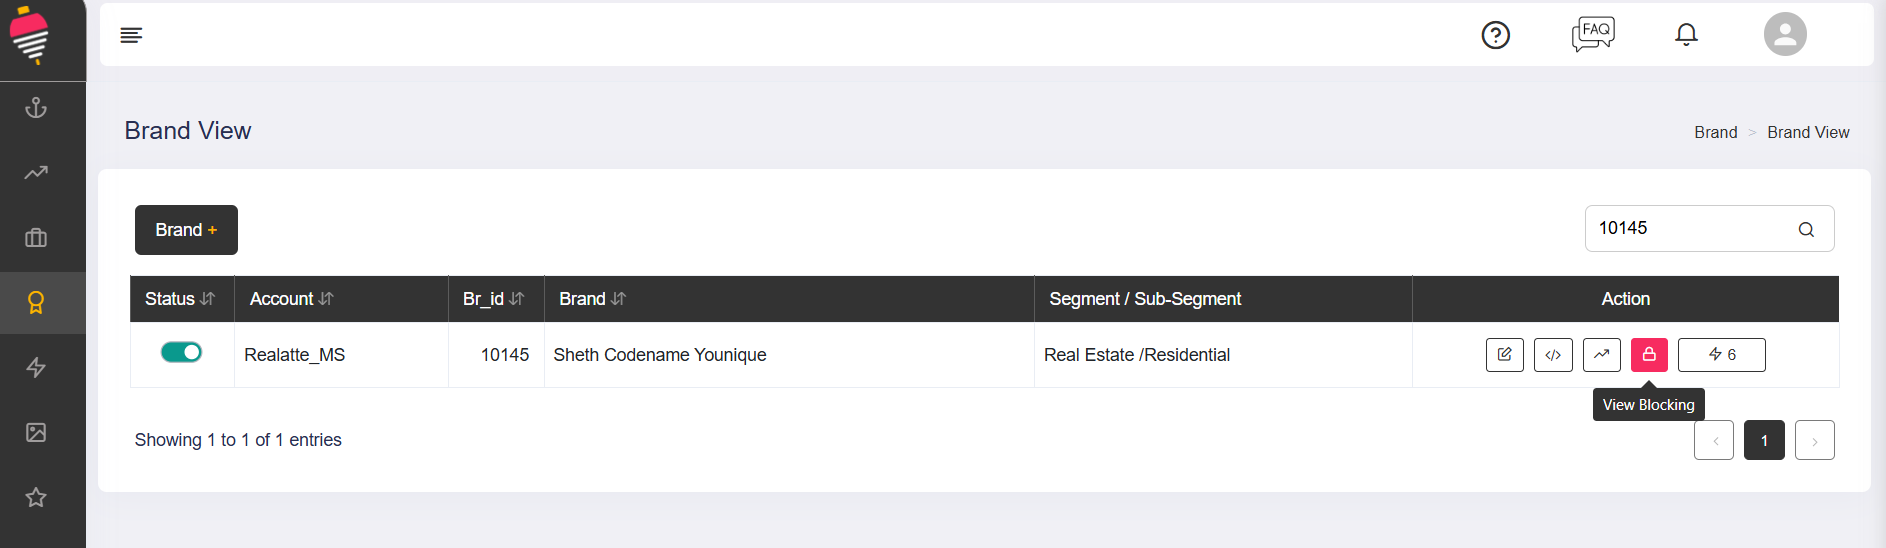
> Go the brand **view screen> Action button> View Blocking**<br>

<figure><img src="/files/dz6Pb6FsgesB1NMRSnM1" alt=""><figcaption><p><strong>Please note : The blocking icon will only be enabled when there is any blocking been applied to your brand.</strong> </p></figcaption></figure>

> Upon click of view blocking, you will able to see the list of placement/device/geo that are blocked for  your brand, by click of the unblock button here you will able to unblock the particular placement or its placement/device/geo combination.

<figure><img src="/files/kIwY7fHwyFE3na1XxjSE" alt=""><figcaption></figcaption></figure>

**What category ads are banned in Adgebra?**

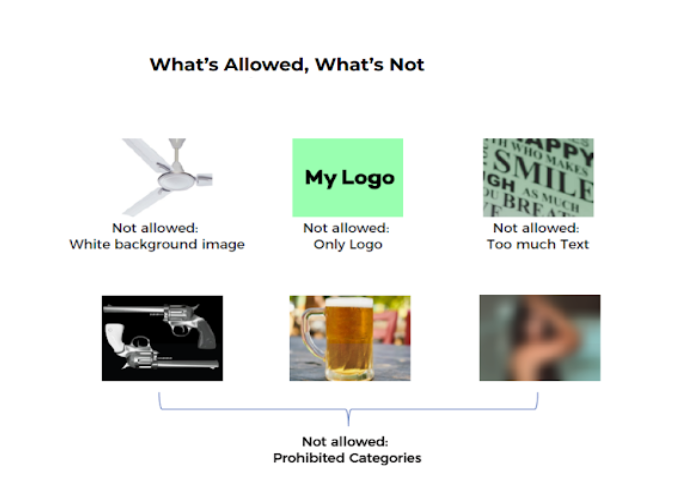
> Adgebra does not permit the serving of certain categories of ads. You can find detailed information about these restrictions in the native ad specifications [Click Here!](https://info.adgebra.co/native-ad-specs/AD_Native_Specs)


# Campaign

In digital advertising, a **campaign** is a coordinated effort to promote a product, service, or brand through various types of ads across a specific platform or set of platforms. A campaign in Adgebra refers to a series of ads that target audiences through **native ads** in order to achieve particular goals, such as brand awareness, engagement, lead generation, or conversions.

**Steps to Set Up a Campaign in Adgebra**

> 1. **Log In to Your Adgebra Account**
>    * Access your Adgebra account by logging in at [Adgebra's website.](https://adgebra.co/)
>    * If you don't have an account yet, you’ll need to sign up and register your brand or business first.[Click here](/getting-started/general/registration) to know more
> 2. **Create a Brand**
>    * Go to the **Brands** section and click the **Brand+** button to create a new brand.
>    * Fill in the required brand information, upload your brand logo, and complete any other relevant brand details.
>    * Once your brand is created successfully, it will be listed in the Brands view section.
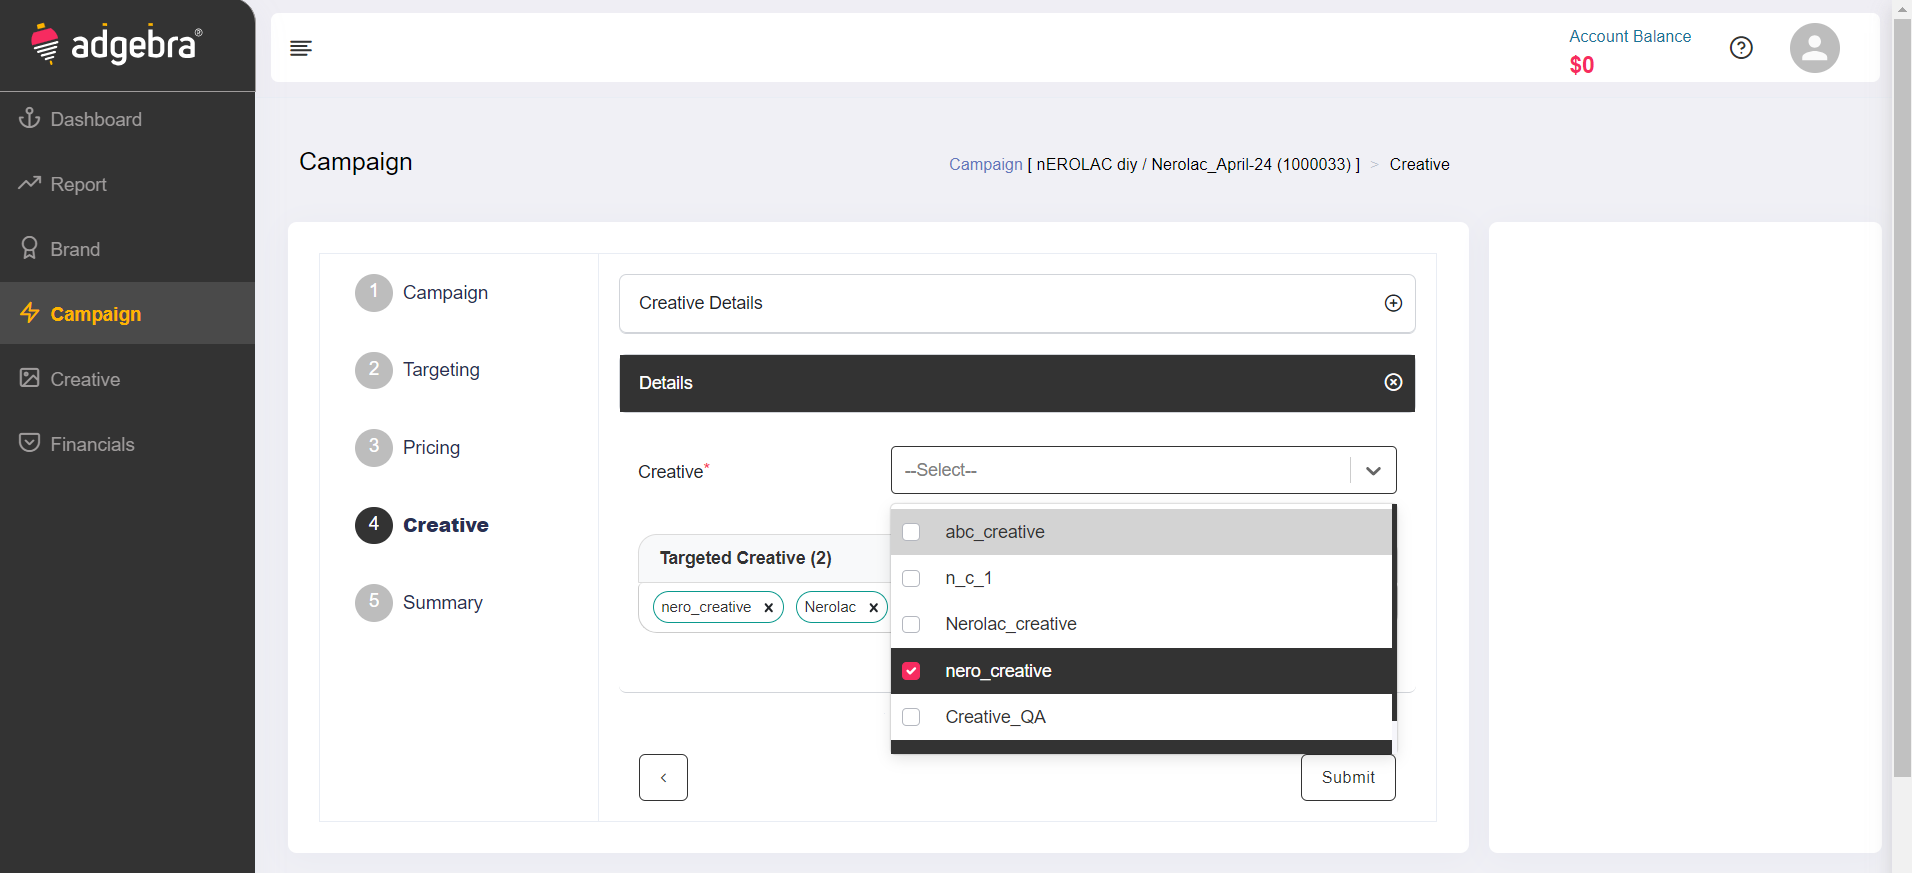
> 3. **Create a Creative**
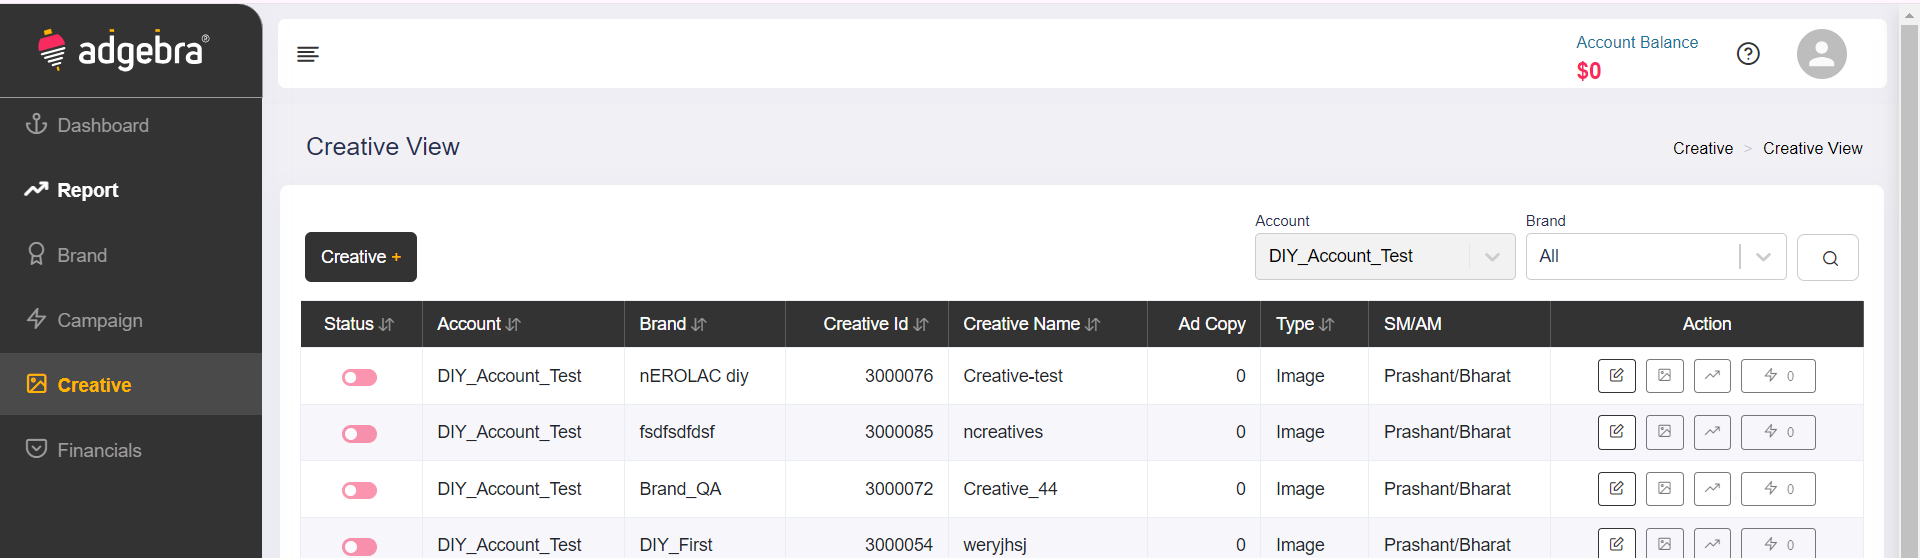
>    * Click on the **Creative+** button to start creating an ad creative.
>    * Select the brand you created earlier.
>    * Add the **native and display creatives** under this brand:
>      * **Cropping for Native Creatives**: Crop the creatives as needed for native ad formats.
>      * **Add Ad Copy Details**: Enter key information for your native creatives, including:
>        * **Headline**: The main message or title.
>        * **Landing Page URL (LPU)**: Where users will go after clicking.
>        * **CTA (Call to Action)**: Text that prompts user action.
>        * **Brand Display Name**: The name of your brand as it will appear.
>        * **Headline Language Translation**: Add translations if you’re targeting multilingual audiences.
>      * Save the creatives once details are added.
> 4. **Create a Campaign**
>    * Go to the **Campaigns** section and click **Campaign+** to begin setting up your new campaign.
>    * **Campaign Details**:
>      * **Campaign Info** : Add the campaign details like campaign name etc.
>      * **Scheduling**: Set the campaign start and end dates.
>      * **Select Strategy**: Choose a strategy that aligns with your campaign goal as per mentioned [here ](https://info.adgebra.co/Strategy-Pricing/Strategy_Pricing_Page3)
>      * **Set Targeting**: Define your target audience by device, interests, location, or language.
>      * **Set Pricing**: Specify your budget and bid structure based on your pricing preferences.
> 5. **Link Creatives to the Campaign**
>    * Attach the ad creatives you created earlier to this campaign.
>    * Make sure all necessary ad copies and creatives are linked to ensure your campaign is ready for display.
> 6. **Review Campaign Summary**
>    * You’ll be shown a **campaign summary** where you can review all campaign details, including:
>      * Scheduling, targeting, strategy, and pricing.
>      * Linked creatives and ad copy information.
>    * Double-check all details to confirm accuracy.
> 7. **Submit for Approval**
>    * Once everything looks good, submit your campaign.
>
>    * **Note**: Your campaign will start serving only after the creatives and the relevant ad copies are reviewed and approved by our operational team.
>
> By following these steps, your campaign will be set up and ready to go live after the approval process. Make sure to check your campaign’s status and performance regularly to make any necessary adjustments.


# Information

**What is a delivery channel?**

> In the context of advertising, a delivery channel refers to the medium or source through which an advertisement is delivered to the target audience. This could include various channels such as Native,In-image, In-footer, In-screen

**What are the different campaign statuses shown in the campaign view screen?**

> The various statuses for your campaign in Adgebra are as follows:
>
> 1.)Active: This status indicates that your campaign is live and running. There are various states when your campaign is active, such as:
>
> a.)**Scheduled**: The campaign is scheduled to start at a specific date and time.\
> b.)**Ready**: This status indicates that the campaign is currently not delivering ads but is prepared and ready to start delivering ads when necessary conditions are met.\
> c.)**Delivering**: The campaign is currently delivering ads to the target audience.\
> d.)**Daily Budget Exhausted**: The campaign has exhausted its daily budget limit and is no longer delivering ads for the particular day.
>
> 2.) Inactive: This status means that your campaign is not currently live. It may have been paused manually or expired. There are various states when your campaign is inactive.
>
> a.)**Expired**: The campaign has reached its end date and is no longer delivering ads.\
> b.)**Overall Budget Exhausted**: The campaign has exhausted its overall budget limit and is no longer delivering ads.\
> c.)**Paused**: The campaign is temporarily paused manually.\
> d.) **Draft**: This status indicates that your campaign is still in the draft stage and has not been launched yet to be live.

**What is the default and performance view in a campaign?**

> In the Campaign view screen of Adgebra, there are two options available: Default View and Performance View.
>
> **Default View:** In the Default View, you can edit various campaign parameters such as bid prices, budgets, and end dates. Additionally, you can view the campaign's spending for the previous day. This view provides comprehensive control over campaign settings and allows for adjustments to be made as needed.
>
> **Performance View:** The Performance View is focused solely on displaying campaign performance metrics. In this view, you can access data and insights related to the campaign's performance, including metrics such as impressions, clicks, conversions, and other relevant performance indicators. This view is useful for analyzing campaign effectiveness and making data-driven decisions to optimize performance.

**Editable Fields from the Campaign View Screen:**

> In the Default View, you can edit various campaign parameters such as bid price, daily budget, overall budget, and end dates.

**Campaign Summary and Its Usefulness:**

> A campaign summary is a concise overview or snapshot of the key metrics and performance indicators related to an advertising campaign. It provides brands with a quick and easy way to assess the overview and effectiveness of their campaign at a glance.
>
> A typical campaign summary may include the following elements: Campaign Name and Date:The name of the advertising campaign and the duration for which it ran. Targeting Details: Geo Targeted, Advance targeting options Scheduling details: Campaign flight date and scheduling details. Key Metrics: Bid Type, Bid Price

**What is Keyword targeting? How can I use it?:**

> Keyword targeting is a digital advertising strategy that involves displaying ads to users based on the specific keywords or phrases they search for or use while browsing online content. You can use keyword targeting only by selecting the strategy as a keyword.
>
> In keyword targeting:
>
> **Relevance**: Brands select keywords that are relevant to their products, services, or target audience. For example, a shoe retailer might target keywords like "running shoes" or "athletic footwear".
>
> **Ad Display:** When users search for or visit web pages containing the selected keywords, the advertising platform displays relevant ads to those users. These ads may appear as sponsored search results, display ads on websites, or within relevant content.
>
> **Audience Reach:** Keyword targeting allows brands to reach users who are actively searching for information related to their offerings. This increases the likelihood of capturing the attention of interested prospects and driving engagement or conversions.
>
> **Precision**: By selecting specific keywords, brands can tailor their ads to be highly relevant to the user's search intent. This precision targeting improves the effectiveness of the ad campaign and enhances the user experience.
>
> Overall, keyword targeting is a powerful advertising strategy that helps brands to connect with theirtargetaudience by displaying ads based on their search behavior and interests.

**How do to choose relevant keywords for campaigns?**

> Choosing relevant keywords for your campaigns is crucial for targeting the right audience and achieving success.
>
> Here are some steps to help you choose relevant keywords:
>
> **Understand Your Audience:** Research and understand your target audience, including their demographics, interests, and behaviors. This will help you identify keywords that are likely to resonate with them.
>
> **Identify Key Themes**: Determine the key themes or topics related to your product or service. These themes will guide your keyword research process.
>
> **Use Keyword Research Tools:** Utilize keyword research tools such as Google Keyword Planner, SEMrush, or Ubersuggest to discover relevant keywords. These tools provide insights into search volume, competition, and related keywords.
>
> **Consider Long-Tail Keywords**: Long-tail keywords are more specific and typically have lower search volume but higher conversion rates. Include a mix of both broad and long-tail keywords in your campaign.
>
> **Review Competitor Keywords**: Analyze the keywords used by your competitors in their campaigns. This can provide insights into relevant keywords and help identify gaps in your own keyword strategy.
>
> **Group Keywords:** Group related keywords into thematic ad groups within your campaign. This allows for more targeted ad copy and better alignment between keywords and ad content.
>
> **Monitor and Refine:** Continuously monitor the performance of your keywords and make adjustments as needed. Remove underperforming keywords and add new ones based on insights from campaign data.
>
> By following these steps and conducting thorough keyword research, you can choose relevant keywords that effectively target your audience and drive the success of your campaigns.

**What is Intent targeting? How to use it?**

> Intent targeting is a digital advertising strategy that focuses on reaching users based on their demonstrated intent or behavior, indicating a specific interest or likelihood to take a desired action. Unlike traditional demographic or interest-based targeting, intent targeting prioritizes reaching users who are actively showing signals of intent relevant to the brand’s objectives.
>
> By focusing on users with demonstrated intent, brands can increase the effectiveness and efficiency of their campaigns, driving higher engagement, conversions, and return on investment (ROI).
>
> You can use Intent targeting only by selecting the strategy as Intent.

**What is click affinity targeting? How to use it.**

> Click affinity targeting focuses on targeting users based on their past behavior and engagement with specific types of content or ads. Instead of solely relying on demographic or interest-based targeting, click affinity targeting identifies users who have previously demonstrated an affinity for certain topics, products, or categories by clicking on related content or ads.
>
> Here's how click affinity targeting works:
>
> **User Behavior Analysis**: Click affinity targeting analyzes users' past interactions with content or ads across websites, apps, or platforms. This includes tracking users' clicks on specific links, articles, products, or ads.
>
> **Interest Identification**: Based on users' click behavior, click affinity targeting identifies their interests, preferences, or affinities for particular topics, products, or categories. For example, if a user frequently clicks on articles about travel destinations, they may be categorized as having an affinity for travel.
>
> **Targeting Strategy**: Brand can then target users with ads that align with their identified affinities. This allows brands to reach users who are more likely to be interested in their products or services based on their past behavior, increasing the relevance and effectiveness of their advertising campaigns
>
> **Optimizatio**n: Click affinity targeting also enables brands to optimize their campaigns based on real-time performance data. By analyzing the engagement and conversion rates of users targeted through click affinity targeting, brands can refine their targeting criteria and improve campaign effectiveness over time.
>
> Overall, click affinity targeting helps brands reach users who have demonstrated a genuine interest in specific topics or products, leading to higher engagement, click-through rates, and ultimately, better campaign performance.

**What are the different audience targeting options?**

> In Adgebra, there are several audience targeting options available:
>
> **Click Affinity:** This targeting option allows brands to target users based on their click behavior across various segments or subsegments. Brands can focus their ads on users who have shown interest in specific topics or categories by clicking on related content.
>
> **Retargeting**: With audience retargeting, brands can target users who have previously interacted with their ads or visited their website. This allows for more personalized and relevant advertising, as brands can re-engage users who have already shown interest in their products or services. Additionally, brands have the option to exclude users who have already converted, ensuring that ad spend is focused on acquiring new customers rather than targeting existing ones.

**What are premium placements?**

> Premium placements typically refer to high-quality websites or digital platforms that offer premium content and attract a large and engaged audience. These sites are often distinguished by their reputation, credibility, and the quality of their content, which may include original journalism, exclusive interviews, in-depth analysis, or premium entertainment.
>
> Characteristics of premium placements may include:
>
> **High-Quality Content:** Premium sites publish content that is well-researched, well-written, and relevant to their target audience. This content is often curated and edited to ensure accuracy, credibility, and professionalism.
>
> **Large and Engaged Audience:** Premium sites attract a significant and loyal audience base, often comprising of affluent or highly engaged users who value the quality of the content and the reputation of the site.
>
> **Brand Safety**: Premium sites typically adhere to strict editorial standards and guidelines, ensuring that brand messages are displayed in a safe and reputable environment. Brands often prioritize premium sites for their brand advertising campaigns to enhance brand perception and trust.
>
> **Limited Ad Inventory:** Due to their high demand and limited ad inventory, premium sites may command higher advertising rates compared to other websites. Brands may need to negotiate directly with the site's sales team or work through premium ad networks to access ad inventory on these sites.
>
> Examples of premium sites include only those strategies where the premium sites are enabled. You can check the strategy and pricing structure. [Click Here!](https://info.adgebra.co/Strategy-Pricing/Strategy_Pricing_Page3)

**What are high-traffic placements?**

> High-traffic placements are sites that receive a significant volume of visitors or page views regularly. These sites attract a large audience and typically rank among the most visited or popular destinations on the internet. High-traffic sites are characterized by their ability to generate substantial user engagement, attract brands, and serve as influential platforms for content distribution and promotion.
>
> Characteristics of high-traffic placements may include:
>
> **Large Audience Reach**: High-traffic placements have a vast audience reach, with millions of users visiting the site each month. This broad audience base offers brands the opportunity to reach a diverse and potentially lucrative target audience.
>
> **Wide Range of Content Categories**: High-traffic placements may cover a wide range of topics and interests to cater to a diverse audience. They often offer content across multiple categories such as news, entertainment, sports, lifestyle, technology, and more, ensuring there's something for everyone.
>
> **Advertising Opportunities**: Due to their large audience and high visibility, high-traffic sites are attractive to brands seeking to reach a broad audience or target specific demographics. These sites offer various advertising opportunities, including display ads, native advertising, sponsored content, and more.
>
> High-traffic sites include for only those strategies where the high-traffic sites are enabled. You can check the strategy and pricing structure. [Click Here!](https://info.adgebra.co/Strategy-Pricing/Strategy_Pricing_Page3)


# Strategy

**What are the different strategies that Adgebra Offers?**

> Adgebra provides various strategies for native and rich media advertising. For detailed information about these strategies, you can refer to the native ad specifications document. [Click Here!](https://info.adgebra.co/Strategy-Pricing/Strategy_Pricing_Page3)

**Is it possible to add multiple strategies to a single campaign?**

> In the Adgebra dashboard, you cannot add multiple strategies to a single campaign. Instead, you will need to create multiple campaigns for different strategies. This approach ensures that each campaign is focused on a specific strategy, allowing for better management and optimization of advertising efforts.

**Is it possible to change the strategy of an existing campaign?**

> Once a campaign is created in Adgebra, you **can't** change its strategy. If you wish to use a different strategy for an existing campaign, you would need to create a new campaign with the desired strategy. This ensures that each campaign remains consistent and focused on its intended strategy throughout its duration.

**What is the Affiliate strategy and how can I get it?**

> The Affiliate strategy in Adgebra is specifically designed for affiliate accounts. It provides affiliates with access to the entire Adgebra inventory for targeting, excluding high-volume inventory, at a minimal price. For more information about the terms and conditions and pricing chart for affiliate accounts, you can check the provided documentation [Click Here!](https://info.adgebra.co/Strategy-Pricing/Strategy_Pricing_Page3) . To obtain an affiliate account, please contact your respective sales manager or reach out to us at <sales@inuxu.media>

**Can you target only specific sites/categories?**

> Yes, you can target specific sites which is nothing but the placements only from the whitelist strategy.


# Scheduling & Targeting

**What are the different targeting options does adgebra offers?**

> Adgebra provides a diverse array of targeting options, including geographical, device-based, operating system, language, audience demographics, keyword targeting, user intent, category targeting, site selections, and more. It's important to note that the availability of these targeting options may vary depending on the strategy selected for the campaign. Please consult the native ad specifications.[ Click Here!](https://info.adgebra.co/Strategy-Pricing/Strategy_Pricing_Page3)

**What are the different types of scheduling does adgebra offer?**

> Adgebra provides scheduling options for campaigns, allowing brands to set start and end dates, select different time zones, schedule campaigns on specific weekdays, and define start and end times for each day. These scheduling features offer flexibility and control over when ads are displayed to the target audience, enabling brands to optimize campaign performance and reach their marketing objectives effectively.

**Does advance targeting change strategy to strategy?**

> Yes, advance targeting changes from strategy to strategy selected for the campaigns.

**What is the difference between Premium & Non-Premium Geos?**

> In Adgebra, geo-targeting is divided into two categories:

**Can you target only specific sites/categories?**

> **Premium Geo-Targeting**: This includes specific high-value geo-locations such as Australia, Bahrain, Kuwait, Oman, Qatar, Saudi Arabia, UAE, USA, Canada, Singapore, and New Zealand.
>
> **Non-Premium Geo-Targeting:** This category encompasses all countries except the ones listed under premium geo-targeting.
>
> By segmenting geo-targeting into premium and non-premium categories, brands can tailor their campaigns to specific regions based on their target audience and campaign objectives.

**How can you schedule ads to run at specific times during the day?**

> In campaign creation, you have the option to select the scheduling type as "schedule." Within this scheduling type, you can specify the start time and end time to run ads at specific times during the day.&#x20;
>
> This allows for more precise control over when your ads are displayed to the target audience, helping you optimize campaign performance and reach your advertising goals.

**Can Adgebra target different Operating Systems?**

> Yes, Adgebra facilitates targeting different operating systems, making it easy to target various versions as well. However, please note that this feature is not yet live in the latest release. In an upcoming release, you will have the option for this targeting as well.

**What is Preset in Geo Targeting?**

> In the context of geo-targeting, a preset refers to a predefined set of geographic locations that can be easily selected and applied to a campaign without having to manually specify each individual location. Presets simplify the process of targeting specific regions by grouping commonly targeted locations.
>
> For example, a preset for a specific country or region may include major cities or states within that area. Presets save time and effort for brands by providing convenient options for targeting their desired geographic locations

**How to target a campaign based on language?**

> Yes, language targeting is available for only certain strategies in Adgebra. You can refer to the native ads specifications to determine which strategies support language targeting. [Click Here!](https://info.adgebra.co/Strategy-Pricing/Strategy_Pricing_Page3)


# Pricing & Budget

**What are the pricing details for different strategies?**

> Each strategy in Adgebra comes with its own pricing structure. For details about the pricing associated with each strategy, please consult the native ad specifications. [Click Here!](https://info.adgebra.co/Strategy-Pricing/Strategy_Pricing_Page3)

**What is the minimum daily budget to set a campaign on Adgebra?**

> The minimum daily and overall budget for a campaign in Adgebra depends on the strategy applied. Each strategy comes with its own pricing structure, which determines the budget requirements. For detailed information about the pricing associated with each strategy, please refer to the native ad specifications document. [Click Here!](https://info.adgebra.co/Strategy-Pricing/Strategy_Pricing_Page3)

**Minimum Bid to start a campaign?**

> The minimum bid for a campaign in Adgebra depends on the strategy applied. Each strategy comes with its own pricing structure, which determines the budget requirements. For detailed information about the pricing associated with each strategy, please refer to the native ad specifications document. [Click Here!](https://info.adgebra.co/Strategy-Pricing/Strategy_Pricing_Page3)

**Where can you get a Bid chart?**

> For detailed information about the bid pricing associated with each strategy, please refer to the native ad specifications document. [Click Here!](https://info.adgebra.co/Strategy-Pricing/Strategy_Pricing_Page3)

**How to set a budget for my Adgebra campaigns?**

> Daily Budget: This is your daily spending goal for the campaign. Overall Budget: This represents the total spend allocated for your campaign.
>
> The system sets a minimum budget threshold based on the strategy applied. While you can edit the budget at your convenience, you cannot set it below this minimum threshold. You can adjust the budget from the pricing tab in the campaign creation screen.

**How can you change the budget during an ongoing campaign and how does it impact ads?**

> Yes, you have the flexibility to change your daily or overall budget until the campaign is active. However, if your campaign becomes inactive due to reaching the overall budget limit, you will need to create a new campaign to continue advertising.

**Can the Daily Budget & Overall Budget be the same?**

> No, the daily budget must be less than the overall budget. This ensures that the daily spending does not exceed the total allocated budget for the entire campaign duration.

**How can you avoid over-delivery of my campaign?**

> To avoid overdelivery of your campaign and ensure that your ads are served within your budget constraints, you can take the following steps:
>
> **Set Daily Budget:** Define a daily budget for your campaign to limit the amount spent each day. This helps control spending and prevents overdelivery.
>
> **Monitor Campaign Performance**: Regularly monitor the performance of your campaign to track spending and ensure that it stays within budget. Use our reporting tools to keep track of spending and adjust as needed. You can use our placement analysis report to optimize the campaign per your needs.
>
> **Adjust Bid Strategy**: Consider adjusting your bid strategy to optimize spending and ensure efficient delivery of your ads. Experiment with different bidding strategies to find the one that best fits your budget and campaign goals.
>
> **Pause or Adjust Campaign:** If you notice that your campaign is approaching or exceeding your budget, consider pausing or adjusting the campaign settings to prevent overdelivery. You can adjust targeting, bid strategy, or daily budget to better control spending.
>
> **Blocking** : Users have the ability to block placements at various levels to optimize their campaign performance and targeting. They can block entire placements, specific devices, or certain geographic locations where their campaign is serving. This level of control allows brands to refine their targeting and ensure their ads are being delivered to the most relevant audience, ultimately improving campaign effectiveness and ROI.
>
> By implementing these strategies and closely monitoring your campaign performance, you can effectively avoid over-delivery and ensure that your ads are served within your budget limits.


# Blocking

Users can block placements at various levels to optimize their campaign performance and targeting. They can block entire placements, specific devices, or certain geographic locations where their campaign is serving. This level of control allows brands to refine their targeting and ensure their ads are being delivered to the most relevant audience, ultimately improving campaign effectiveness and ROI.

By implementing these strategies and closely monitoring your campaign performance, you can effectively avoid over-delivery and ensure that your ads are served within your budget limits.

**How to manage blocking of placement done at placement/geo/device level in the campaign?**

> In Adgebra, you indeed have the option to block non-performing placements directly from the Placement Analysis report, which can be generated from the campaign view screen. Furthermore, you can manage blocking and unblocking at the placement, device, or specific geographic levels. In the targeting tab within the campaign screen, you'll be able to view the blocking settings and make adjustments accordingly, including unblocking if necessary. This level of control allows brands to fine-tune their targeting and optimize campaign performance effectively.

**How to manage blocking at the campaign level or brand level?**

> In a placement analysis report, Brands typically have the ability to manage blocking settings at various levels to control where their ads appear. Here's how blocking can be managed:
>
> **Placement Level**: Brands can specify particular placements where they don't want their ads to appear. This could be specific websites, or apps. It allows brands to avoid placements that may not align with their brand values or audience preferences. Brands can only block the placements after the campaign is started delivering, you will need to keep track once the campaign is made live.
>
> **Device Level**: Brands can also choose to block their ads from appearing on specific types of devices. For example, brands may want to block only a desktop device for only a specific placement.
>
> **Geo Level:** Brands can also block their ads from appearing in specific geographic locations. This could be at the State and city level. For example, brands may block a specific geo state or city for a specific device/placement.
>
> By providing these blocking options, placement analysis reports empower brands to fine-tune their ad placements and ensure that their campaigns reach the right audience in the right context, maximizing effectiveness and ROI.
>
> Note: Placements/device/geo can be blocked at brand or campaign level.

**How to block non-performing geos (state/cities) for any campaign?**

> Yes, Brands can also block their ads from appearing in specific geographic locations. This could be at the State and city level. For example, brands may block a specific geo state or city for a specific device/placements.

**How to block nonperforming devices for any campaign?**

> Yes, Brands can also choose to block their ads from appearing on specific types of devices(Laptop/desktop, Mobile). For example, brands may want to block only a desktop device for a specific placement.

**How to block non-performing placements for any campaign?**

> Brands can specify particular placements where they don't want their ads to appear. This could be specific websites, or apps. It allows brands to avoid placements that may not align with their brand values or audience preferences. Brands can only block the placements after the campaign is started delivering, you will need to keep track once the campaign is made live.


# Adding Creative

**How can to link creatives in the campaign?**

> Add Creatives: Navigate to the Creative tab under your account, within the same brand where the campaign is created. Here, you can add creatives and ad copies.

<figure><img src="https://demo.adgebra.in/custom/html/Adgebra_Help_Center/Campaign/images/img1.png" alt=""><figcaption></figcaption></figure>

> Link Creatives to Campaign: Once your creatives are created, go to the Campaign screen. From here, you can link your creatives to the campaign. Alternatively, you can also link the campaign from the Creative screen. By linking your creatives to your campaign, you ensure that the ads associated with your campaign are using the appropriate creatives and ad copies. This helps maintain consistency and relevance in your advertising efforts.

<figure><img src="https://demo.adgebra.in/custom/html/Adgebra_Help_Center/Campaign/images/img2.png" alt=""><figcaption></figcaption></figure>

**Is it possible to make a copy of a campaign?**

> In Adgebra, you cannot create a copy of existing campaigns. If you need to replicate a campaign with similar settings, you would need to manually recreate the campaign with the desired parameters.

**How to add custom CTA in campaigns if it is not available in the CTA dropdown?**

> Yes, you can add custom CTA for your campaigns in Adgebra. For any custom CTA options, please reach out to your account manager for assistance. They will be able to help you set up custom CTAs tailored to your specific campaign objectives and requirements.

**Does Adgebra Support 3rd Party Impression Tracker?**

> Yes, Adgebra supports third-party impression trackers for various platforms. In the ad copy details, you can add your third-party impression tracker to track third-party impressions effectively. This feature allows brands to integrate their preferred tracking systems seamlessly and accurately measure the performance of their campaigns across different platforms.


# Troubleshooting

When troubleshooting native ads on **Adgebra**, here are the essential steps to ensure your campaigns are delivering effectively:

#### 1. **Check Ad Approval and Compliance**

* **Approval Status:** Verify if the ads are approved, as disapproved ads will not be delivered.
* **Compliance with Adgebra Policies:** Adgebra has specific content guidelines; check that your creatives and landing pages meet their standards. Some content may be flagged even if it seems minor, affecting delivery.

#### 2. **Budget and Bidding**

* **Daily Budget:** Ensure your daily budget is adequate for your target audience size and campaign goals. A low budget can throttle ad delivery.
* **Competitive Bidding:** Check if your bid is competitive enough within the Adgebra ecosystem. Too low a bid might prevent impressions if other advertisers are outbidding.

#### 3. **Targeting Parameters**

* **Audience Size and Segmentation:** Make sure your audience targeting is not overly restrictive. Adgebra uses a native ad network that relies on broader audience segments; overly narrow targeting may reduce reach.
* **Geo-targeting and Demographic Targeting:** Confirm that your geo and demographic targeting align with your objectives, as overly specific targeting can limit delivery.

#### 4. **Creative Quality and Relevance**

* **Creative Quality:** Ensure your creatives are engaging and visually appealing. Native ads perform best when they blend well with content but still capture attention.
* **Relevancy to Audience:** Ads that resonate with the target audience will have higher engagement rates, which can positively impact delivery.

#### 5. **Ad Fatigue**

* **Ad Fatigue:** Refresh or rotate creatives periodically to maintain engagement with your audience and avoid ad fatigue.

#### 6. **Placement and Publisher Constraints**

* **Publisher Requirements:** Adgebra works with a network of publisher sites that may have different ad requirements. Ensure that your ad creatives meet the specific guidelines of those publishers.
* **Publisher Competition:** If certain placements are competitive, you may need to adjust your bid or targeting to achieve better delivery.

#### 8. **Monitor Performance Metrics**

* **CTR and Engagement Rates:** Low click-through rates (CTR) can signal a mismatch between the ad and audience, affecting delivery.
* **Conversion Tracking:** If Adgebra supports conversion tracking, use it to gauge campaign performance and adjust based on what’s working.

By regularly reviewing these elements, you can keep your Adgebra campaigns optimized and troubleshoot any delivery issues effectively.


# Campaign is not delivering

1. &#x20;**Account Verification**
   1. Check Account Status
2. **Ensure the account is active.**
   1. Check Wallet Balance in case of (DIY Only)
   2. Confirm there is sufficient wallet balance in the account available to there is not impact in delivery.
3. **Advertiser (Brand) Verification**
   1. Check Band Status
   2. Verify the (Brand) under the account is active.
4. **Campaign Verification**
   1. Check Campaign Status
   2. Ensure the campaign is active.
   3. Check Creative and Ad Copy
   4. Confirm there is at least **one active creative and one active ad copy**.
5. **Flight Dates Verification**
   1. Check Active Flight Dates
   2. Ensure the campaign's start and end dates are currently live.
6. **Targeting Verification**
   1. If the campaign is audience-targeted, check if we have enough audience data for the segment in the past 15-30 days.
   2. Check the geo excluded and sites targeted are relevant to geo. Ex: Marathi Sites are targeted and geo-targeted are only Tamil Nadu. Here there will probably be less delivery.
   3. Check if there is any language targeted in a campaign which is doesnt not have any relevant ad copy i.e site language targeted is English and the assigned creatives/ad copy is in the Marathi language headline.
7. **Placement Analysis Report**
   1. Run the **Placement Analysis Report from the campaign view screen.**
   2. Generate a report for the particular campaign to check for any delivered impressions are there on which sites.
8. **Impressions Analysis**
   1. Check Impressions Delivery
   2. If no impressions have been delivered since the campaign became active (1-2 hours), proceed to the next steps.
9. **Publisher Blocking Check**
   1. Check for Publisher Blocking with the publisher team. There might be some cases where publishers won't allow certain categories of brands not to serve on sites.
   2. Search the placement ID in the placement analysis report to see if your brand or its segments are blocked from the publisher's end.
10. **Placement Blocking Analysis**
    1. If the targeted site is blocked, coordinate with the publisher team or change the brand segment.
    2. If there is no blocking for the targeted site, follow the next step.
11. **Placement Report**
    1. Run a report for that placement to see if there is any delivery for that placement . Verify if there has been delivery in the past for that particular site.
    2. Check which campaigns have been delivered in the past and their bid prices.
12. &#x20;**Adjust Bid Price**
    1. Increase Bid Price
    2. If past campaigns had higher bid prices, increase your campaign's bid price by a few cents (¢) and monitor if the delivery starts.
13. &#x20;**Escalation**
    1. Raise with the Product Team
    2. If the campaign still does not deliver after increasing the bid price, escalate the issue to the product team.


# The campaign was running previously but has now stopped delivering.

1. **Verify Recent Changes**
   1. Check for Recent Changes made to changes that might affect the campaign delivery.
   2. Confirm if any changes were made recently to the campaign settings, targeting, budget, or creatives.
2. **Account Verification**
   1. Check Account Status
   2. Ensure the account is still active.
   3. Check Wallet Balance in case of (DIY Only)
   4. If the wallet balance is negative, check if it is correctly shown in the transaction history as well!  If it's incorrect raise with product team.
   5. Confirm there is sufficient wallet balance in the account.
3. **Advertiser (Brand) Verification**
   1. Check Advertiser Status
   2. Verify the advertiser (Brand) under the account is still active.
4. **Campaign Verification**
   1. Check Campaign Status
   2. Ensure the campaign is still active.
   3. Check Creative and Ad Copy
   4. Confirm there is at least one active creative and one active ad copy.
5. **Flight Dates Verification**
   1. Check Active Flight Dates
   2. Ensure the campaign's start and end dates are currently live.
6. **Budget and Spend Check**
   1. Check Budget Utilization in the past and current.
   2. Ensure the campaign has not exhausted its overall budget.
   3. Check the Daily/Total spending of the campaign.
   4. Verify if there are any spend limits (daily/total) that have been reached.
7. **Detail Analysis Report**
   1. Run detailed analysis Report by placement.
   2. Generate a report to check the historical and current impressions, clicks, and conversions.
   3. Compare the performance over time to identify when the delivery drop occurred.&#x20;
   4. Run trend analysis report to see when the delivery has been effected.
8. **Targeting Verification**
   1. Check Targeting Settings-related changes that affected the addition of audience/intent/keywords/retargeting-related strategies to the campaign.
   2. Ensure there were no changes to the targeting settings that might have restricted the audience reach (e.g., geo-targeting, demographics, interests).
9. **Bid Price Analysis**
   1. Review the Bid Price of the site which was delivered for the campaign in the past.
   2. Compare the current bid price with historical data.
   3. Ensure the bid price is competitive compared to similar campaigns.
10. **Publisher and Inventory Check**
    1. Check Publisher Blocking.
    2. Verify if the brand or its segments are being blocked by any publishers.
    3. Inventory Availability, there might be a possibility that the publisher might have paused the tags and impacted in overall campaign by not delivering on that site.
    4. Confirm if there is enough inventory available for the targeted sites and audience.
11. **Competitor Analysis**
    1. Analyze Competitor Activity
    2. Check if new campaigns have entered the auction or increased their bids, affecting your campaign’s delivery.
12. &#x20;**Escalation**
    1. Raise with the Product Team
    2. If all the above checks are in place and the campaign still isn't delivering, escalate the issue to the support or product team for further investigation.


# The campaign is delivering, but not at its full potential.

1. **Performance Analysis**
   1. Run a Performance Report
   2. Analyze key metrics: impressions, clicks, conversions, CPC, CTR, and eCPA.
   3. Identify trends and pinpoint areas where performance is lacking.
   4. You can increase/decrease placement-specific bid prices based on your needs in the performance analysis report.&#x20;
   5. In this report, you can block any underperforming placement/device/geo with any combination of entire placement, placement-device, and placement-geo.
   6. If certain geo are not performing well for your campaign for the selected sites, you can block that particular placement for the particular geo-locations.
   7. Check if any device is not performing well for the particular placement, you can block or lower the bid price of that placement device.
   8. Check if any placement is not performing well, you can block the entire placement or lower the price of that particular placement and increase the price for the performing one.
2. **Targeting Refinement**
   1. Review Targeting applied for the campaign and placements targeted.&#x20;
   2. Try creating campaigns for different strategies and monitor the performance of each.
   3. Assess current geo-targeting, demographic, interest, and keyword/intent/audience targeting applied for the campaign.
   4. Check the geo-targeted and placements targeted are relevant to geo. Ex: Marathi Sites are targeted and geo-targeted is only Tamil Nadu. Here there will probably be less delivery or no delivery.
   5. Identify placements that are underperforming and consider reallocating the budget to better-performing segments.
   6. Expand or Narrow Targeting wherever required.
   7. Consider expanding targeting to reach a broader audience if the current scope is too narrow.
   8. Conversely, narrow targeting if the audience is too broad, to focus on high-converting sites.
   9. Block geos/placements or devices wherever they are nonperforming.
   10. If the campaign is audience-targeted, check if we have enough audience data for the segment in the past 15-30 days.
3. **Budget and Bid Adjustments**
   1. Reallocate the Budget if needed based on the above steps.
   2. Shift the budget from underperforming placements or times to high-performing ones..(New UI only)
   3. Adjust Bid Prices
   4. Increase bid prices to become more competitive in the auction.
4. **Creative Optimization**
   1. Test different creatives/adcopy to see which ones perform best.
   2. Check the average ctr and ecpm of the creative/adcopy in the report and evaluate performance.
   3. Evaluate performance based on engagement metrics (CTR, conversion rate).
   4. Refresh Creatives/ad copy i.e add multiple ad copies to creatives or update the existing ones.
   5. Update or create new ad copies and visuals to avoid ad fatigue.
   6. Align Creatives/ad copy with the Target Audience.
   7. Ensure creatives/ad copy are tailored to resonate with the target audience’s preferences and interests.
5. **Ad Placement and Inventory**
   1. Evaluate Ad Placements
   2. Analyze performance by placement and adjust targeting to focus on high-performing placements.
   3. Check for Publisher Issues i.e if there is any certain bidfloor price set for the particular placement or if there is any roadblock running through the particular targeted site.
   4. Ensure there are no issues with publishers or inventory sources.
   5. Address any publisher blocking or inventory limitations.
6. **Landing Page Optimization**
   1. Improve Landing Page Experience
   2. Ensure the landing page is relevant, fast-loading, and mobile-friendly.
   3. A/B tests different landing pages to see which ones convert better.
   4. Match the Ad copy headline with the Landing Page if it's relevant.
   5. Ensure the ad copy headline aligns with the landing page content to provide a seamless user experience.
7. **Analyze Competitor Activity**
   1. Monitor Competitor campaigns running on the sites under different placements.
   2. Keep an eye on competitor campaigns and strategies.
   3. Adjust your campaign targeting/pricing based on competitive insights of other campaigns.
   4. Review the past performance of the targeted placements, i.e by running the campaign detail analysis report where you will able to see what type of campaigns were running before, and what the average CPC, CTR, and eCPA worked out for those sites. Check what type of segments performed well on that site, and match with your brand segment. Based on this analysis you may make changes to your campaign.
8. **Audience Segmentation and Retargeting to improve CPL**
   1. Create an audience campaign based on behavior, engagement, and conversion data of your campaign
   2. Target the campaign by creating click affinity, and audience strategies to improve your overall CPL.
   3. Implement Retargeting by creating campaign click affinity.
   4. Use retargeting strategies to re-engage users who have previously interacted with your ads/sites.
9. **Regular Monitoring and Iteration**
   1. Continuously Monitor Performance
   2. Regularly review campaign performance and make data-driven adjustments.
   3. Iterate and Optimize
   4. Implement changes incrementally and measure the impact, iterating based on results.


# Campaign Over-delivery

Overdelivery of a campaign occurs when the actual spending exceeds the planned budget, which can lead to budget overruns and potentially wasted spend. Here is an approach to diagnose and minimize an over-delivery issue.

Note: The major over-delivery issue happens when the IRCTC partner placements that are targeted in your campaign.&#x20;

Why does this happen? In the case of IRCTC Push notifications ads are served on irctc are push notifications ads and the request volume of a single shoot time is huge, when an ad is served/delivers an impression to the user, there are pretty chances the user may or may not click on the ad at that moment, hence if user clicks later sometime, that time when the user clicked on the ad and redirected to the advertiser site, adgebra marks as a spillover click and hence those clicks are charged to the advertiser. This is a scenario where we have to consider there will be a certain amount of spillover clicks that will be there. Hence considering that thing you need to plan your campaign to manage it effectively and minimize it to optimal cost.

1. &#x20;**Run Trend Analysis Report**
   1. In the trend analysis report, you will be able to see the number of impressions/clicks delivered in a particular hour.
   2. In trend analysis check if the campaign has stopped delivering impressions after your daily budget was over. If that's the case: then there is no issue from the backend tech side. The campaign has stopped delivering impressions after the daily budget has been exhausted. If not then raise with the product team.
   3. Check in the trend analysis report, once the impression has stopped delivering, check the number of spillover clicks in the next several hours. Check how much the budget has been exhausted through spillover clicks and then plan/optimize the campaign accordingly by lowering the budget.
2. &#x20;**Verify Campaign Settings**
   1. Check campaign budget settings i.e more than 10k budget for irctc site.
   2. Ensure that the daily and total budget settings are correctly configured.
   3. Confirm that there are no discrepancies in the budget setup.
   4. Make sure that the campaign doesn’t have a more number of sites that has a high volume in spending. As there are pretty chances of over-delivery with other high-volume sites.
   5. Make sure that you add the daily budget 10-15% lower than what your media plan is. Based on performance you can increase it later.
3. **Pause or Adjust Overdelivering Campaigns**
   1. If necessary, temporarily pause the overdelivering campaign to prevent further spending while adjustments are made.
   2. Reduce the budget or bids to bring the campaign spend back in line with the planned budget.
   3. Review the average eCPC price campaign that where running for those targeted sites in the past few days and adjust your price accordingly. If your price is higher than others. Then there is a chance your campaign has more priority to serve and hence over-delivery may happen. To avoid such try with lower price and then pace up with high price.
4. Monitor Performance
   1. Track Real-Time Spend through Trend Analysis.
   2. Check if the campaign budget is 70% exhausted, you can plan to pause the campaign temporarily so that in the remaining 30%, the spillover clicks can be adjusted.&#x20;
5. **Optimize Campaign Performance**
   1. Optimize High-Cost/Low-Performance placements
   2. Identify placement of the campaigns that are high cost but low performing and optimize or exclude them.
   3. You can block device-specific placements, and geos or also lower the price of device-specific placements, and geo through the placement analysis report.
   4. Refine Ad Creatives review and optimize ad creatives to improve cost efficiency and prevent unnecessary spend.
6. **Escalation if Needed**
   1. If over-delivery continues despite these measures, contact the product team for assistance.


# The campaign is not tracking conversions

1. **Verify Conversion Tracking Setup**
   1. Check the adgebra pixel Code if placed or not.
   2. Ensure the adgebra conversion tracking code or pixel is correctly placed on the appropriate pages of the client's website (e.g., confirmation or thank-you page).
   3. Verify if the adgebra code/pixel is not commented out or placed within other script tags that might prevent it from firing.
2. **Open Developer Tools in the browser**
   1. Right-click on the webpage and select "Inspect" or press Ctrl+Shift+I (Windows/Linux) or Cmd+Option+I (Mac) to open the browser's developer tools. Or Simply press F12.
   2. Enter the adgebra click tracker URL in Chrome browser, if you do not have adgebra click tracker then see if you can see the ad on the website then open that website where your ad can be seen and click on that ad.
   3.
   4. Go to the Network Tab: Navigate to the "Network" tab in the developer tools.
   5. Filter by Network Requests: Filter the requests by typing keywords like "conversion?p1" or the name of our platform (e.g., “adgebra”) in the search bar within the Network tab.
   6. Perform a Conversion Action: Perform the action on the website that should trigger the conversion pixel (e.g., making a purchase, or filling out a form).
   7. Check for the Pixel Request: Look for network requests related to our conversion pixel. The request will usually show up as below. You need to be very sure that the same pixel with the advertiser ID is firing here which you have shared with the advertiser/brand you can verify by using the p1 parameter value as the advertiser/brand ID.&#x20;

<figure><img src="https://lh7-rt.googleusercontent.com/docsz/AD_4nXcky7cY1N-tCboifItlXG3B2fxcPlZGTcht_srhqTnvhdOKRyAAE0MYor4tMLRLPct5w-Xhf59SblZQEsmae_70UKSivv0uyqkPi8_M2qbfH2OrtH-WFTvqrgnYusDgWK9HnQ_56ET3sYnMyKfWNhFCTMg?key=c0OVuu8D2J_w9FKrTMgH3A" alt=""><figcaption></figcaption></figure>

<figure><img src="https://lh7-rt.googleusercontent.com/docsz/AD_4nXfrn1IpUG_ELRu7rDx1vMO4ZmDQ3WbRPbBmzdRQGBT5yq8Tdt0nrx81FS0P8Q1bAm-PHpA95xSwl3rnl62tyRTsWFJ_X55ghQdqxgdOAybgQavUvTHR_ClrkJkN_aSWV2d5jqONjd5JrrhgXqK-lWw0X48?key=c0OVuu8D2J_w9FKrTMgH3A" alt=""><figcaption></figcaption></figure>

7. Inspect the Request: Click on the request to see the details and ensure it was sent correctly. Check the response status to ensure it was successful (typically a 200 status code).

<figure><img src="https://lh7-rt.googleusercontent.com/docsz/AD_4nXdxMBDMSwtDEoeYj4KRe3dRDoor4Hqxz-cP_OJk-L4OuVqdniXu8mxuiIGIO7FaCYxA6NPWfgxr3UHF0kWpjVJS0FXU1yBG3FyDey2IuFGJ_FY8Ri1AANXsJWMGqDIdC0smvcn60n5DyOct9Rt4sCl_dtxz?key=c0OVuu8D2J_w9FKrTMgH3A" alt=""><figcaption></figcaption></figure>

3. Test and Verify
   1. Perform test conversions to ensure that the tracking is working as expected.
   2. Clear your browser cache or use incognito mode to simulate a new user conversion.
   3. If the conversion pixel is fired with status code 200, then there is no issue with pixel firing. Now you check the reports if you can see a number in the report. If not please raise the issue with the product team to check further.

Note: If the pixel is fired correctly and still not able to track the number, there might be also the possibility of your browser the third-party cookies being blocked. You can check your browser settings if you have allowed third-party cookies. As per the below

<figure><img src="https://lh7-rt.googleusercontent.com/docsz/AD_4nXfmbNl8eeJrYiJzrUMBzFBTXTKKE4XgUkSEy3h0VP1WA6GqAh7YK4JTtfk9Sc-5sTvhU3S3k9OiHB5cgW19i3eXTFvqnGjaUoqYsi7JixXHbbULRfjA97y5dDdkQiF3eMuh5TE-eb9QffwVOnUm04r95L_K?key=c0OVuu8D2J_w9FKrTMgH3A" alt=""><figcaption></figcaption></figure>

<br>


# Conversion Discrepancies

Campaign tracking conversions but could see huge discrepancies in clients and adgebra numbers.

Campaign tracking conversions but could see huge discrepancies in clients and adgebra numbers.

1. Verify Conversion Tracking Setup
2. Check if the client has placed our code directly on the side or through any third-party platform like (GTM)
3. If placed through GTM: You need to follow the checks as mentioned in the document here: <https://docs.google.com/document/d/1fvGVv3IY6Rj6j9VCaLXj6dlux0x_oCVbTb1Fp48wv1k/edit?usp=sharing>
4. Check after the GTM pixel is fired on conversion if the GTM pixel is firing our adgebra pixel. You need to check in the developer tool as per the above steps. If the GTM pixel is firing but not triggering our adgebra pixel(script/img/iframe). So there is an issue with the setup in GTM for sure hence client end would track the number and our end would not.
5. Possibilities 3rd party pixels getting fired multiple times on page load or any particular event might also lead to discrepancies in numbers.&#x20;
6. Possibilities that the 3rd party pixel gets fired correctly but doesn’t trigger our pixel which might also lead to discrepancy
7. Incorrect configuration setup or multiple pixel setup in 3rd party platforms might lead to a discrepancy.

<br>


# Creative

**What are the different ad formats available in Adgebra?**

> Adgebra offers various ad formats to cater to different advertising objectives and audience preferences. The three main ad formats available with Adgebra are:
>
> **Native Ads:** Native ads blend in seamlessly with the content on the platform where they are displayed. They match the look, feel, and style of the surrounding content, making them less intrusive and more engaging for users. Native ads are designed to appear like editorial content, improving user experience and increasing the likelihood of engagement.
>
> **Rich Media Ads:** Rich media ads are interactive and engaging ad formats that go beyond static images or text. They often include features such as animations, videos, audio, and interactive elements like games or quizzes. Rich media ads can capture users' attention more effectively and deliver a more immersive brand experience, leading to higher engagement rates and better campaign performance.
>
> **Video Ads:** Video ads are a powerful format for delivering compelling brand messages. They can be in-stream ads that play before, during, or after video content, or they can be out-stream ads that appear within content or as standalone units on websites and apps. Video ads allow brands to tell stories, demonstrate products, and evoke emotions more effectively than other formats, making them a popular choice for> > brand awareness and engagement campaigns.&#x20;
>
> **Note : Video Ads are currently in development phase.**
>
> By offering a variety of ad formats like native, rich media, and video, Adgebra enables brands to choose the format that best suits their campaign goals, target audience, and creative assets, thereby maximizing the impact of their advertising efforts.

**What are the creative guidelines?**

> For creative guidelines, please refer to the document. [Click Here!](https://info.adgebra.co/native-ad-specs/AD_Native_Specs)

**What is the Max character limit for the ad copy?**

> With a maximum character limit of 80 characters for the headline in ad copy on Adgebra, brands need to ensure their headlines are concise, clear, and attention-grabbing. This limitation emphasizes the importance of using impactful language and focusing on key messaging to effectively communicate with the target audience within the restricted space. Brands may need to prioritize essential information, such as product benefits, offers, or calls to action, while still maintaining relevance and appeal to drive engagement and clicks.

**How to edit or pause ads without losing historical performance data?**

> Yes, within the Adgebra dashboard, brands have the flexibility to manage their creatives and ad copies effectively. Here's how:
>
> **Pausing Creatives:** Brands can pause entire creatives if they want to temporarily halt the delivery of those ads. This could be useful for making adjustments, conducting A/B testing, or for any other reason.
>
> **Pausing Specific Ad Copies:** Brands can also pause individual ad copies within a creative while keeping the rest of the ad copies and creative active. This allows for granular control over which ads are being shown to the audience.
>
> **Editing Ad Copies**: Brands have the option to edit both the associated ad copies directly from the creative tab in the Adgebra dashboard. This enables brands to make changes to the content, messaging, targeting parameters, or any other aspect of the creative or ad copy as needed.
>
> By offering these management capabilities, Adgebra empowers brands to optimize their campaigns in real time, make necessary adjustments, and ensure that their ads are performing effectively to meet their campaign objectives.

**How does rotation happen for multiple creative/ad copies?**

> Adgebra, particularly with the use of AI-driven technology. Adgebra's AI-based ad rotation system plays a crucial role in ensuring that multiple creatives or ad copies are displayed fairly and effectively to users. Here's a summary of the key points you mentioned:
>
> **AI-Driven Ad Rotation**: Adgebra utilizes AI-driven technology to manage the rotation of creatives or ad copies within campaigns. This AI-based system analyzes various factors to determine how to distribute impressions among different creatives.
>
> **Random Rotation:** One method employed by Adgebra's AI is random rotation. This approach ensures that impressions are equally distributed among various creatives or ad copies within a campaign. By randomly selecting which creative to display, each one has an equal chance of being shown to users.
>
> **Real-Time Performance Optimization**: Adgebra's AI also optimizes ad rotation based on real-time performance metrics. This means that the system continuously evaluates the effectiveness of each creative and adjusts the rotation strategy accordingly. Creatives that perform well may receive more impressions to maximize campaign performance.
>
> overall, Adgebra's AI-driven ad rotation system combines random rotation with real-time performance optimization to ensure that brands achieve the best possible results from their campaigns. This approach helps to maximize engagement, improve ad relevance, and ultimately drive better outcomes for brands.

**How adgera translate English text in different regional languages?**

> Adgebra has a real-time translator integrated into the platform is a valuable asset, especially for brands looking to reach audiences across diverse linguistic backgrounds in India. By translating the English headlines of ad copies into over 10+ Indian languages, Adgebra enhances the accessibility and effectiveness of advertising campaigns by making them more relevant and engaging to users who prefer or are more comfortable with languages other than English.
>
> Adgebra has a professional language translators for each languages which ensures high-quality translations that accurately convey the intended message and maintain cultural nuances. This feature enables brands to effectively target specific linguistic groups and expand their reach in the Indian market.
>
> Overall, the real-time translator feature in Adgebra demonstrates a commitment to linguistic diversity and inclusivity, ultimately contributing to more impactful and successful advertising campaigns for brands on the platform.

**How to run language-specific ads?**

> The language targeting options provided by Adgebra offer brands a powerful tool to precisely target their ads to audiences based on language preferences. Allowing brands to run their ads on specific language sites enables them to tailor their messaging to resonate more effectively with users who speak or understand a particular language. This approach can significantly enhance ad relevance, and engagement, and ultimately drive better campaign performance.
>
> By leveraging language targeting options within their campaigns, brands can ensure that their ads are displayed on websites or platforms where the content is primarily in the desired language. This strategy not only improves the user experience by presenting ads in a language that users understand but also increases the likelihood of capturing their attention and driving desired actions such as clicks or conversions.
>
> Overall, Adgebra's language targeting options empower brands to reach their target audience more precisely and effectively by delivering ads in languages that resonate with users, ultimately maximizing the impact and ROI of their advertising efforts.

**How to add multiple creatives & ad copy in a single campaign?**

> Brands have the flexibility to include multiple creatives in their campaigns, with each creative capable of containing up to 10 ad copies. This feature allows brands to diversify their ad content and messaging within a single campaign, which can be beneficial for testing different variations, targeting specific audience segments, or showcasing various product features or offers.

**Is there an option to link a single creative to multiple campaigns?**

> Linking a single creative to multiple campaigns is a convenient feature offered by Adgebra, allowing brands to maximize the use of their creatives across various campaigns. This capability streamlines the management process for brands, enabling them to leverage a single creative asset effectively in multiple campaigns without the need to duplicate efforts or create redundant content.
>
> From the creative tab in the dashboard, brands can easily link a single creative to multiple campaigns under the same brand. This centralized control simplifies campaign management and ensures consistency in branding and messaging across different advertising initiatives

**What is the creative approval timeline?**

> Having a creative approval team with a ETA of 3-4 hours demonstrates Adgebra's commitment to timely and efficient processing of creatives and ad copies. This quick turnaround time is advantageous for brands as it minimizes delays in launching their campaigns and ensures that their ads go live promptly.

**What is the adcopy translation timeline?**

> Adgebra uses an AI-based queue management tool to handle translation requests and efficiently distribute them to different translators, Adgebra ensures a streamlined and organized workflow. Here are some key points highlighted:
>
> **Translation Request Management**: Adgebra's queue management tool effectively handles translation requests for ad copies in multiple or single languages. This centralized approach helps streamline the process and ensures that requests are managed systematically.
>
> **Translator Allocation:** The tool assigns translation tasks to different translators based on their language expertise and availability. This ensures that each translation request is assigned to a qualified professional capable of delivering accurate and high-quality translations.
>
> **Efficient Turn Around Time**: Adgebra aims to deliver translations within a reasonable timeframe, typically within 4-6 hours. This quick turnaround time enables brands to promptly access translated ad copies and proceed with their campaigns without significant delays. Dashboard Integration: Translated ad copies are seamlessly integrated into their respective ad copies.

**How to pause any single creative in the active campaign?**

> Yes, within the Adgebra dashboard, brands have the flexibility to manage their creatives and ad copies effectively. Here's how:
>
> **Pausing Creatives:** Brands can pause entire creatives if they want to temporarily halt the delivery of those ads. This could be useful for making adjustments, conducting A/B testing, or for any other reason. The creative can be paused from the creative tab, please note if creative is paused and that creative is linked to multiple campaigns then this would apply for all the linked campaigns as well.

**Does Adgebra support in making creatives?**

> Having a dedicated team to support brands in creating compelling and engaging creatives is a valuable service. This team can assist advertiser/brands ers in developing ad creatives that effectively communicate their brand message, capture the attention of their target audience, and drive desired actions such as clicks or conversions.
>
> By leveraging the expertise of Adgebra's creative team, brands can access professional assistance in crafting high-quality and visually appealing creatives that align with their campaign objectives and resonate with their target audience. Whether it's designing eye-catching visuals, writing persuasive ad copy, or optimizing creative elements for better performance, the creative team can provide valuable insights and recommendations to enhance the effectiveness of ad campaigns.
>
> The availability of such support underscores Adgebra's commitment to providing comprehensive solutions to brands, helping them achieve their advertising goals more effectively. Brands can reach out our sales team at [sales@inuxu.media ](mailto:sales@inuxu.media)to leverage the services.

**How many ad copies is possible to add in a single creative?**

> Brands have the flexibility to include multiple creatives in their campaigns, with each creative capable of containing up to 10 ad copies.

**How to get creative/adcopy-specific reports?**

> Yes, Brands have the flexibility to obtain creative or ad copy-specific reports. This can be get from the detailed analysis report in the reporting tab. This feature provides brands with valuable insights into the performance of their individual creatives or ad copies, enabling them to assess the effectiveness of their messaging, imagery, or other creative elements.


# Creative Specifications

Creative Specs are as follows:

<table data-view="cards"><thead><tr><th>Type</th><th>File Size</th><th>Image Size</th><th>Image Type</th></tr></thead><tbody><tr><td>Brand Logo</td><td>300 Kb</td><td>200x200</td><td>JPG, JPEG, PNG</td></tr><tr><td>Native Image</td><td>300 Kb</td><td>Min(1200x720) and Max(1920X1080)</td><td>JPG, JPEG, PNG</td></tr><tr><td>Display Image</td><td>150 Kb</td><td>320x50, 300x250 and 728x90</td><td>JPG, JPEG , PNG, GIF</td></tr><tr><td>Cuboid Image</td><td>300 Kb</td><td>Desktop : 200x200<br>Mobile : 150x150</td><td>JPG, JPEG, PNG</td></tr></tbody></table>

**Creative Guidelines:**

* Recommended Native Image Dimension: 1200x720 pixels with content size of 850x500 pixels.
* Images with a white background are strictly prohibited.
* The use of text on images is not permitted.
* The inclusion of a logo on the creative is allowed, and it should be positioned either at the top or bottom right. However, the image should not contain any Play/Pause buttons.
* The content guidelines prohibit the inclusion of skin shows, bikini-clad women, and any form of nudity, whether featuring men or women.
* Stretched / Shrink images are not allowed.
* Visuals featuring fat or flabby tummies are not allowed.
* The use of X-rays or visuals depicting body internals is not allowed.
* The visuals with a zoomed view of the body where the head is not present are not allowed.
* Visuals that specifically focus on a bald head are not allowed.
* Emphasizing specific features of faces, such as focusing on hair on the head, is prohibited
* Visuals portraying negative, angry, or depressed emotions are not permitted.
* For gaming creatives, it is required to include a disclaimer that states: " This game involves an element of financial risk and may be addictive.Please play responsibly and at your own risk." This disclaimer should occupy 20% of the space in the creative. Additionally, it is essential to ensurethat the same disclaimer is present on the landing page associated with the creative.

**Native Ad Copy Guidelines:**

* The maximum character limit for the ad copy, including special characters and spaces, is 80 characters. This applies to both English and other regional languages. Keep the content concise and within the specified limit for a good CTR.
* Title case is permitted for the ad copy within the specified character limit.
* Avoid making exaggerated or unrealistic promises in your content. This includes statements like "Lose 100 kg in 7 days without exercise" or "Lose 3 kg every day." The Adgebra guidelines emphasize refraining from making big or high promises that may be considered unrealistic or misleading.
* Steer clear of using repetitive words in your content. For instance, refrain from using repetitive terms like "Free Free." The Adgebra guidelines advise against the use of redundant or repeated language for better communication and user experience.
* Avoid excessive use of punctuation in your content. For instance, refrain from overusing punctuation marks like "Book Now!!!" The adgebra guidelines suggest maintaining a balanced and appropriate use of punctuation for clear and effective
* Utilize straightforward and uncomplicated language without incorporating jargon. The Adgebra guidelines emphasize the importance of using simple and easily understandable language to enhance communication clarity.
* For regional language translation needs, we adhere to an SLA of 2 business days. This implies that translations will be completed within this timeframe.

**Sample Native Creatives** :

![](https://cdn.adgebra.net/custom/html/Native_ad_specificaton_Page/img3.png)                                     ![](https://cdn.adgebra.net/custom/html/Native_ad_specificaton_Page/img4.png)

<figure><img src="https://cdn.adgebra.net/custom/html/Native_ad_specificaton_Page/specs.png" alt=""><figcaption></figcaption></figure>

<figure><img src="https://cdn.adgebra.net/custom/html/Native_ad_specificaton_Page/img2.png" alt=""><figcaption></figcaption></figure>


# Creative Tokens

### **Overview**

In Adgebra’s ad serving platform, adgebra provides a **dynamic token replacement** feature that allows advertisers to pass tracking or contextual information through their **Landing Page URLs (LPUs)** or **ad copy headlines**.\
This is useful for campaign analytics, attribution, personalization, and downstream tracking.

Advertisers can insert predefined tokens in the Landing Page URL of the ad copy. When the ad is rendered and clicked, Adgebra automatically replaces these tokens with actual values related to the ad request, click, or user context.

### **Purpose of Token Replacement**

* **Campaign & Creative Tracking:**\
  Identify the exact campaign, creative, and placement responsible for the traffic.
* **User Context Personalization:**\
  Pass user-specific data such as IP, location, or device type for personalization or attribution.
* **Performance Analytics:**\
  Enable accurate reporting of bid prices, conversion IDs, or referral sources.

### **How It Works**

1. **Token Insertion:**\
   While creating the ad copy in adding the LPU, the advertiser inserts tokens in the URL or content.
2. **Ad Rendering & Click:**\
   When a user views the ad, tokens remain untouched. When the user clicks, tokens in the LPU are **dynamically replaced** at runtime.
3. **Redirection:**\
   The user is redirected to the landing page with actual values substituted in the URL.

### **Supported Tokens**

| **Token**       | **Description**                                                                 | **Example Value**                 |
| --------------- | ------------------------------------------------------------------------------- | --------------------------------- |
| `${placement}`  | Placement or site name where the ad is served.                                  | `ONIN_oneindia.com_Web`           |
| `${creativeId}` | Unique ID of the creative being served.                                         | `12345`                           |
| `${campaignId}` | Campaign ID to identify the campaign.                                           | `7890`                            |
| `${brandId}`    | Brand ID associated with the ad.                                                | `456`                             |
| `${refURL}`     | Referrer URL or source page URL from where the ad was clicked.                  | `https://www.example.com/article` |
| `${IP}`         | User's IP address at the time of the click.                                     | `192.168.1.10`                    |
| `${Price}`      | Actual bid price (cpc) associated with the campaign at click time.              | `2.50`                            |
| `${langId}`     | Language name of the creative ad copy.                                          | `Hindi`                           |
| `${ConvId}`     | Unique Conversion ID generated for click tracking.                              | `IID_123421212222455`             |
| `${location}`   | User’s geo-location (city or region). Can be used in LPU or ad headline.        | `Mumbai`                          |
| `${device}`     | Device type from which the click occurred. Possible values: `Desktop`, `Mobile` | `Mobile`                          |

### **Example Use Case**

#### **Landing Page URL Before Replacement:**

```
https://www.example.com/landing?camp=${campaignId}&crid=${creativeId}&plc=${placement}&ip=${IP}&price=${Price}&city=${location}&dev=${device}
```

#### **Landing Page URL After Replacement:**

```
https://www.example.com/landing?camp=7890&crid=12345&plc=ONIN_oneindia.com_web&ip=192.168.1.10&price=0.0250&city=Mumbai&dev=Mobile
```

***

### **Use in Ad Copy Headline (Location Token)**

Advertisers can personalize **headlines** using `${location}` token.

#### **Example:**

**Headline Setup:**

```
Best Offers in ${location} - Shop Now!
```

**Rendered Headline (User in Pune):**

```
Best Offers in Pune - Shop Now!
```

### **Notes**

* **Case Sensitivity:** Tokens are **case-sensitive**. Use exactly as specified.
* **Encoding:** All replaced values are **URL-encoded** to ensure safe transmission.
* **Fallbacks:** If a value is unavailable, the token will be replaced with an empty string unless a fallback mechanism is set in the platform (optional).
* **Security:** Sensitive data, like IP, is shared based on compliance and agreements with the publisher/advertiser.


# Third-Party Impression Tracking

Creative Details

**OVERVIEW**

To verify and measure impressions from your ad campaign, you can apply third-party impression tracking tags to validate delivery using a trusted source. Adgebra supports tracking URLs sourced to enable real-time verification, viewability, and reach measurement.

Third-party 1x1 Impression Trackers: These are standard 1x1 pixel tags that can be used to track impressions in third-party platforms. They typically fire in real time and are used to verify ad delivery, viewability, or reach.

**SPECIFICATIONS**

We have implemented the third-party impression tracking system at the creative level. There are two options for implementation.

1\. Using the script-based tags.\
2\. Using the tracker URL.

Implementation :

For the implementation of third-party impression trackers, you will receive the trackers from the client and need to integrate it into our system.

Here, to implement the 3rd party impression trackers, you will need to add the code in the fields below.

1.) Impression Tracker\
2.) Impression Tracker URL.

**How to add the trackers**&#x20;

> **1.) Impression tracker:** You need to enter a third-party impression tracker in any of the following formats: img src, script or iframe. If client has not provided the tracker in any of the formats and just has provided the tracker URL. In that case you can append in below format. This will be used to track in the web inventory.\
> \
> Format : < img src="Enter the tracker URL">\
> \
> Example of how the final tags should look like :\
> \
> < img src="[https://bs.serving-sys.com/Serving/adServer.bs?cn=display\\\&c=19\\\&pli=1078778652\\\&gdpr=${GDPR}\\\&gdpr\\\_consent=${GDPR\\\_CONSENT\\\_68}\\\&adid=1089278347\\\&ord=\\\[timestamp\]">\\](https://bs.serving-sys.com/Serving/adServer.bs?cn=display\\\&c=19\\\&pli=1078778652\\\&gdpr=${GDPR}\\\&gdpr\\_consent=${GDPR\\_CONSENT\\_68}\\\&adid=1089278347\\\&ord=\\\[timestamp]">\\)
> \
> **2.) Impression Tracker URL** : Here you can enter the tracker URL for which you have received the client. In case if you have not received the URL and just have received the tags you can extract the URL from the tag and enter the URL in the field. This will be used to track in the push/app inventory.\
> \
> An example of URL should look like this: <https://bs.serving-sys.com/Serving/adServer.bs?cn=display\\&c=19\\&pli=1078778652\\&gdpr=${GDPR}\\&gdpr\\_consent=${GDPR\\_CONSENT\\_68}\\&adid=1089278347\\&ord=\\[timestamp]\\>
> \
> **You can add the third party impression tracker from creative>Ad copy>3p Tracker.**\
> \
> Attaching the screenshot for reference.

<figure><img src="/files/6QRC3QbNJC622Nda165N" alt=""><figcaption></figcaption></figure>

**Note**: both fields are mandatory to add the tracker. If you received the tracker in any one format, you will need to modify and add as per the above instructions.

**Validation**:

**Note**: both fields are mandatory to add to the tracker. If you received the tracker in any one format, you will need to modify and add as per the above instructions. \
\
1.)Open a site where your creative is serving.

\
2.)Open the inspector in Chrome using F12 or right-click>>inspect

\
3.)Go to network>>select filter>>search using the ID in the tracker URL or using the complete tracker URL that you have implemented for the creative.

<figure><img src="https://demo.adgebra.in/custom/html/Adgebra_Help_Center/Creative/images/1.2.png" alt=""><figcaption></figcaption></figure>

4\. Here in the screenshot below, you can see the tracker is firing and the status code is 200. If the tracker is not firing, you will not be able to see results in the search.

<figure><img src="https://demo.adgebra.in/custom/html/Adgebra_Help_Center/Creative/images/1.3.png" alt=""><figcaption></figcaption></figure>

\
5.)In case the trackers are not firing or getting 404 or 504 status codes, there might be an issue in implementation. In that case, you can connect to the tech team.


# Reports

**What are the different types of reports available for DIY accounts?**

Below are the few reports available for the DIY account users, that offer valuable insights into various aspects of campaign performance, enabling Brands to make informed decisions and optimize their advertising strategies.&#x20;

Here's a brief overview of each type of report:

* Placement Analysis&#x20;
* Detail Analysis&#x20;
* Trend Analysis
* Conversion Analysis<br>

**What are the different types of reports available for DIY Partners?**

Below are the few reports available for the DIY partner users, that offer valuable insights into various aspects of site performance, enabling partners to make informed decisions and optimize their sites accordingly.

Here's a brief overview of each type of report:

* Revenue Summary
* Widget Analysis


# Placement Analysis

Placement Analysis Report

**Placement Analysis Report**

These reports offer valuable insights that enable you to manage your ad delivery effectively across various placements, devices, and geographical locations. By analyzing this data, you can make informed decisions about optimizing your campaigns for better results. Additionally, provides you with the flexibility to manage your bid prices, ensuring that you can effectively balance your return on ad spend (ROAS) and campaign performance. By adjusting bid prices based on performance metrics and campaign objectives, you can maximize the effectiveness of your advertising efforts and achieve your desired outcome. This report is more into the optimization report where you can manage the bid price of placement/device/geo and also manage the blocking of placement/device/geo.

The **Placement Analysis Report** is designed to help users optimize their ad campaign performance across different levels of data granularity, allowing for more effective bid adjustments and blocking placements when necessary. The optimization process is divided into three hierarchical steps:

1. **Placement Analysis**
2. **Device Analysis**
3. **Geo Analysis**

Each step provides deeper insights into campaign performance, with specific actions available at each level.

#### *Step-by-Step Optimization Process*

**Step 1: Placement Analysis**

1. **Accessing the Report:**
   * Navigate to the **Campaign View** screen or from the dashboard under **Campaign Analysis**.
   * Select the **Report** tab.
2. **Placement-Level Analysis:**
   * Users are presented with a detailed overview of each **placement** where the campaign is delivering.
   * **Actions Available:**
     * **Bid Adjustment:** Increase or decrease the bid for specific placements. Note that bids cannot be lowered below the minimum bid value set by the campaign strategy.
     * **Blocking a Placement:** Block placements that are underperforming or irrelevant.
     * **Further Analysis Option:** For more detailed insights, users can click the **Report Icon** in the action menu for a specific placement. This will open **Device Analysis** for that placement (see Step 2).

<figure><img src="/files/kS9bgrXoPkBCCXG7tkiN" alt=""><figcaption><p>Placement Level Analysis</p></figcaption></figure>

**Step 2: Device Analysis**

1. **Running Device-Level Report:**
   * When users initiate the Device Analysis for a placement, it displays which **devices** the ad is being served on, along with performance data for each device.
2. **Device-Level Actions:**
   * **Bid Adjustment:** Users can modify bids specifically for each device associated with the placement. Note that bids cannot be lowered below the minimum bid value set by the campaign strategy.
   * **Device Blocking:** Users have the option to block the selected placement on specific devices.
   * **Further Analysis Option:** For more precise optimization, users can click the **Report Icon** in the action menu for a geo analysis of the selected placement and device combination. This initiates the **Geo Analysis** (see Step 3).

<figure><img src="/files/TWvFNwgx4Dzs3SwdLPYC" alt=""><figcaption><p>Device Analysis </p></figcaption></figure>

**Step 3: Geo Analysis**

1. **Running Geo-Level Report:**
   * After performing Device Analysis, users can click the report button to access **Geo Analysis** for the selected device.
2. **Geo-Level Data and Filters:**
   * Users can view geo-specific performance data, typically at the **state** level by default. The granularity can be adjusted to **country/state** or **city** using geo-filters from the reports fields.
3. **Geo-Level Actions:**
   * **Bid Adjustment:** Adjust bids specifically for the selected geography (country, state, or city). Minimum bid values apply. Note that bids cannot be lowered below the minimum bid value set by the campaign strategy.
   * **Geo-Based Blocking:** Users can block specific placements at a country, state, or city level, depending on the performance and relevance in those regions.

<figure><img src="/files/tjxRb8IyGaTI4GPrjc3A" alt=""><figcaption><p>Device analysis </p></figcaption></figure>

#### Summary&#x20;

The **Placement Analysis Report** allows users to methodically refine their campaign's effectiveness by analyzing placements at increasingly granular levels. This hierarchical approach gives users control over where and how ads are displayed, ensuring that bids and placements align closely with campaign goals. By following this optimization process, users can achieve better targeting and maximize return on ad spend, leveraging data-driven insights to make strategic bid and blocking adjustments across placements, devices, and geographic locations.

**How to block/unblock non-performing placements at the brand level?**

> In Adgebra, you have the option to block non-performing placements directly from the Placement Analysis report, which you can generate from the campaign view screen. Additionally, you can manage blocking and unblocking at the placement, device, or specific geographic levels as well.

Blocking of placement/device or geo(state or city level) all are possible from the campaign analysis from the dashboard or from the campaign view screen&#x20;

<figure><img src="/files/uqctdwIuNnODttsmOV0X" alt=""><figcaption><p>On click of report icon in the action button from campaign analysis or campaign view screen will redirect to the beloe placement analysis report where you can block the placement/device/geo.</p></figcaption></figure>

<figure><img src="/files/WjpZGxE7XbbpovkQTnSt" alt=""><figcaption><p>On click of the action button here you can block placement</p></figcaption></figure>

<figure><img src="/files/8Rz7td7IsDpIYoQghlKh" alt=""><figcaption><p>Here you can block placement/device/geo with these combination from placement analysis report.</p></figcaption></figure>

**How to unblock the placement/device or geo from the brand level?**

> Go the brand **view screen> Action button> View Blocking**<br>

<figure><img src="/files/dz6Pb6FsgesB1NMRSnM1" alt=""><figcaption><p><strong>Please note : The blocking icon will only be enabled when there is any blocking been applied to your brand.</strong> </p></figcaption></figure>

> Upon click of view blocking, you will able to see the list of placement/device/geo that are blocked for  your brand, by click of the unblock button here you will able to unblock the particular placement or its placement/device/geo combination.

<figure><img src="/files/kIwY7fHwyFE3na1XxjSE" alt=""><figcaption></figcaption></figure>

users can block placements at various levels to optimize their campaign performance and targeting. They can block entire placements, specific devices, or certain geographic locations where their campaign is serving. This level of control allows brands to refine their targeting and ensure their ads are being delivered to the most relevant audience, ultimately improving campaign effectiveness and ROI.

By implementing these strategies and closely monitoring your campaign performance, you can effectively avoid over-delivery and ensure that your ads are served within your budget limits.

**How to manage blocking of placement done at placement/geo/device level in the campaign?**

> In Adgebra, you indeed have the option to block non-performing placements directly from the Placement Analysis report, which can be generated from the campaign view screen. Furthermore, you can manage blocking and unblocking at the placement, device, or specific geographic levels. In the targeting tab within the campaign screen, you'll be able to view the blocking settings and make adjustments accordingly, including unblocking if necessary. This level of control allows brands to fine-tune their targeting and optimize campaign performance effectively.

**How to manage blocking at the campaign level or brand level?**

> In a placement analysis report, Brands typically have the ability to manage blocking settings at various levels to control where their ads appear. Here's how blocking can be managed:
>
> **Placement Level**: Brands can specify particular placements where they don't want their ads to appear. This could be specific websites, or apps. It allows brands to avoid placements that may not align with their brand values or audience preferences. Brands can only block the placements after the campaign is started delivering, you will need to keep track once the campaign is made live.
>
> **Device Level**: Brands can also choose to block their ads from appearing on specific types of devices. For example, brands may want to block only a desktop device for only a specific placement.
>
> **Geo Level:** Brands can also block their ads from appearing in specific geographic locations. This could be at the State and city level. For example, brands may block a specific geo state or city for a specific device/placement.
>
> By providing these blocking options, placement analysis reports empower brands to fine-tune their ad placements and ensure that their campaigns reach the right audience in the right context, maximizing effectiveness and ROI.
>
> Note: Placements/device/geo can be blocked at brand or campaign level.

**How to block non-performing geos (state/cities) for any campaign?**

> Yes, Brands can also block their ads from appearing in specific geographic locations. This could be at the State and city level. For example, brands may block a specific geo state or city for a specific device/placements.

**How to block nonperforming devices for any campaign?**

> Yes, Brands can also choose to block their ads from appearing on specific types of devices(Laptop/desktop, Mobile). For example, brands may want to block only a desktop device for a specific placement.

**How to block non-performing placements for any campaign?**

> Brands can specify particular placements where they don't want their ads to appear. This could be specific websites, or apps. It allows brands to avoid placements that may not align with their brand values or audience preferences. Brands can only block the placements after the campaign is started delivering, you will need to keep track once the campaign is made live.


# Detail Analysis

Detail Analysis Report

**Detail Analysis Report:**

This report provides comprehensive insights into the performance of ad campaigns, including metrics such as impressions, clicks, click-through rates (CTR), conversions, and more. It offers detailed breakdowns of performance by various dimensions such as geography, demographics, and devices. Brands can use this report to assess the effectiveness of their campaigns, identify areas for improvement, and make data-driven decisions to optimize their advertising efforts.

The **Detailed Analysis Report** is designed for an in-depth examination of campaign data, allowing users to view both current and historical data across multiple dimensions. This report provides various filtering options, enabling users to analyze performance metrics based on specific combinations of attributes such as brand, campaign, device, geography, and more. It closely resembles the **Campaign Summary** and **Targeting** views, with added flexibility for custom analyses.

<figure><img src="/files/ve6vOJITIVD7zSJCcZv2" alt=""><figcaption></figcaption></figure>

<mark style="background-color:orange;">**Please Note**</mark><mark style="background-color:orange;">:</mark> <mark style="background-color:orange;"></mark>*<mark style="background-color:orange;">**The date range selected in the report follows the GMT zone. Meaning, that all the numbers generated between 00:00 GMT to 24:00 GMT are shown against the selected date. The time range for different time zones can be different. For example, in IST, the numbers for a selected date are captured between 5:30 AM IST and to next day 5:30 AM IST.**</mark>*

**Key Filters and Options**

The report includes the following filter options, each with default settings and dependencies:

1. **Brand**
   * **Description:** Dropdown list of brands associated with the selected account.
   * **Default Value:** "ALL" (shows data across all brands).
2. **Campaign**
   * **Description:** Dropdown list of campaigns linked to the selected brand.
   * **Default Value:** "ALL" (shows data across all campaigns).
3. **Delivery Channel**
   * **Description:** Selection of the campaign’s delivery channel. For DIY accounts, the default delivery channel is **Native**.
   * **Default Value:** "Native".
4. **Strategy**
   * **Description:** Dropdown list of strategies available within the selected brand.
   * **Default Value:** "ALL" (shows data across all strategies).
5. **Device**
   * **Description:** Dropdown for device type, allowing users to filter data by device (e.g., laptop/desktop or mobile).
   * **Default Value:** "ALL" (includes all device types).
6. **Geo**
   * **Description:** Dropdown for geographic targeting, allowing users to filter data by location (Country, State, City).
   * **Default Value:** "ALL" (includes all geographic levels).
7. **Creative**
   * **Description:** Dropdown list of creatives associated with the selected campaign.
   * **Default Value:** "ALL" (shows data across all creatives).
8. **Ad Copy**
   * **Description:** Dropdown for ad copies under the selected creative, allowing for detailed analysis by specific ad copy.
   * **Default Value:** "ALL" (shows data across all ad copies).
9. **Placement**
   * **Description:** Dropdown list of placements within the campaign.
   * **Default Value:** "ALL" (shows data across all placements).
10. **Group By**
    * **Description:** Multi-select dropdown enabling users to organize and segment the data by multiple dimensions, such as Date, Device, Geo, brand, campaign, creative, ad copy etc.
    * **Default Value:** "Date".
    * **Details:** Users can select up to 3 dimensions to group the data. The data displayed in the table will adapt according to the selected values.
11. **Date Filter**
    * **Description:** Date selection dropdown for filtering data by specific date ranges.
    * **Default Value:** Current date.
    * **Details:** Users can select any date up to the current date to view historical data.

#### Using the Detailed Analysis Report

1. **Accessing the Report:**
   * Navigate to the **Detailed Analysis Report** section in the analytics dashboard.
   * The report view will be similar to the **Campaign Summary** and **Targeting** views, providing a familiar layout with added filtering flexibility.
2. **Selecting Filters:**
   * **Start with Brand and Campaign** filters to narrow down data at the campaign level.
   * Apply filters in other fields (such as Device, Geo, Creative, etc.) for a more focused analysis.
   * Use the **Group By** field to define up to three data dimensions for segmented views.
3. **Viewing Data by Custom Combinations:**
   * The report will adapt to the selected filters and **Group By** combinations, displaying data according to the selected hierarchy.
   * For example, grouping by **Date, Device, and Geo** will show a breakdown of campaign performance by each date, device, and geographic location.
4. **Exporting or Saving Views:**
   * Users can export or save specific filtered views for reporting purposes, enabling quick access to customized analysis in future sessions.

#### Best Practices

* **Leverage "Group By" Selections**: Use the multi-select "Group By" option to segment data by the most relevant dimensions for your analysis goals, such as device type or geographic region.
* **Use Date Filters for Trend Analysis**: Apply date filters to analyze trends over time, especially when tracking the impact of recent campaign adjustments.
* **Combine Filters for Granular Insights**: Applying multiple filters, such as Brand, Campaign, Device, and Geo, allows for deeper insights, making it easier to identify performance trends and areas for optimization.

#### Summary

The **Detailed Analysis Report** is an essential tool for users seeking a granular view of campaign performance across multiple dimensions. With customizable filters and grouping options, users can analyze data based on specific combinations of brand, campaign, device, geo, and more, allowing for data-driven decision-making and precise targeting adjustments.


# Trend Analysis

Trend Analysis Report

The **Trend Analysis Report** provides users with a time-based view of campaign performance, allowing detailed analysis of data by **hour**. This report enables users to analyze trends over the last 24 hours, current data, or historical data, offering flexibility to assess performance patterns at a granular, hourly level. This feature is especially useful for identifying peak engagement times, understanding audience behavior, and making timely adjustments to optimize campaign performance.

#### Key Features and Functionality

1. **Data Timeframe Options**:
   * **24-Hour Data**: Analyze performance over the past 24 hours, providing a snapshot of the most recent activity and trends.
   * **Current Data**: View up-to-the-moment performance data, giving real-time insights to enable quick adjustments.
   * **Past Date Data**: Select specific past dates to review hourly data, which helps in understanding long-term trends or comparing performance across days.
2. **Time Format**:
   * The data is organized and displayed **by the hour**, allowing users to view performance trends for each hour within the selected date range.
   * This format enables the identification of high and low engagement times, helping in decision-making around ad scheduling and bid adjustments.

<figure><img src="/files/mH2PDbuRuwdPK3BeSqC4" alt=""><figcaption><p>Trend Analysis</p></figcaption></figure>

<mark style="background-color:orange;">**Please Note**</mark><mark style="background-color:orange;">:</mark> <mark style="background-color:orange;"></mark>*<mark style="background-color:orange;">**The date range selected in the report follows the GMT zone. Meaning, that all the numbers generated between 00:00 GMT to 24:00 GMT are shown against the selected date. The time range for different time zones can be different. For example, in IST, the numbers for a selected date are captured between 5:30 AM IST and to next day 5:30 AM IST.**</mark>*

**Key Filters and Options**

The report includes the following filter options, each with default settings and dependencies:

1. **Time**
   * **Description:** Dropdown list of time associated with the selected account.
   * **Default Value:** "ALL" (shows data across all time).
   * 00 hr represents 5:30-6:30 and so on.
2. **Brand**
   * **Description:** Dropdown list of brands associated with the selected account.
   * **Default Value:** "ALL" (shows data across all brands).
3. **Campaign**
   * **Description:** Dropdown list of campaigns linked to the selected brand.
   * **Default Value:** "ALL" (shows data across all campaigns).
4. **Delivery Channel**
   * **Description:** Selection of the campaign’s delivery channel. For DIY accounts, the default delivery channel is **Native**.
   * **Default Value:** "Native".
5. **Strategy**
   * **Description:** Dropdown list of strategies available within the selected brand.
   * **Default Value:** "ALL" (shows data across all strategies).
6. **Device**
   * **Description:** Dropdown for device type, allowing users to filter data by device (e.g., laptop/desktop or mobile).
   * **Default Value:** "ALL" (includes all device types).
7. **Geo**
   * **Description:** Dropdown for geographic targeting, allowing users to filter data by location (Country, State, City).
   * **Default Value:** "ALL" (includes all geographic levels).
8. **Creative**
   * **Description:** Dropdown list of creatives associated with the selected campaign.
   * **Default Value:** "ALL" (shows data across all creatives).
9. **Ad Copy**
   * **Description:** Dropdown for ad copies under the selected creative, allowing for detailed analysis by specific ad copy.
   * **Default Value:** "ALL" (shows data across all ad copies).
10. **Placement**
    * **Description:** Dropdown list of placements within the campaign.
    * **Default Value:** "ALL" (shows data across all placements).
11. **Group By**
    * **Description:** Multi-select dropdown enabling users to organize and segment the data by multiple dimensions, such as Date, Device, Geo, brand, campaign, creative, ad copy etc.
    * **Default Value:** "Date".
    * **Details:** Users can select up to 3 dimensions to group the data. The data displayed in the table will adapt according to the selected values.
12. **Date Filter**
    * **Description:** Date selection dropdown for filtering data by specific date ranges.
    * **Default Value:** Current date.
    * **Details:** Users can select any date up to the current date to view historical data.

#### Using the Trend Analysis Report

1. **Accessing the Report**:
   * Open the **Trend Analysis Report** from the analytics dashboard.
   * Choose the desired **timeframe** (24-hour, current, or past date).
2. **Applying Filters**:
   * Select the relevant filters, starting with Brand and Campaign, to narrow down data to specific segments.
   * Use other filters (Device, Geo, Creative, etc.) to further focus the analysis on specific dimensions.
3. **Viewing Data Hourly**:
   * The report will display data in hourly increments based on the selected date range.
   * This layout allows for easy identification of engagement patterns across different hours of the day.
4. **Interpreting Trends**:
   * Use the hourly breakdown to assess when performance peaks and troughs occur.
   * Leverage these insights to adjust bid strategies, ad scheduling, or target audience settings for optimal results.

#### Best Practices

* **Analyze Peaks and Valleys**: Identify peak hours when audience engagement is high, and consider increasing bids or ad frequency during these times.
* **Use Past Data for Comparison**: When analyzing current data, refer to past dates to compare and understand seasonal or campaign-specific trends.
* **Optimize Ad Scheduling**: Use hourly data to adjust campaign schedules, ensuring ads are shown during high-engagement hours while reducing spend during off-hours.

#### Summary

The **Trend Analysis Report** enables users to perform hourly analysis of campaign performance, using 24-hour, current, or past date data. With various filtering options, users can gain detailed insights into when their campaigns are most effective, allowing for data-driven adjustments that optimize ad reach and engagement throughout the day.


# Conversion Analysis

Conversion Summary Report

The **Conversion Summary Report** provides a detailed view of campaign conversions, offering insights into how well campaigns are achieving desired outcomes across various dimensions, such as brand, campaign, device, and geo-targeting. This report builds on the existing **Conversion Report**, with additional filters to allow for more refined analysis.

This report is specifically helpful for users who need to monitor conversions across different segments and attributes, enabling data-driven optimizations.

The **Conversion Report** provides comprehensive insights into conversion events, allowing users to view specific details about each conversion. This report includes detailed information on the **Device**, **IP Address**, **Geographic Location** (Country, State, City), and unique identifiers for **Campaign**, **Creative**, and **Placement**. By examining these details, users can better understand the origins and specifics of each conversion, enabling more targeted campaign optimizations.

#### Conversion Details Fields

In the **Conversion Report**, users can view the following details for each conversion:

1. **Device**:
   * **Description**: Indicates the device type (e.g., laptop/desktop, mobile) from which the conversion was received.
   * **Purpose**: Helps users analyze performance across different device types, assisting in device-specific optimization strategies.
2. **IP Address**:
   * **Description**: Shows the IP address associated with each conversion event.
   * **Purpose**: Allows for tracking of unique IP addresses to identify potential user patterns or regions of high activity.
3. **Country**:
   * **Description**: Displays the country where the conversion occurred.
   * **Purpose**: Enables geographical analysis at the country level, allowing users to assess performance across different regions.
4. **State**:
   * **Description**: Shows the state or province associated with the conversion.
   * **Purpose**: Provides a more granular view within a country, aiding in regional targeting or bid adjustments.
5. **City**:
   * **Description**: Indicates the city where the conversion took place.
   * **Purpose**: Offers an even more detailed geographic breakdown, useful for hyper-local targeting and city-specific analysis.
6. **Campaign ID (Ca\_id)**:
   * **Description**: Unique identifier for the campaign that generated the conversion.
   * **Purpose**: Allows for tracking and analysis at the campaign level to determine which campaigns are driving the most conversions.
7. **Creative ID (Cr\_id)**:
   * **Description**: Unique identifier for the creative that led to the conversion.
   * **Purpose**: Helps in identifying high-performing creatives, enabling optimization of creative assets for improved conversion rates.
8. **Placement ID (Pl\_id)**:
   * **Description**: Unique identifier for the placement where the conversion occurred.
   * **Purpose**: Provides insight into which placements are most effective in driving conversions, and supporting placement-level optimization.

<figure><img src="/files/7VPgIwwRsnLFwJPaZj8y" alt=""><figcaption><p>Conversion Analysis</p></figcaption></figure>

<mark style="background-color:orange;">**Please Note**</mark><mark style="background-color:orange;">:</mark> <mark style="background-color:orange;"></mark>*<mark style="background-color:orange;">**The date range selected in the report follows the GMT zone. Meaning, that all the numbers generated between 00:00 GMT to 24:00 GMT are shown against the selected date. The time range for different time zones can be different. For example, in IST, the numbers for a selected date are captured between 5:30 AM IST and to next day 5:30 AM IST.**</mark>*

**Key Filters and Options**

The report includes the following filter options, each with default settings and dependencies:

1. **Brand**
   * **Description:** Dropdown list of brands associated with the selected account.
   * **Default Value:** "ALL" (shows data across all brands).
2. **Campaign**
   * **Description:** Dropdown list of campaigns linked to the selected brand.
   * **Default Value:** "ALL" (shows data across all campaigns).
3. **Strategy**
   * **Description:** Dropdown list of strategies available within the selected brand.
   * **Default Value:** "ALL" (shows data across all strategies).
4. **Device**
   * **Description:** Dropdown for device type, allowing users to filter data by device (e.g., laptop/desktop or mobile).
   * **Default Value:** "ALL" (includes all device types).
5. **Creative**
   * **Description:** Dropdown list of creatives associated with the selected campaign.
   * **Default Value:** "ALL" (shows data across all creatives).
6. **Ad Copy**
   * **Description:** Dropdown for ad copies under the selected creative, allowing for detailed analysis by specific ad copy.
   * **Default Value:** "ALL" (shows data across all ad copies).
7. **Placement**
   * **Description:** Dropdown list of placements within the campaign.
   * **Default Value:** "ALL" (shows data across all placements).
8. **Date Filter**
   * **Description:** Date selection dropdown for filtering data by specific date ranges.
   * **Default Value:** Current date.
   * **Details:** Users can select any date up to the current date to view historical data.

#### Using the Conversion Summary Report

1. **Accessing the Report**:
   * Open the **Conversion Summary Report** from the analytics dashboard.
   * The report will display a familiar layout similar to the **Conversion Report**, with the added filtering options for customization.
2. **Selecting Filters**:
   * Start with the **Brand** and **Campaign** fields to filter data by specific campaigns.
   * Use additional filters such as **Device**, **Geo**, **Creative**, etc., to drill down further and refine the data shown.
3. **Viewing Conversion Data**:
   * The data will be displayed based on the filters applied, providing insights into conversion performance across selected attributes.
   * Users can see specific metrics such as conversion rates, cost per conversion, and total conversions, broken down by the selected filter criteria.

#### Best Practices

* **Use Multiple Filters for Focused Analysis**: Apply combinations of Brand, Campaign, Device, and Geo filters to analyze conversions in specific segments and pinpoint the best-performing elements.
* **Compare Creatives and Ad Copies**: Using the **Creative** and **Ad Copy** filters can help in assessing which creatives or ad copies are most effective in driving conversions.
* **Monitor Conversions Across Devices**: Filtering by **Device** allows for an understanding of how conversions differ between mobile and desktop audiences, which can guide device-specific bid and strategy adjustments.

#### Summary

The **Conversion Summary Report** provides a refined view of conversion performance, with additional filters that allow for detailed analysis by brand, campaign, device, geo, and more. This report enables users to focus on specific segments of their campaigns, helping to identify trends and make informed decisions that optimize conversion outcomes.

This targeted approach to conversion analysis ensures that campaigns are well-aligned with performance goals, driving meaningful results across various channels and segments.


# Widget Analysis

Widget Analysis Report

The Widget Analysis Report provides insights into the performance of templates currently applied on a website. Users can filter and view detailed reports based on several criteria, allowing for targeted analysis.

#### Overview

The Widget Analysis report includes various filtering fields to customize the data displayed in the report. Each field provides specific filtering options to refine the report’s focus, from partner selection to device type.

<figure><img src="/files/FUiaeTbsxetHOQQ61Noh" alt=""><figcaption><p>Widget Analysis</p></figcaption></figure>

#### Field Descriptions and Functionality

1. **Partner**
   * **Description**: Lists all available partners to filter the report data.
   * **Default Selection**: ALL
2. **Placement**
   * **Description**: Displays placement options specific to the selected partner.
   * **Default Selection**: ALL
3. **Site**
   * **Description**: Shows the list of sites associated with the selected partner.
   * **Default Selection**: ALL
4. **Delivery Channel**
   * **Description**: Lists available delivery channels for a campaign.
   * **Default Selection**: ALL
5. **Delivery Type**
   * **Description**: Displays delivery types available for a campaign.
   * **Default Selection**: ALL
6. **Device**
   * **Description**: Provides options to filter by device type (e.g., Laptop/Desktop or Mobile).
   * **Default Selection**: ALL
7. **Time From**
   * **Description**: Allows users to set the start time of the data to be filtered. Users can select from a 24-hour range (01-24).
   * **Default Selection**: ALL
8. **Time To**
   * **Description**: Allows users to set the end time for filtering the data. This field also provides a 24-hour range (01-24).
   * **Default Selection**: ALL
9. **Group By**
   * **Description**: Users can select up to three criteria to group the report data. Each selected grouping option organizes data to highlight unique perspectives in the table.
   * **Options**: Example grouping values include "Template," "Partner," "Device," etc.
   * **Default Selection**: Template
   * **Maximum Selections**: 3


# Translation Summary

Translation Summary Report

The Translation Summary Report provides insights into translations completed for various ad copies, helping users review the number of translations and associated details for each account, brand, and campaign.

#### Overview

This report includes multiple filtering fields that allow users to view data specific to their needs, such as account, brand, campaign, and more. Each field provides different filtering options to narrow down the data and enhance the report’s relevance.

<figure><img src="/files/FUiaeTbsxetHOQQ61Noh" alt=""><figcaption><p>Widget Analysis</p></figcaption></figure>

#### Field Descriptions and Functionality

1. **Language**
   * **Description**: Preselected with the translator’s language; for example, if the translator is Hindi, the Language dropdown will automatically select Hindi, and no other languages will appear in the list.
   * **Default Setting**: Translator's language only
2. **Date**
   * **Description**: Filters the report based on selected dates, showing translation data within the specified date range.
3. **Group By**
   * **Description**: Allows users to group data by up to three criteria. Each selected criterion organizes data in the report table for targeted analysis.
   * **Options**: Options include "Date," "Language," and "Type."
   * **Default Selection**: Date
   * **Maximum Selections**: 3


# Partner API Report

Partner Api Reports

### Adgebra Partner Report Api Integration Guidelines

The Adgebra Report API integration guidelines will be able to fetch numbers from adgebra reports in real-time by sending the required parameters in an API call. In response, adgebra will send data as per the below-mentioned format.

### API Format&#x20;

1. ### Request Format:

{% code overflow="wrap" %}

```html
https://adgebra.co.in/pssreport/GetPSSReportWS?p1=[PartnerID]&p2=[Date]&p3=[SiteName]&p4=[Uniwque-Pin]&p7=[Geo]&p8=[Currency]
```

{% endcode %}

**Request Parameters :**

{% code overflow="wrap" %}

```json
p1: This parameter is the Partner ID of which the reports need to be fetched ex:'432'.Here you will need to enter your unique partner id.
p2: This Parameter is the date of the report that needs to be fetched. The Date format for this field is "DD-MMM-YYYY" Ex: 01-Nov-2023
p3: This parameter represents the site name. The default is 'all'. If you need data on any particular site you can enter the site name in the p3 parameter.
p4: This Parameter is the unique pin associated with the partner. Here you need to contact your partner manager to get the unique pin. Ex : z8Sgxc82Mnxrb9me
p7: This Parameter is the Geo field. The default is 'All'. Hence your report will be shown for all geos. Removing this parameter will run the reports by site instead of geo.
p8: This parameter is the currency format that you wish to fetch in the report. The default is 'USD'. You cannot change it to any other currency at this time.
```

{% endcode %}

**Request Example:**

{% code overflow="wrap" %}

```html
https://adgebra.co.in/pssreport/GetPSSReportWS?p1=490&p2=02-Nov-2023&p3=all&p4=z8Sgxc82Mnxrb9r3&p7=all&p8=usd
```

{% endcode %}

2. ### Response Format:

{% code overflow="wrap" %}

```json
{
  "Site_Device": [
    {
      "Geo": "[Country]",
      "CTR": "[Count]",
      "Rev": "[Count]",
      "Impression": "[Count]",
      "Clicks": "[Count]"
    }
  ],
```

{% endcode %}

**Response Example:**

{% code overflow="wrap" %}

```json
{
  prfd-sarkaryojana.in_Mobile": [
    {
      "Geo": "Bahrain",
      "CTR": "0.00",
      "Rev": "0.00",
      "Impression": "9",
      "Clicks": "0"
    },
    {
      "Geo": "India",
      "CTR": "0.21",
      "Rev": "2.65",
      "Impression": "176608",
      "Clicks": "364"
    },
    {
      "Geo": "Kuwait",
      "CTR": "0.00",
      "Rev": "0.00",
      "Impression": "109",
      "Clicks": "0"
    },
    {
      "Geo": "Oman",
      "CTR": "0.00",
      "Rev": "0.00",
      "Impression": "19",
      "Clicks": "0"
    },
    {
      "Geo": "United Arab Emirates",
      "CTR": "0.00",
      "Rev": "0.00",
      "Impression": "142",
      "Clicks": "0"
    },
    {
      "Geo": "Qatar",
      "CTR": "0.00",
      "Rev": "0.00",
      "Impression": "44",
      "Clicks": "0"
    }
  ],
  "prfd-biharhelp.in_Mobile": [
    {
      "Geo": "Pakistan",
      "CTR": "0.00",
      "Rev": "0.00",
      "Impression": "1",
      "Clicks": "0"
    },
    {
      "Geo": "India",
      "CTR": "0.13",
      "Rev": "4.91",
      "Impression": "496712",
      "Clicks": "643"
    },
}
```

{% endcode %}

#### Note:

1. At any point in time, if the response is blank or invalid, then it should be handled at the client's end.
2. At times when planned/unplanned adgebra maintenance activity may be scheduled.
3. If any reponse is blank, please check the values entered in the parameters. The response will also be blank in case there is no data.


# Partner Widget API Report

Adgebra Partner Widget Report Api Integration Guidelines

### Adgebra Partner Report Api Integration Guidelines

The Adgebra Partner widget Report API integration guidelines will be able to fetch numbers from Adgebra Partner widget reports in real time by sending the required parameters in an API call. In response, adgebra will send data as per the below-mentioned format

### Widget API Format <a href="#h.uu0ibjf34ptc_l" id="h.uu0ibjf34ptc_l"></a>

1. ### Request Format:

{% code overflow="wrap" %}

```html
https://adgebra.co.in/pssreport/GetPSSReportWS?p1=[PartnerID]&p2=[Date]&p3=[SiteName]&p4=[Uniwque-Pin]&p7=[Geo]&p8=[Currency]&p9=1
```

{% endcode %}

**Request Parameters :**

{% code overflow="wrap" %}

```json
p1: This parameter is the Partner ID of which the reports need to be fetched ex:p1=Partner Id of which the reports need to be fetched ex:'432'.

p2: This Parameter is the date of the report that needs to be fetched. The Date format for this field is "DD-MMM-YYYY". Ex: 01-Nov-2023

p3: This parameter represents the site name. The default is 'all'. If you need data on any particular site, you can enter the site name in the p3 parameter. Please note site names need to be entered the same as whitelisted in adgebra.

p4: This Parameter is the unique PIN associated with the partner. Here, you need to contact your partner manager to get the unique PIN. Ex: z8Sgxc82Mnxrb9me

p7: This Parameter is the Geo field. The default is 'All'. Hence, your report will be shown for all geos. Removing this parameter will run the reports by site instead of geo.

p8: This parameter is the currency format that you wish to fetch in the report. The default is 'USD'. You cannot change it to any other currency as of now.

p9: This parameter Fetches widget-wise reporting data.(default value as: 1) to fetch reports per widget.
```

{% endcode %}

**Request Example:**

{% code overflow="wrap" %}

```html
https://adgebra.co.in/pssreport/GetPSSReportWS?p1=490&p2=02-Nov-2023&p3=all&p4=z8Sgxc82Mnxrb9r3&p7=all&p8=usd&p9=1
```

{% endcode %}

2. ### Response Format:

{% code overflow="wrap" %}

```json
{
  "Site_Device": [
    {
      "Geo": "[Country]" // If p7=all, return geo-wise breakdown, else this field will not be shown.
      "Template": "[Template Name]",
      "CTR": "[Count]",
      "Revenue": "[Count]",  Only widget-specific revenue
      "Impression": "[Count]",  // Only widget-specific impressions
      "Clicks": "[Count]",  // Only unique clicks count.
      "eCPM:"[Count]", Only widget-specific ecpm
    }
  ]
}
```

{% endcode %}

**Response Example:**

{% code overflow="wrap" %}

```json
{
   "prfd-sarkaryojana.in_Mobile": [
    {
      "Geo": "India"
      "Template": "8243_880x1260_Ocean_English",
      "CTR": "0.45",
      "Revenue": "5.75",
      "Impression": "500",
      "Clicks": "225",
      "eCPM: "0.12",
    },
    {
      "Geo": "Indonesia",
      "Template": "8243_880x1260_Ocean_English",
      "CTR": "0.00",
      "Rev": "0.00",
      "Impression": "30",
      "Clicks": "0"
      "eCPM: "0.12",
    },
  ],

"pwco-outlookbusiness.com_Laptop": [
    {
      "Geo": "Bahrain",
      "Template": "8252_750x270_Infeed_English",
      "CTR": "0.00",
      "Rev": "0.00",
      "Impression": "30",
      "Clicks": "0"
      "eCPM: "0.12",
    },
]
}
```

{% endcode %}

Example Response without p7 value, if you remove the p7 value from api, below is a sample response that will be shown without geos.

{% code overflow="wrap" %}

```json
{
  "prfd-sarkaryojana.in_Mobile": [
    {
      "Template": "8243_880x1260_Ocean_English",
      "CTR": "0.45",
      "Revenue": "5.75",
      "Impression": "500",
      "Clicks": "225",
    },
    {
      "Template": "Unknown",
      "CTR": "0.00",
      "Rev": "0.00",
      "Impression": "30",
      "Clicks": "0"
      "eCPM: "0.12",
    },
  ],
"pwco-outlookbusiness.com_Laptop": [
    {
      "Template": "8252_750x270_Infeed_English",
      "CTR": "0.00",
      "Rev": "0.00",
      "Impression": "30",
      "Clicks": "0"
      "eCPM: "0.12",
    },
    {
      "Template": "Unknown",
      "CTR": "0.00",
      "Rev": "0.00",
      "Impression": "30",
      "Clicks": "0"
      "eCPM: "0.12",
    },
]
}
```

{% endcode %}

#### Note:

1. At any point in time, if the response is blank or invalid, then it should be handled at the client's end.
2. At times, when planned/unplanned adgebra maintenance activity may be scheduled.
3. If any reponse is blank, please check the values entered in the parameters. The response will also be blank in case there is no data.


# Partner Slot ID API Report

Adgebra Partner Slot ID Report Api Integration Guidelines

### Adgebra Partner Slot Id Report Api Integration Guidelines

The Adgebra Partner SLOT ID Report API integration guidelines will be able to fetch numbers from Adgebra Partner SLOT ID reports in real time by sending the required parameters in an API call. In response, adgebra will send data as per the below-mentioned format

### SLOT ID API Format :

1. ### Request Format:

{% code overflow="wrap" %}

```html
https://adgebra.co.in/pssreport/GetPSSReportWS?p1=[PartnerID]&p2=[Date]&p3=[SiteName]&p4=[Uniwque-Pin]&p7=[Geo]&p8=[Currency]&p10=1
```

{% endcode %}

**Request Parameters :**

{% code overflow="wrap" %}

```json
p1: This parameter is the Partner ID of which the reports need to be fetched ex:p1=Partner Id of which the reports need to be fetched ex:'432'.

p2: This Parameter is the date of the report that needs to be fetched. The Date format for this field is "DD-MMM-YYYY". Ex: 01-Nov-2023

p3: This parameter represents the site name. The default is 'all'. If you need data on any particular site, you can enter the site name in the p3 parameter. Please note site names need to be entered the same as whitelisted in adgebra.

p4: This Parameter is the unique PIN associated with the partner. Here, you need to contact your partner manager to get the unique PIN. Ex: z8Sgxc82Mnxrb9me

p7: This Parameter is the Geo field. The default is 'All'. Hence, your report will be shown for all geos. Removing this parameter will run the reports by site instead of geo.

p8: This parameter is the currency format that you wish to fetch in the report. The default is 'USD'. You cannot change it to any other currency as of now.

p9: This parameter Fetches widget-wise reporting data.(default value as: 1) to fetch reports per widget.

p10: This parameter fetches SLOT ID-wise reporting data. (default value as: 1) to fetch reports per the slot ID passed by the partner.

```

{% endcode %}

**Request Example:**

{% code overflow="wrap" %}

```html
https://adgebra.co.in/pssreport/GetPSSReportWS?p1=490&p2=02-Nov-2023&p3=all&p4=z8Sgxc82Mnxrb9r3&p7=all&p8=usd&p9=1
```

{% endcode %}

2. ### Response Format:

Sample Request: <https://adgebra.co.in/pssreport/GetPSSReportWS?p1=490\\&p2=02-Nov-2023\\&p3=all\\&p4=z8Sgxc82Mnxrb9r3\\&p8=usd\\&p10=1>

{% code overflow="wrap" %}

```json
  "Site_Device": [
    {
      "Slot ID": "[Slot Value]", // Passed by the publisher
      "CTR": "[Count]", CLick Through Rate
      "Revenue": "[Count]",  Only slot pecific revenue
      "Impression": "[Count]",  // Only Slot specific impressions
      "Clicks": "[Count]",  // Only unique clicks count.
      "eCPM:"[Count]", Only Slot Specific ecpm
    }
  ]
}
```

{% endcode %}

**Response Example:**

{% code overflow="wrap" %}

```json
{
  "prfd-sarkaryojana.in_Mobile": [
    {
      "Slot": "Gamezoof1",
      "CTR": "0.45",
      "Revenue": "5.75",
      "Impression": "500",
      "Clicks": "225",
       "eCPM: "0.12",
    },
    {
     "Slot": "Gamezoof2",
      "CTR": "0.00",
      "Rev": "0.00",
      "Impression": "30",
      "Clicks": "0"
      "eCPM: "0.12",
    },
  ],
"pwco-outlookbusiness.com_Laptop": [
    {
      "Slot": "Gamezoof3",
      "CTR": "0.00",
      "Rev": "0.00",
      "Impression": "30",
      "Clicks": "0"
      "eCPM: "0.12",
    },
]
}
```

{% endcode %}

### 3. Response Format: If any partner wants to fetch the report by slot id and geo

Sample Request <https://adgebra.co.in/pssreport/GetPSSReportWS?p1=490&p2=02-Nov-2023&p3=all&p4=z8Sgxc82Mnxrb9r3&p7=all&p8=usd&p10=1>

{% code overflow="wrap" %}

```json
 "Site_Device": [
    {
      "Geo": "[Country]" // If p7=all, return geo-wise breakdown, else this field will not be shown.
      "Slot ID": "[Slot Value]", // Passed by the publisher
      "CTR": "[Count]", CLick Through Rate
      "Revenue": "[Count]",  Only slot pecific revenue
      "Impression": "[Count]",  // Only Slot specific impressions
      "Clicks": "[Count]",  // Only unique clicks count.
      "eCPM:"[Count]", Only Slot Specific ecpm
    }
  ]
}
```

{% endcode %}

**Response Example:**

{% code overflow="wrap" %}

```json
{
  "prfd-sarkaryojana.in_Mobile": [
    {
      "Geo": "India"
      "Slot": "Gamezoof1",
      "CTR": "0.45",
      "Revenue": "5.75",
      "Impression": "500",
      "Clicks": "225",
       "eCPM: "0.12",
    },
    {
      "Geo": "Indonesia",
      "Slot": "Gamezoof2",
      "CTR": "0.00",
      "Rev": "0.00",
      "Impression": "30",
      "Clicks": "0"
      "eCPM: "0.12",
    },
  ],
"pwco-outlookbusiness.com_Laptop": [
    {
      "Geo": "Bahrain",
      "Slot": "Gamezoof3",
      "CTR": "0.00",
      "Rev": "0.00",
      "Impression": "30",
      "Clicks": "0"
      "eCPM: "0.12",
    },
]
}
```

{% endcode %}

**Example Response without p7 and p9 value, if you remove the p7 value from api, below is a sample response that will be shown without geos.**\
\
Sample Request: <https://adgebra.co.in/pssreport/GetPSSReportWS?p1=490\\&p2=02-Nov-2023\\&p3=all\\&p4=z8Sgxc82Mnxrb9r3\\&p8=usd\\&p10=1>

{% code overflow="wrap" %}

```json
{
  "prfd-sarkaryojana.in_Mobile": [
    {
      "Slot": "Gamezoof4",
      "CTR": "0.45",
      "Revenue": "5.75",
      "Impression": "500",
      "Clicks": "225",
    },
    {
      "Slot": "Gamezoof5",
      "CTR": "0.00",
      "Rev": "0.00",
      "Impression": "30",
      "Clicks": "0"
      "eCPM: "0.12",
    },
  ],
"pwco-outlookbusiness.com_Laptop": [
    {
      "Slot": "Gamezoof6",
      "CTR": "0.00",
      "Rev": "0.00",
      "Impression": "30",
      "Clicks": "0"
      "eCPM: "0.12",
    },
    {
      "Slot": "Gamezoof7",
      "CTR": "0.00",
      "Rev": "0.00",
      "Impression": "30",
      "Clicks": "0"
      "eCPM: "0.12",
    },
]
}
```

{% endcode %}

**Example Response with p9=1 and p10=1 value, data will be shown by the widget and slot**

Sample Request: <https://adgebra.co.in/pssreport/GetPSSReportWS?p1=198\\&p2=25-Jun-2025\\&p3=esakal.com\\&p4=uRcgiSYu2k\\&p8=usd\\&p9=1\\&p10=1>

{% code overflow="wrap" %}

```json
{
  "prfd-sarkaryojana.in_Mobile": [
    {
      "Template": "8246_Home_Sec_Page_Sakal_GRP_Marathi",
      "Slot": "Gamezoof4",
      "CTR": "0.45",
      "Revenue": "5.75",
      "Impression": "500",
      "Clicks": "225",
    },
    {
      "Template": "46_Marathi",
      "Slot": "Gamezoof5",
      "CTR": "0.00",
      "Rev": "0.00",
      "Impression": "30",
      "Clicks": "0"
      "eCPM: "0.12",
    },
  ],
"pwco-outlookbusiness.com_Laptop": [
    {      "Template": "82_Marathi",
      "Slot": "Gamezoof6",
      "CTR": "0.00",
      "Rev": "0.00",
      "Impression": "30",
      "Clicks": "0"
      "eCPM: "0.12",
    },
    {
      "Template": "82GRP_Marathi",      "Slot": "Gamezoof7",
      "CTR": "0.00",
      "Rev": "0.00",
      "Impression": "30",
      "Clicks": "0"
      "eCPM: "0.12",
    },
]
}
```

{% endcode %}

#### Note:

1. If any partner is passing a slot ID dynamically, please ensure that it does not contain any special characters other than hyphen (-), underscore (\_), period (.), or tilde (\~). The slot ID data log only accepts letters, digits, and the aforementioned characters.
2. If any reponse is blank, please check the values entered in the parameters. The response will also be blank in case there is no data.


# Publisher

Adgebra Publisher Information

#### Introduction: Better Engagement, Better Earnings

Adgebra is designed to help publishers maximize revenue through smarter ad placements and tailored content. By matching the ad language to the language of your site or blog content, Adgebra enhances reader engagement and increases the likelihood of higher earnings.

#### Benefits of Using Adgebra for Publishers

<table data-view="cards"><thead><tr><th></th><th></th></tr></thead><tbody><tr><td><strong>Quality Advertisers</strong></td><td>Adgebra ensures that you only serve clean, genuine ads on your site. Every ad is carefully filtered through a stringent review process, meaning your audience will only see relevant and trustworthy advertisements.</td></tr><tr><td><strong>Simple &#x26; Powerful</strong></td><td>Leverage a wide variety of powerful ad formats, including <strong>native ads</strong>, <strong>rich media</strong>, and <strong>video ads</strong>, to maximize revenue. These formats are designed to blend seamlessly with your site content, enhancing user experience while boosting your earnings.</td></tr><tr><td><strong>Real-Time Insights</strong></td><td>Adgebra provides <strong>100% transparent, real-time reporting</strong> that allows you to track your earnings and analyze performance at any time. This level of insight helps you optimize your strategy and revenue generation in a timely manner.</td></tr><tr><td><strong>Simple Integration</strong></td><td>Get started quickly with <strong>one-time integration</strong>. Adgebra provides over <strong>100 custom, responsive ad widgets</strong>, including support for AMP (Accelerated Mobile Pages). This means you can begin monetizing your site or blog immediately without extensive setup or technical requirements.</td></tr></tbody></table>

**Struggling to Drive Higher Traffic on Your Site?**

> Adgebra offers the **Traffic+** solution, which allows publishers to buy high-quality traffic at competitive **CPC /CPM** pricing. This access to <mark style="color:orange;">**2000+**</mark>**&#x20;partner publishers** enables you to expand your reach, attract more visitors, and boost engagement.

#### Key Statistics that Show the Power of Adgebra

{% stepper %}
{% step %} <mark style="color:orange;">**75% of users engage more with recommended articles**</mark>

Relevant content, including ads and recommendations, drives higher user interaction.
{% endstep %}

{% step %} <mark style="color:orange;">**90% of users have a higher Click-Through Rate (CTR)**</mark>

When content is in the **regional language**: Localized content is more relevant to your audience, which directly increases CTR.
{% endstep %}

{% step %} <mark style="color:orange;">**80% of users trust content on genuine sites**</mark>

Adgebra’s focus on serving clean, vetted ads increases the trust and engagement of your audience.
{% endstep %}
{% endstepper %}

By using Adgebra, publishers can significantly improve ad engagement and revenue. From ensuring that only high-quality ads appear on your site, to providing simple integration and real-time insights, Adgebra empowers you to optimize your earnings effectively. Additionally, with the **Traffic+** solution, you can drive more relevant traffic to your site, ensuring consistent growth and better monetization.


# DIY Partner

DIY Partner Program

**What is a DIY Partner?**

A **DIY Partner** (Do-It-Yourself Partner) with Adgebra is a publisher who utilizes Adgebra's self-serve platform to easily monetize their website or blog. This program is designed for publishers who want full control over the ad placement and optimization process. With the DIY platform, publishers can register their site, integrate ads, and start earning revenue with minimal involvement from Adgebra’s team.

### Steps to Sign Up as a DIY Partner with Adgebra

Adgebra’s DIY (Do-It-Yourself) Partner program offers a self-serve platform for publishers, allowing you to register your site, get approval, and start monetizing to earn revenue. Follow the steps below to get started:

#### 1. Visit the Signup Page

Go to the Adgebra DIY Partner registration page by clicking the following link : [DIY Publisher Signup](https://login.adgebra.co/DIY/publisher-signup/).

#### 2. Fill in the Signup Form

Once on the signup page, complete the registration form by providing the necessary details:

* **Partner Information**: Fill in your name, email address, and phone number.
* **Financial Details** : Provide details about your financial details like gst,pan,bank account details
* Other Details: Complete any other required fields as requested in the form.

#### 3. Submit the Form

After filling in all the required details, submit the form to initiate the registration process.

#### 4. Call Back from Adgebra Team

Once you submit the form, you’ll receive a call back from the Adgebra team. Our team will walk you through the onboarding process and address any questions or concerns you may have. We will ensure all your doubts are clarified and help you get started. You additionally will receive an email from us on your registered email, where you will able to find the login details for our dashboard

#### 5. Site onboarding and approval

After login to your dashboard,, you will need to add your site details. Once your sites are saved in our dashboard publisher teal will review your site, and Adgebra will approve/disapprove your site based on the various approval criteria and upon you can start the monetization of your site. This approval is typically based on factors such as site content, traffic quality, and alignment with Adgebra’s standards.

#### 6. Start Monetizing and Earning

Once your site is approved, you can start using Adgebra’s self-serve platform to place ads on your site. You'll have access to various ad formats such as native, rich media, and video ads. The more traffic and engagement you generate, the more revenue you can earn.

#### Key Features of the DIY Partner Program:

1. **Self-Serve Platform**:
   * As a DIY Partner, you get access to a **self-serve platform** where you can manage all aspects of ad monetization on your site. This means you can integrate, customize, and monitor ad performance without needing to rely on a third party.
2. **Simple Registration**:
   * Signing up as a DIY Partner is easy. All you need to do is fill out a registration form on the Adgebra website and wait for approval. Once approved, you’ll be able to start monetizing your website immediately.
3. **Instant Access to Ad Inventory**:
   * DIY Partners gain access to a wide range of ad inventory, including **native ads**, **rich media ads**, and **video ads**. These formats are designed to seamlessly blend with your site content and improve user engagement.
4. **100+ Custom Ad Widgets**:
   * The platform offers over **100 customizable ad widgets** that are responsive and designed for easy integration. These widgets can be added to your site with a one-time setup, allowing you to start monetizing quickly.
5. **Monetizing AMP Pages**:
   * DIY Partners can also monetize **AMP (Accelerated Mobile Pages)**, which ensures that your mobile audience can also engage with ads, further maximizing your revenue opportunities.
6. **Real-Time Analytics and Reporting**:
   * The platform provides **real-time insights** and transparent reports, allowing you to track performance and earnings. You can monitor which ads are performing best and adjust your strategy for optimal revenue generation.
7. **Quality Control**:
   * As a DIY Partner, you are assured that the ads displayed on your site meet Adgebra’s stringent quality standards. This means your audience will only see relevant, high-quality ads, ensuring a positive user experience and higher engagement rates.
8. **Revenue Generation**:
   * By placing relevant ads on your site and ensuring a good user experience, you can **generate consistent revenue** through impressions, clicks, and other engagement metrics. The more traffic and interaction your site receives, the more money you can make.

#### Who Can Be a DIY Partner?

* **Website Owners**: If you own a blog or a content-driven website, you can monetize your site by joining Adgebra's DIY Partner program.
* **Publishers**: Anyone with a website that attracts visitors can sign up to be a DIY Partner. Adgebra works with various types of publishers, including those in niches like news, entertainment, tech, lifestyle, and more.
* **App Developers**: If you have a mobile app with web-based content, you can also use the DIY Partner program to integrate ads into your app's website or landing page.

#### Advantages of Being a DIY Partner

1. **Full Control**: You manage all aspects of your ad strategy and placement, enabling you to tailor the ads to your audience’s preferences.
2. **Earn Revenue on Your Own Terms**: With Adgebra’s flexible platform, you can monitor and adjust ad placements to maximize your earnings.
3. **Access to Premium Ads**: Adgebra’s stringent vetting process ensures that only high-quality ads are shown on your site, enhancing user engagement and trust.
4. **Simple Integration**: With just a one-time setup, you can integrate ads across your site with minimal effort and no technical knowledge.
5. **Scalability**: As your traffic grows, you can scale your monetization efforts accordingly, increasing revenue opportunities as your audience expands.

**How to edit a DIY Partner profile?**

> Indeed, DIY Partners with Adgebra have the capability to edit their profile information, including details such as company profile information, financial details, contact information, and more. This feature allows partners to keep their information up-to-date and accurate within the Adgebra platform. If you have any updates or changes to make to your profile, you can go to profile sections within your partner dashboard. If you need further assistance with editing your profile information, feel free to contact Adgebra's support team for guidance.

**How to register with multiple DIY partners under the same sites or the same company profile?**

> Adgebra doesn't permit the duplication of DIY Partner profiles. This means that you can't register multiple times for the same company profile or the same sites. This policy ensures that each partner profile is unique and avoids unnecessary redundancy within the platform. If you have any questions or concerns about this policy, or if you require assistance with your partner profile, please don't hesitate to reach out to Adgebra's support team for further clarification and guidance.

#### Conclusion

The **DIY Partner Program** with Adgebra is a great way for publishers to take control of their ad monetization efforts. With a simple registration process, powerful ad formats, real-time insights, and a self-serve platform, Adgebra provides all the tools you need to succeed in generating revenue. Whether you're a blogger, website owner, or app developer, the DIY Partner program offers a straightforward and effective way to start monetizing your site today.


# Tag Placements

Tag placements

**How to place adgebra tags on blogs?**

To place Adgebra tags on your blog, follow these steps:

{% stepper %}
{% step %}
**Step 1**

Copy the Adgebra Footer Code from Tags in Site Screen Log in to your Adgebra account. Navigate to the "Tags” in the Site screen or section. Locate the footer code provided by Adgebra.
{% endstep %}

{% step %}
**Step 2**

Paste Footer Code Inside the HTML Code of Your Blog Open the HTML code of your blog editor. Locate the closing body tag in your HTML code. Paste the footer code provided by Adgebra just above the closing body tag. Ensure that you paste it inside the open body tag, not outside it.
{% endstep %}

{% step %}
**Step 3**

Place Ad Size-Specific Code Where You Want to Show Ads In the Adgebra dashboard, find the ad size-specific code for the ad you want to display on your blog. You will find the code for your specific site by selecting the site and You will need to click on the generate button. After regenerating, you will find the size-specific code in the various tabs below like Responsive tags, MobileTags, Desktop Tags, and WordPress Tags. Copy the ad size-specific code. Navigate to the section of your blog post or page where you want to display the ad. Paste the ad size-specific code provided by Adgebra at the desired location within your HTML code.
{% endstep %}
{% endstepper %}

**Note**:

* Always test the placement of the codes to ensure they are working correctly and not causing any\
  layout issues on your site.
* Adherence to any additional instructions provided by Adgebra for optimal integration and\
  performance is recommended.

**How to place adgebra tags on a WordPress site?**

To place Adgebra tags on your WordPress, follow these steps:

{% stepper %}
{% step %}
**Step 1: Copy Tags in the Site Screen**

* Copy the Adgebra Footer Code from Tags in the Site Screen.
* Log in to your Adgebra account.
* Navigate to the "Tags” in the Site screen or section.
* Locate the footer code provided by Adgebra.
  {% endstep %}

{% step %}
**Step 2: Install "Insert Headers and Footers" Plugin**

* In your WordPress dashboard, go to the "Plugins" section.
* Click on "Add New" and search for the "Insert Headers and Footers" plugin.
* Install and activate the plugin.
  {% endstep %}

{% step %}
**Step 3: Add Footer Code**

* Go to the "Settings" section in WordPress.
* Click on "Insert Headers and Footers."
* Paste the footer code copied from the Adgebra Tags screen into the footer section.
* Save your changes.
  {% endstep %}

{% step %}
**Step 4: Add Ad Slot Specific Code**

* Go to the "Appearance" section in WordPress.
* Click on "Widgets."
* Find the "Text" widget and drag it to the sidebar where you want to display the ad.
* Paste the ad slot-specific code of the desired size from the Adgebra Tags screen into the text widget.
* Save your changes.
  {% endstep %}
  {% endstepper %}

**Note:**

* Always test the placement of the codes to ensure they are working correctly and not causing\
  any layout issues on your site.
* Adherence to any additional instructions provided by Adgebra for optimal integration and\
  performance is recommended.


# Partner Payment T\&C

Partner Payment Terms & Conditions

**What is the procedure for the DIY Partner Payments?**

As per adgebra terms and conditions, please find below the guidelines for submitting invoices for the services rendered:

Submission Deadline: DIY Partners are required to submit their invoices by the 7th of the subsequent month when the billing amount i.e diy partner revenue reaches a minimum of **$100**.

Recipient Email Addresses: Invoices should be sent to the following email addresses:\
Finance Department: <finance@inuxu.media>\
Publisher Relations: <pub@inuxu.media>

Invoice Content: DIY Partners must include the following details in their invoices:

* Always test the placement of the codes to ensure they are working correctly and not causing any\
  layout issues on your site.
* Adherence to any additional instructions provided by Adgebra for optimal integration and\
  performance is recommended.

**Payment Terms:** Invoices will be processed for payment within **60 days** from the date of reception, subject to collections from Inuxu clients/advertisers.

**Tax Deduction:** Inuxu reserves the right to deduct the required TDS (Tax Deduction at Source), Withholding Tax, or any other applicable tax as per prevailing Government norms.

**Currency Restrictions**: All payments will be made in INR (Indian Rupees) or USD (United States Dollars) only. Please ensure compliance with the above guidelines to facilitate the timely processing of your invoices and payments. If you have any questions or require further clarification, please don't hesitate to contact our Finance Department at <finance@inuxu.media>.

**Where adgebra partner can see their revenue?**

> The revenue details can be accessed through our real-time reports in the Adgebra dashboard via the reports screen. This provides DIY Partners with convenient access to track their earnings and performance metrics efficiently. Having real-time reporting capabilities enhances transparency and enables partners to make data-driven decisions to optimize their ad strategy and maximize revenue generation.


# Partner API Integration

Adgebra Ad-Serving API integration Guidelines

These API integration guidelines will be able to request demand from adgebra in real time by sending required parameters in API calls. In response, adgebra will send ad details that can be used to serve ads on the Web, Push Notifications, and In-App environment.

### Ad elements&#x20;

<figure><img src="/files/2VjQXYvkmxxLNo4pfQ4W" alt=""><figcaption></figcaption></figure>

### 1. Request Format:

{% code overflow="wrap" %}

```html
https://adgebra.co.in/AdServing/PushNativeAds?pid=[Partner_Id]&mkeys=[KEYWORDS]&dcid=9&nads=[Number_of_Ads]&deviceId=[Device_ID]&uid=[Unique_ID]&gaid=[Goodle_Advertiser_ID]&ip=[IP_address]&url=[whitelisted_Domain_mapping_url]&pnToken=[Token_Id]&inApp=[In_App]&slotId=[Slot_ID]&templateId=[Template_ID]&articleTitle=[Article_Title]&articleDescp=[Article_Description]&refUrl=[Refer_URL]&chToken=[Token_Id]&osType=[Operating_System_Type]&osVersion=[Operating_System_Version]&deviceBrand=[Device_BrandName]&deviceModel=[Device_ModelName]
```

{% endcode %}

2. **Request Parameters:**

<table><thead><tr><th width="133">Parameter</th><th width="135">Definition</th><th width="139">Mandatory</th><th width="414">Description</th></tr></thead><tbody><tr><td>pid</td><td>Partner ID</td><td>Yes</td><td>It is a unique identifier that adgebra requires. It will be shared by adgebra team at the time of initial setup.</td></tr><tr><td>mkeys</td><td>Meta Keywords</td><td>No</td><td>Meta keywords present on the page. Multiple keywords should be sent separating by commas in singleEncodedformat. It is recommended to send meta keywords so that adgebra can respond with most relevant ads.</td></tr><tr><td>dcid</td><td>Delivery Channel ID</td><td>Yes</td><td>This is an ad format ID that adgebra requires.<br>For Native, it is 9.</td></tr><tr><td>nads*</td><td>Number of ads</td><td>Yes</td><td>Number of ads required to serve in the request. adgebra will accept maximum 8 ads in one request. For any value greater than 8, adgebra will send response with only 8 ads.</td></tr><tr><td>deviceId</td><td>Device ID</td><td>Yes</td><td>Desktop – 2<br>Mobile – 1</td></tr><tr><td>uid</td><td>Unique ID</td><td>Yes</td><td>Pass a unique ID of the user. In case of APP, pass GUID/Advertiser ID</td></tr><tr><td>ip</td><td>IP Address</td><td>Yes</td><td>LATEST IP address of the user at client end. It helps adgebra to identify from which geo location, the request has come, so that it can serve relevant ads to the user.</td></tr><tr><td>url</td><td>URL</td><td>Yes</td><td>Domain from which the request has come. In case of push notification, at least domain URL should be sent. In case of In-App, the app name should be sent.</td></tr><tr><td>pnToken</td><td>Token (PIN)</td><td>Yes</td><td>It is an authentication PIN – adgebra will send response only if it is successfully verified.<br>Adgebra will share the password at the time of initial setup.</td></tr><tr><td>gaid</td><td>Unique ID</td><td>Yes</td><td>The Google Advertising ID is a user-specific and unique identifier for advertising created by Google Play.</td></tr><tr><td>inApp</td><td>In-App</td><td>No – Web, Notification<br>Yes – In-App</td><td>If the request is sent from In-App environment then this flag should be 1. Otherwise it should be 0.</td></tr><tr><td>slotId</td><td>Slot ID</td><td>No</td><td>Slot ID of the Ad placement.</td></tr><tr><td>templateId</td><td>Template ID</td><td>No</td><td>Template ID</td></tr><tr><td>articleTitle</td><td>Article Title</td><td>No</td><td>Article title in single encoded format</td></tr><tr><td>articleDescp</td><td>Article Description</td><td>No</td><td>Article description</td></tr><tr><td>refUrl</td><td>Refer URL</td><td>No</td><td>Article landing page URL</td></tr><tr><td>chToken</td><td>Unique Pin</td><td>Yes</td><td>Unique pin - exactly same value as against pnToken</td></tr><tr><td>osType</td><td>Operating System</td><td>Yes</td><td>Operating System type eg : windows,linux,ios,andoid etc</td></tr><tr><td>osVersion</td><td>Operating System Version</td><td>Yes</td><td>Operating System Version based on the operating system type</td></tr><tr><td>deviceBrand</td><td>Device Brand Name</td><td>Yes</td><td>Device brand name eg : samsung, apple, vivo</td></tr><tr><td>deviceModel</td><td>Device Model Name</td><td>No</td><td>Device model name based on brand name eg ; Apple 16 Pro, Samsum s22 ultra</td></tr></tbody></table>

3. **Request Example:**

{% code overflow="wrap" %}

```
https://adgebra.co.in/AdServing/PushNativeAds?pid=123&mkeys=cricket%2Cipl%2Cvirat&dcid=9&nads=3&deviceId=1&uid=9c98c8c8863ce7ef&ip=156.26.55.11&url=xyz.com&pnToken=KGnveR3b2h5H3VdH&gaid=Google_123&slotId=0&templateId=128&osType=android&articleTitle=We%20Get%20Excited%20Not%20Nervous%20Looking%20at%20Lively%20Pitches%3A%20Kohli&articleDescp=WATCH%20%7C%20We%20Get%20Excited%20Not%20Nervous%20Looking%20at%20Lively%20Pitches%3A%20Kohli%20on%20Perth%20Track&refUrl=https%3A%2F%2Fwww.news18.com%2Fcricketnext%2Fvideos%2Fwatch-we-get-excited-looking-at-lively-pitches-rather-than-nervous-virat-kohli-on-perth-track-1972185.html&chToken=KGnveR3b2h5H3VdH
```

{% endcode %}

3. **Response Format:**

{% code overflow="wrap" %}

```json
[
  {
    "imageUrl": "[Image_Path]",
    "lifeOfAd": "[Validity_of_Ad]",
    "languageId": "[Site_Language_ID]",
    "ctaMessage": "[CTA_Button_NAME]",
    "notificationMessage": "[Description_of_Ad]",
    "trackerUrl": "[Landing_Page_URL]",
    "notificationTitle": "[Short_Text_or_Brand_Name]",
    "icon": "[Short_Text_or_Brand_Name]",
    "notificationImage": "[Ad_Image]",
    "advId": "[Ad_ID]",
    "campId": "[Campaign_ID]",
    "pricingModel": "[Pricing_Model]",
    "currency": "[Current_Format]",
    "price": "[Bid_Price]",
    "brandingLine": "[Brandline]",
    "brandingImageUrl": "[Brand_Image_URL]",
    "clientImpressionTracker": "[Third_Party_Impression_Tracker_URL]",
    "impressionTrackerUrl": "[Impression_Tracker_URL]",
    "landingPageUrl": "[Actual_Landing_Page_URL]",
    "uId": "[UserID]",
    "gaid": "[Google_Advertiser_ID]",
    "size_43_400x300": "[imageurl for the size 400x300]",
    "size_43_200x150": "[imageurl for the size 200x150]",
    "size_43_100x75": "[imageurl for the size 100x75]",
    "size_169_400x225": "[imageurl for the size 400x225]",
    "size_169_200x113": "[imageurl for the size 200x113]",
    "size_169_100x56": "[imageurl for the size 100x56]",
    "size_21_800x400": "[imageurl for the size 800x400]",
    "size_21_400x200": "[imageurl for the size 400x200]",
    "size_21_200x100": "[imageurl for the size 200x100]",
    "size_21_100x50": "[imageurl for the size 100x50]",
    "size_65_600x500": "[imageurl for the size 600x500]",
    "size_65_300x250": "[imageurl for the size 300x250 ]",
    "size_65_100x83": "[imageurl for the size 100x83]",
    "custom_360x240": "[imageurl for the size 360x240]",
    "img990x505": "[imageurl for the size 990x505]",
    "impTPTracker": ["Third Party Impression Tracker 1 to be fired at client side", "Third Party Impression Tracker 2 to be fired at client side"],
  }
]
```

{% endcode %}

4. **Response Parameters**&#x20;

<table><thead><tr><th width="220">Parameter</th><th width="182">Definition</th><th width="365">Description</th></tr></thead><tbody><tr><td>imageUrl</td><td>Image URL</td><td>The original version of the main image of the ad with dimensions 400x300px. It can be resized and served in any dimension. It is recommended that aspect ratio should not be changed when resizing.</td></tr><tr><td>notificationMessage</td><td>Notification Message</td><td>The description part in the Native ad in single encoded format. It is Mandatory to use for in-App and Push Notification both.</td></tr><tr><td>trackerUrl</td><td>Tracker URL</td><td>On click of ad, user should be redirected to this URL. It is a mandatory parameter.<br>For In-App ads, adgebra will send this URL in single encoded format.</td></tr><tr><td>notificationTitle</td><td>Notification Title</td><td>It is a short text – generally used to mention brand name. It is an optional parameter.</td></tr><tr><td>Icon</td><td>Icon</td><td>It is a small image of 200x200px – generally used as brand logo. It is an optional parameter.</td></tr><tr><td>lifeOfAd</td><td>Validity of the Ad in minutes</td><td>Once the response is sent by adgebra, the ad must be served within this time in minutes.</td></tr><tr><td>notificationImage</td><td>Notification Image</td><td>The compressed version of the main image of the ad with dimensions 360x240px. It can be resized and served in any dimension. It is recommended that aspect ratio should not be changed when resizing.</td></tr><tr><td>advId</td><td>Advertiser ID</td><td>Advertiser ID of which the ad is. This is used for reports &#x26; troubleshooting.</td></tr><tr><td>campaignId</td><td>Campaign ID</td><td>Campaign ID of which the ad is. This is used for reports &#x26; troubleshooting.</td></tr><tr><td>pricingModel</td><td>Pricing Model</td><td>Pricing Model of the bid price at which adgebra is going to pay.<br>1 – CPM<br>2 – CPC</td></tr><tr><td>price</td><td>Price</td><td>Bid Price at which adgebra is going to Pay.</td></tr><tr><td>brandingLine</td><td>adgebra Branding text</td><td>Use it only when branding image URL is not available or cannot be used. (This is an alternative parameter to branding image URL)</td></tr><tr><td>brandingImageUrl</td><td>adgebra branding image URL</td><td></td></tr><tr><td>Client Impression Tracker</td><td>Third Party Impression Tracker</td><td>Additional Impression tracker to be triggered when ad is served if available</td></tr><tr><td>impressionTrackerUrl</td><td>adgebra impression tracker</td><td>To be triggered to notify adgebra about impression being served</td></tr><tr><td>osType</td><td>Operating System</td><td>Operating System type eg : windows,linux,ios,andoid etc</td></tr><tr><td>osVersion</td><td>Operating System Version</td><td>Operating System Version based on the operating system type</td></tr><tr><td>deviceBrand</td><td>Device Brand Name</td><td>Device brand name eg : samsung, apple, vivo</td></tr><tr><td>deviceModel</td><td>Device Model Name</td><td>Device model name based on brand name eg ; Apple 16 Pro, Samsum s22 ultra</td></tr></tbody></table>

4. **Response Example:**

{% code overflow="wrap" %}

```json
[
{
"imageUrl": "https://cdn.adgebra.in/images/991_4142_9663/BMW_updated_400x300.jpg",
"notificationMessage": "Own+the+BMW+2GC+at+a+monthly+payment+of+%E2%82%B939%2C300",
"trackerUrl": "https://adgebra.co.in/Tracker/ClickTracker p1=160432&p2=4966&token=91921010700717&p3=&p4=${flag}&slotId=0&templateId=0&pnStatus=1&uid=1421_12345678&pnReferUrl=english.dailyhunt.in&p5=${url}&adg_dummy=1",
"notificationTitle": "BMW+India",
"icon": "https://cdn.adgebra.in/images//991_4142/31781_157791/BMW_Logo.jpg",
"lifeOfAd": "1800",
"notificationImage": "https://cdn.adgebra.in/images/991_4142_9663/BMW_updated_360X240.jpg",
"advId": "4142",
"campId": "32227",
"pricingModel": "1",
"currency": "inr",
"price": "12.0",
"brandingLine": "null",
"brandingImageUrl": "null",
"clientImpressionTracker": "",
"impressionTrackerUrl": "https://adgebra.co.in/AdServing/SPNTracker?bannerId=160432&siteId=4966&dcId=9&deviceId=1&uid=1421_12345678&countryId=1269750&stateId=1264418&cityId=1259229&ipAdrs=203.109.101.177&bidPrice=12.0&apiFlag=1",
"uId": "12345678",
"gaid": "g127j283i42j2344",
"img990x505": "https://cdn.adgebra.in/images/991_4142_9663/990x505.jpg",
"size_43_200x150": "https://cdn.adgebra.in/images/991_4142_9663/BMW_updated_200x150.jpg",
"size_43_100x75": "https://cdn.adgebra.in/images/991_4142_9663/BMW_updated_100x75.jpg",
"size_169_400x225": "https://cdn.adgebra.in/images/991_4142_9663/BMW_updated_400x225.jpg",
"size_169_200x113": "https://cdn.adgebra.in/images/991_4142_9663/BMW_updated_200x113.jpg",
"size_169_100x56": "https://cdn.adgebra.in/images/991_4142_9663/BMW_updated_100x56.jpg",
"size_21_400x200": "https://cdn.adgebra.in/images/991_4142_9663/BMW_updated_400x200.jpg",
"size_21_200x100": "https://cdn.adgebra.in/images/991_4142_9663/BMW_updated_200x100.jpg",
"size_21_100x50": "https://cdn.adgebra.in/images/991_4142_9663/BMW_updated_100x50.jpg",
"size_65_600x500": "https://cdn.adgebra.in/images/991_4142_9663/BMW_updated_600x500.jpg",
"size_65_300x250": "https://cdn.adgebra.in/images/991_4142_9663/BMW_updated_300x250.jpg",
"size_65_100x83": "https://cdn.adgebra.in/images/991_4142_9663/BMW_updated_100x83.jpg"
"impTPTracker":["https://adgebra.co.in/clicktracker/click?p1=302473&p2=21400&p3=&p5=&p6=&p7=9&p18=&langId=2&languagePriority=2&slotId","https://adgebra.co.in/clicktracker/click?p1=302473&p2=21400&p3=&p5=&p6=&p7=9&p18=&langId=2&languagePriority=2&slotId"]
}
]
```

{% endcode %}

#### Note:

1. At any point in time, if the response is blank or invalid, then it should be handled at the client's end. At times when planned/unplanned adgebra maintenance activity may be scheduled.
2. If no. of available ads is less than requested, then it will send a response for available campaigns, and the remaining elements will be indicated with a message - {"msgCode": "Campaign Not Found"}


# Site

#### Introduction: Better Engagement, Better Earnings

Adgebra is designed to help publishers maximize revenue through smarter ad placements and tailored content. By matching the ad language to the language of your site or blog content, Adgebra enhances reader engagement and increases the likelihood of higher earnings.

#### Benefits of Using Adgebra for Publishers

<table data-view="cards"><thead><tr><th></th><th></th></tr></thead><tbody><tr><td><strong>Quality Advertisers</strong></td><td>Adgebra ensures that you only serve clean, genuine ads on your site. Every ad is carefully filtered through a stringent review process, meaning your audience will only see relevant and trustworthy advertisements.</td></tr><tr><td><strong>Simple &#x26; Powerful</strong></td><td>Leverage a wide variety of powerful ad formats, including <strong>native ads</strong>, <strong>rich media</strong>, and <strong>video ads</strong>, to maximize revenue. These formats are designed to blend seamlessly with your site content, enhancing user experience while boosting your earnings.</td></tr><tr><td><strong>Real-Time Insights</strong></td><td>Adgebra provides <strong>100% transparent, real-time reporting</strong> that allows you to track your earnings and analyze performance at any time. This level of insight helps you optimize your strategy and revenue generation in a timely manner.</td></tr><tr><td><strong>Simple Integration</strong></td><td>Get started quickly with <strong>one-time integration</strong>. Adgebra provides over <strong>100 custom, responsive ad widgets</strong>, including support for AMP (Accelerated Mobile Pages). This means you can begin monetizing your site or blog immediately without extensive setup or technical requirements.</td></tr></tbody></table>

**Struggling to Drive Higher Traffic on Your Site?**

> Adgebra offers the **Traffic+** solution, which allows publishers to buy high-quality traffic at competitive **CPC /CPM** pricing. This access to <mark style="color:orange;">**2000+**</mark>**&#x20;partner publishers** enables you to expand your reach, attract more visitors, and boost engagement.

#### Key Statistics that Show the Power of Adgebra

{% stepper %}
{% step %} <mark style="color:orange;">**75% of users engage more with recommended articles**</mark>

Relevant content, including ads and recommendations, drives higher user interaction.
{% endstep %}

{% step %} <mark style="color:orange;">**90% of users have a higher Click-Through Rate (CTR)**</mark>

When content is in the **regional language**: Localized content is more relevant to your audience, which directly increases CTR.
{% endstep %}

{% step %} <mark style="color:orange;">**80% of users trust content on genuine sites**</mark>

Adgebra’s focus on serving clean, vetted ads increases the trust and engagement of your audience.
{% endstep %}
{% endstepper %}

By using Adgebra, publishers can significantly improve ad engagement and revenue. From ensuring that only high-quality ads appear on your site, to providing simple integration and real-time insights, Adgebra empowers you to optimize your earnings effectively. Additionally, with the **Traffic+** solution, you can drive more relevant traffic to your site, ensuring consistent growth and better monetization.


# Site Addition

**How to Add a Site in Adgebra Dashboard?**

Adding your site to the Adgebra Dashboard is a simple process that allows you to begin monetizing your site through a variety of ad formats. Follow the steps below to complete the setup.

{% stepper %}
{% step %}
**Register with Adgebra**

Begin by registering on the Adgebra platform. Go to the Adgebra registration page and complete the signup form with your details.
{% endstep %}

{% step %}
**Receive Login Credentials**

Upon successful registration, you will receive an email containing your login credentials.
{% endstep %}

{% step %}
**Log into the Dashboard**

Use the provided credentials to log into the Adgebra Dashboard. You will be able to see the dashboard below.

<img src="/files/sAewx10l1DK0F3TyjvRy" alt="" data-size="original">
{% endstep %}

{% step %}
**Go to the Site Menu**

Once logged in, navigate to the **Site** menu on the dashboard's left panel.
{% endstep %}

{% step %}
**Add a New Site (Site+)**

Click on **Site+** to add a new site

<img src="/files/2B7TrIrmB30KkIpibJXO" alt="" data-size="original">
{% endstep %}

{% step %}
**Enter Site Information**

Fill in the required details about your site, including:

* **Site URL**: The URL of your website.
* **Country:** County to which belongs
* **Category/Sub-Category and Language**: Specify the main category and language of your site.

After entering the required information, click **Save** to submit your site.

<img src="/files/u6yL3lIydtYqFXSDZAqB" alt="" data-size="original">
{% endstep %}

{% step %}
**Site Review**

Once your site information is submitted, it will be reviewed by Adgebra’s Publisher Team. The team will evaluate your site based on content, quality, and compliance with Adgebra’s guidelines. You’ll receive a notification of **approval** or **disapproval** based on the outcome.
{% endstep %}

{% step %}
**Assigned Partner Manager**

If your site is approved, a **dedicated Partner Manager** will be assigned to assist you with any questions and help you maximize your site's monetization potential.
{% endstep %}

{% step %}
**Access and Place Ad Tags**

Once your site is approved, you can start placing Adgebra ad tags on your site.
{% endstep %}

{% step %}
**Generate Tags for Various Ad Formats**

Go to the **Tags** section in the dashboard. Here, you can generate ad tags in a variety of formats, including native, rich media, and video ads. Select the formats that best fit your site’s layout and audience.
{% endstep %}

{% step %}
**Place the Ad Tags on Your Site**

To integrate ads properly, place the **footer ad code** in your site’s footer sections. This ensures proper functioning and visibility of the ads across your site. Placing footer code in your site will ensure you will see various ads like In-image ads, In-footer ads
{% endstep %}
{% endstepper %}

<figure><img src="/files/TCj0m4aJBT8zLqkcrTnK" alt=""><figcaption></figcaption></figure>

#### Here you can see various delivery channels and their ad preview

Additionally, you can add various ad code sizes as per your website requirement, adgebra provides various formats as below, where you can generate tags as the same.

<figure><img src="/files/u4oLjOV9vddHHea2PpQG" alt=""><figcaption></figcaption></figure>

####

#### Important Note

* **Standard Code Placement**: Ensure the code is placed correctly in both the header and footer to guarantee smooth ad rendering and functionality.

#### Summary

By following these steps, you can add your site to the Adgebra Dashboard and start generating revenue through high-quality, relevant ads. If you encounter any issues, reach out to your assigned Partner Manager for assistance.


# Site Informartion

Site Related FAQs

**Can we add multiple domains under a single DIY Partner?**

> You have the ability to add an unlimited number of domains/sites under your dashboard with Adgebra. There are no restrictions on the number of domains/sites you can manage, allowing you to effectively oversee and optimize your advertising efforts across multiple platforms.

**How many domains/sites can I add as a DIY Partner?**

> You can add ‘n’ number of sites under your dashboard, as of now adgebra doesn't restrict on addition of domains/sites for the DIY Partners.

**Does multiple site whitelisting require approval?**

> Yes, every sites that been added has to undergo the Adgebra site approval process again. This ensures that the updated domain/site continues to meet Adgebra's quality and integrity standards before it can be utilized for advertising purposes

**What is the timeline for site approval?**

> Adgebra endeavors to promptly approve or reject websites within a reasonable timeframe, typically aiming for a turnaround of 4-6 hours. This swift process enables DIY partners to swiftly implement the tag code on their sites and commence earning revenue as soon as possible.

**Guidelines for a site to get approved?**

> Adgebra's site approval guidelines are comprehensive and encompass various factors to maintain the quality and trustworthiness of registered websites. Here are several key points that our AI-driven tool and manual approval process typically adhere to during the evaluation:
>
> **Well-Designed Site:** Ensure the website has an organized layout, clear navigation, and aesthetically pleasing design.\
> \
> **Sufficient Quality Content:** Verify that the website provides accurate and helpful information.\
> \
> **Broken or inactive site:** Ensure all links and interactive elements are functional, and the site is regularly updated to maintain relevance and usefulness.\
> \
> **Site is under maintenance**: Avoid approving sites that are currently undergoing maintenance to prevent disapproved.\
> \
> **Nudity, sheer clothing, overtly suggestive themes, or anything illegal**: Ensure the website strictly adheres to appropriate content guidelines,\
> \
> **Mobile Responsiveness:** Confirm that the website is accessible and usable on mobile devices, as many users may access it from smartphones or tablets.\
> \
> **Too much downloading content:** Minimize excessive downloading requirements to enhance user experience, especially for those with limited internet bandwidth.\
> \
> **Site redirection issue:** Ensure that users are not redirected unnecessarily and that all links lead to relevant and functional pages within the website.\
> \
> **Suspicious or fake traffic**: Any signs of artificial traffic or engagement, which may indicate fraudulent activity or unreliable content.\
> \
> **Militarized social movements and violence-inducing conspiracy networks:** Any content or affiliations that promote violence or conspiracy theories, as they are not conducive to a productive learning environment.\
> \
> **Inflammatory content**: Ensure that the website maintains a neutral and respectful tone, avoiding content that could incite conflict or controversy.\
> \
> **Discriminatory practices:** Any content that promotes discrimination based on race, gender, religion, or any other characteristic.\
> \
> **Illegal products and services:** Ensure the website does not promote or facilitate illegal activities, products, or services.\
> \
> **Cheating and deceitful practices**: Prevent the dissemination of misleading or dishonest information that could lead to dishonesty.\
> \
> **Spyware or malware**: Ensure the website is free from malicious software that could compromise users' devices or personal information.\
> \
> **Weapons, ammunition, or explosives:** Avoid any content related to weapons or explosives unless strictly relevant to algebraic concepts (e.g., physics problems involving projectiles).\
> \
> **Unsafe substances:** Exclude any content promoting hazardous substances or illegal drugs.\
> \
> **Sale of body parts**: Prohibit any content related to the illegal sale of human body parts.

**How to run ads through adgebra as a DIY partner?**

> Certainly! You have the flexibility to run your customized ads through Adgebra across multiple websites. As a DIY partner, you'll require additional traffic+ account access to your dashboard to effectively manage your campaigns. For further details, feel free to reach out to us at <pub@inuxu.media> We're here to assist you with any inquiries or assistance you may need.

**How to update the domain/site that is already added?**

> Certainly! You have the flexibility to update your whitelisted domains or sites at any time. However, it's important to note that any changes made to the domain/site will require it to undergo the Adgebra site approval process again. This ensures that the updated domain/site continues to meet Adgebra's quality and integrity standards before it can be utilized for advertising purposes. If you have any questions or need assistance with updating your whitelisted domains/sites, please feel free to reach out to your partner manager or contact us at <pub@inuxu.media> We're here to support you through the approval process and ensure smooth updates to your domain/site listings.


# Ad Widgets

Different type of Ad Widgets

**How to add an ocean widget as a DIY partner?**

> Absolutely! You have the option to add customized widgets according to your requirements. To do so, you can connect with your respective partner manager or reach out to us via email at <pub@inuxu.media> . We're available to assist you in setting up and optimizing your widgets to best suit your needs.

**What are the different ad widgets you can add to your websites?**

> Adgebra offers a variety of ad widgets tailored to suit different needs:
>
> **IBN (Iframe-Based Native) Ads:** Static ad slots that can be customized and placed below articles or pages on your site. These ads help optimize ad revenue by utilizing empty ad slot spaces effectively.

<figure><img src="https://demo.adgebra.in/custom/html/Adgebra_Help_Center/Site/images/single_ads_1.png" alt=""><figcaption></figcaption></figure>

<figure><img src="https://demo.adgebra.in/custom/html/Adgebra_Help_Center/Site/images/IBN_image.png" alt=""><figcaption></figcaption></figure>

**Nano Native Ads:** Nano Ads are a type of ad widget that blends seamlessly within the list of articles on a website, resembling the surrounding content. These ads are designed to mimic the appearance of articles to provide a non-disruptive advertising experience for users.

<figure><img src="https://demo.adgebra.in/custom/html/Adgebra_Help_Center/Site/images/4.png" alt=""><figcaption></figcaption></figure>

<figure><img src="https://demo.adgebra.in/custom/html/Adgebra_Help_Center/Site/images/3.png" alt=""><figcaption></figcaption></figure>

**Ocean Native Ads:** Ad widgets typically placed at the end of articles, featuring unlimited scroll functionality to continuously load ads as users scroll through the content.

<figure><img src="https://demo.adgebra.in/custom/html/Adgebra_Help_Center/Site/images/5.png" alt=""><figcaption></figcaption></figure>

**Video Ads:** Video ads placed within articles, customizable to appear mid-article or at the bottom. These ads can be tailored to fit your specific requirements. Below is example

<figure><img src="https://demo.adgebra.in/custom/html/Adgebra_Help_Center/Site/images/6.png" alt=""><figcaption></figcaption></figure>

**In-Image Ads:** Ads that appear on images within articles, with customization options available for size and position.

<figure><img src="https://demo.adgebra.in/custom/html/Adgebra_Help_Center/Site/images/8.png" alt=""><figcaption></figcaption></figure>

<figure><img src="https://demo.adgebra.in/custom/html/Adgebra_Help_Center/Site/images/7.png" alt=""><figcaption></figcaption></figure>

**In-Footer Ads:** Ads positioned at the very bottom of your website, are customizable in terms of size, number of ads, and placement.

<figure><img src="https://demo.adgebra.in/custom/html/Adgebra_Help_Center/Site/images/9.png" alt=""><figcaption></figcaption></figure>

<figure><img src="https://demo.adgebra.in/custom/html/Adgebra_Help_Center/Site/images/10.png" alt=""><figcaption></figcaption></figure>

**In-Screen Ads:** Ads that appear as bubbles on the screen, often located at the bottom. When clicked, these ads expand into full-page interstitials.

<figure><img src="https://demo.adgebra.in/custom/html/Adgebra_Help_Center/Site/images/11.png" alt=""><figcaption></figcaption></figure>

**Push Notification Ads** : Push Notification ads are a type of advertisement delivered directly to partners who have push notification services enabled on their websites. Site owners with push notification functionality can send out daily notifications to their registered users, and they also have the option to include advertisement notifications among these messages through an API request. This allows site owners to monetize their push notification service by sharing ads with their user base. If you need assistance or further information regarding implementing push notification ads through an API request, please don't hesitate to contact us at [pub@inuxu.media ](mailto:pub@inuxu.media)or reach out to your partner manager. We're here to help you effectively utilize push notifications for advertising purposes.

<figure><img src="https://demo.adgebra.in/custom/html/Adgebra_Help_Center/Site/images/13.png" alt=""><figcaption></figcaption></figure>

<figure><img src="https://demo.adgebra.in/custom/html/Adgebra_Help_Center/Site/images/12.png" alt=""><figcaption></figcaption></figure>

For any customization needs regarding your ad slots, you can reach out to your partner manager or email us at <pub@inuxu.media> We're here to assist you with optimizing your ad placements to maximize revenue and user engagement.

**How to add an ocean widget as a DIY partner?**

> Absolutely! You have the option to add customized widgets according to your requirements. To do so, you can connect with your respective partner manager or reach out to us via email at <pub@inuxu.media> . We're available to assist you in setting up and optimizing your widgets to best suit your needs

**How to add the IBN widget as a DIY partner?**

> Absolutely! You have the option to add customized widgets according to your requirements. To do so, you can connect with your respective partner manager or reach out to us via email at <pub@inuxu.media>. We're available to assist you in setting up and optimizing your widgets to best suit your needs.

**How to run ads through adgebra as a DIY partner?**

> Certainly! You have the flexibility to run your customized ads through Adgebra across multiple websites. As a DIY partner, you'll require additional traffic+ account access to your dashboard to effectively manage your campaigns. For further details, feel free to reach out to us at <pub@inuxu.media> We're here to assist you with any inquiries or assistance you may need.


# Traslator Guide

Translator User Guide

This guide provides step-by-step instructions for translators using the Adgebra platform to manage translation requests, track their progress, and make edits to completed translations. Each section explains how to access and use the platform's features effectively.

#### 1. Logging In

* **Login Page**: Go to [Adgebra Login](https://login.adgebra.co/adgebraui/).
* **Login Credentials**: Enter your **Email** and **Password**.
* **Accessing the Dashboard**: After successful login, you’ll be directed to the **Dashboard**, which provides an overview of your recent translation activity and performance metrics.

<figure><img src="https://lh7-rt.googleusercontent.com/docsz/AD_4nXfqpVVLDPHT5dk7Oxgp5H5sAaTkFnnkiyBO0qKFUQVb3-xMyPyBRJGsdqfPt2GAPU7z5Xq7KNJ0n30sUv0KLoNeIq_tpziRHcOAZLOlonrWOExNfSnL3z9qWmv6HU1msifWZBeIe5L-2_sn5QpGnBdpf686?key=_VeqGGCR-z5lcJbOjIrSeQ" alt=""><figcaption></figcaption></figure>

#### 2. Dashboard Overview

The **Dashboard** provides key metrics and insights about your translation work.

* **Total Requests**: Displays the total number of translation requests you have received.
* **Translated**: Shows the count of completed translations.
* **Revenue**: Displays the revenue earned from your completed translations.
* **Trend Analysis and Translation Analysis**: These graphs show trends over time for translation activity and revenue.
* **Date Filter**: By default, the dashboard displays data for the last 7 days. You can adjust the date range to view metrics for specific time periods.

> **Tip**: Use the date filter to track your performance over longer periods or examine specific time frames.

<figure><img src="https://lh7-rt.googleusercontent.com/docsz/AD_4nXc80JAcMpQKEyCq3dASVBS02zLDBYPP-nyI1aWktuCCfH2aiuTY8f3OCkernaaWFjMirY0Y47HG7L4pDiCJnVIdPMPnMcWNx610NsDXO-1nutkIbxCq-0fJ8KNXD3wB57hLKVVhhSlrej6927oS51ciSrvp?key=_VeqGGCR-z5lcJbOjIrSeQ" alt=""><figcaption></figcaption></figure>

#### 3. **Reports Section**:&#x20;

The Translation Summary Report provides insights into translations completed for various ad copies, helping users review the number of translations and associated details for each account, brand, and campaign.

This report includes multiple filtering fields that allow users to view data specific to their needs, such as account, brand, campaign, and more. Each field provides different filtering options to narrow down the data and enhance the report’s relevance.

The translation interface includes **Reports** sections, each with specific functionality to support your work.

<figure><img src="https://lh7-rt.googleusercontent.com/docsz/AD_4nXdiwsXtYtrZxk-_Rt1hdErBgnvfMnElitBe0prWv4dUeheHhRBAhhGdG0b-UTRJxo2nkiM88LLX2VPa2hRWg_o1z9XZuWREF5tK5nU5mJlfcvNTK2KJrbz7mLdKXmAW-E2qoIB6_PKjwBo1XoN1xbIT67ua?key=_VeqGGCR-z5lcJbOjIrSeQ" alt=""><figcaption></figcaption></figure>

#### 4. Translation Workflow

This section explains the workflow for managing translation requests and completed translations.

On the left panel you will be able to see the translator option, here in this field you will be able to translate the headline as per the language assigned to your role.&#x20;

<figure><img src="https://lh7-rt.googleusercontent.com/docsz/AD_4nXdE7iz2WlEhEcsnevtWwhH1iH7KLdkB3ahXwn-_I7X6R1_f8QvhJwO0VokpHAZ0_c1jpktZyHMuP1zqfxxHzyGIAAPdE88GnxxxMEJsbyX5aw_o2Oh-4YUuroAcZHGIi5ln3oMtgbWrYC8ugTeexbxh3NvC?key=_VeqGGCR-z5lcJbOjIrSeQ" alt=""><figcaption></figcaption></figure>

**>Requested Tab**

This tab lists all pending translations that need to be completed. A red bubble next to the tab title displays the count of pending tasks.

* **Pending Translations Queue**: Each entry in the queue represents a translation request. You can view details and perform actions as described below.

**Actions Available in the Requested Tab:**

* **Landing Page URL**: Click this link to open the landing page for the creative associated with the translation request. This is useful for understanding the context of the headline or creative content.
* **Translation Headline Field**: Enter the translated text for the requested headline. This field should be completed in the language assigned to your role.
* **Submit Button**: This button is activated after you’ve entered text in the **Translation Headline** field.
  * Once submitted, the headline is marked as translated.
  * The translation is added to the **Translated** tab.
  * A success popup confirms completion, and the next item in the queue appears.
* **Skip Button**: Use this button if a translation request is incorrect, already translated, or cannot be completed for any other reason.
  * When skipping, select a reason from the dropdown or provide a custom comment if needed.

<figure><img src="https://lh7-rt.googleusercontent.com/docsz/AD_4nXdHouszq4oc2jDZjZzIxKTTVbyMUXtWj5FT_8NY_7v09DQxMEf9rRrmxfKYBbajAvt6fi5zFry2FaPX-zhBEUq16IjqVJWIpqazOZ_t1HHgh0tEGkrmVPJwmuc7C5wMok0ZZHlvh9mi7QURDMqp8rHwwJ4?key=_VeqGGCR-z5lcJbOjIrSeQ" alt=""><figcaption></figcaption></figure>

**Preview Feature**: As you type your translation in the **Translation Headline Field**, a preview of the creative with your translation appears on the right side of the screen. This allows you to see how the headline will look within the creative context.

**>Translated Tab**

This tab shows all translations you have completed, with the total count indicated in a red bubble. You can filter the list by date to view specific translations.

* **Data Fields**:
  * **Translated Headline**: Displays the headline text that you translated.
  * **Translated Time**: This shows the date and time you submitted the translation.
  * **Requested Time**: Displays the original request date and time.
  * **Time Difference**: Indicates the time taken from request to translation completion.
  * **Actions**:
    * **Edit**: If you need to make changes to a completed translation, click the **Edit** action next to the translation. This opens a popup window where you can update the headline text.
    * Submit the revised translation to finalize changes.

> **Tip**: Use the Edit feature to keep translations accurate and relevant, especially if there are changes in the campaign or creative requirements.

#### 5. Additional Options and Features

* **FAQs and Help Center**: Located in the main navigation, providing access to a library of frequently asked questions and support resources.
* **User Profile**: Access your profile to log out of the platform. This option is available in the main interface under the user profile menu.

#### Summary

* **Dashboard**: Provides an overview of your activity and performance metrics.
* **Reports**: Shows detailed metrics, available after translation work has begun.
* **Translator Section**: The main workspace for managing translation requests and completed translations.
* **Requested Tab**: Lists pending translations with options to submit, skip, and preview translations.
* **Translated Tab**: Displays completed translations with options to filter by date and edit if necessary.

This guide should help you manage your translation tasks efficiently and track your progress within the Adgebra platform.


# Adgebra oRTB

Open Real-Time Bidding (ORTB) integration is a standardized protocol that allows digital ad platforms (like demand-side platforms, or DSPs) and publishers (supply-side platforms, or SSPs) to buy and sell ad space through automated, real-time auctions. ORTB integration enables seamless communication between these platforms by using a common language and structure for bid requests and responses.

In brief:

* **Real-Time Auctions**: ORTB allows ad impressions to be bought and sold in real-time, within milliseconds.
* **Standardized Protocol**: It uses a standardized format for bid requests (from the SSP to DSP) and bid responses (from DSP to SSP).
* **Bid Optimization**: DSPs can analyze user and context data in real time to place optimal bids.
* **Efficient Ad Delivery**: Ensures that the right ad reaches the right audience instantly and at the right price.

This setup improves ad relevance for users, maximizes revenue for publishers, and optimizes ad spending for advertisers.

The Adgebra platform supports API and DSP/SSP Open RTB integrations based on protocol [OpenRTB 2.5](https://www.iab.com/wp-content/uploads/2016/03/OpenRTB-API-Specification-Version-2-5-FINAL.pdf), [native 1.1](https://www.iab.com/wp-content/uploads/2016/03/OpenRTB-Native-Ads-Specification-1-1_2016.pdf).\
\
\
Below are the Integration Guidelines/Documents:

* [DSP oRTB Integration](https://sites.google.com/inuxu.media/adgebra-rtb-dsp-integration/home): In this DSP Integration guideline, Adgebra acts as an SSP platform, so when an impression is available for bidding within the Adgebra network, a bid request is sent to each DSP. All bid requests are only HTTP POST requests that pass the data in a JSON object (we currently only support JSON-encoded bid requests). Bid requests will be sent to the DSP via HTTP to a URL specified by the DSP. For more info please [click here](https://sites.google.com/inuxu.media/adgebra-rtb-dsp-integration/home)!
* [SSP oRTB Integration](https://sites.google.com/inuxu.media/adgebra-rtb-ssp-integration/home): In this SSP Integration guideline, Adgebra acts as a DSP platform, so when an impression is available for bidding with any SSP network, a bid request should be sent to Adgebra DSP. All bid requests sent to Adgebra DSP must be HTTP POST requests that pass the data in a JSON object (we currently only support JSON-encoded bid requests). Bid requests will be sent by the SSP Network to the adgebra DSP via HTTP to the adgebra test EP(endpoint) or production EP. The EP may vary based on the SSP. Please ask the technical support of adgebra to get the EP(endpoint). For more info please [click here](https://sites.google.com/inuxu.media/adgebra-rtb-ssp-integration/home)!

\
[API Integration:](https://sites.google.com/inuxu.media/adgebra-api-integration/home) This API integration guideline, will be able to request demand from Adgebra in real time by sending required parameters in an API call. In response, adgebra will send ad details which can be used to serve ads on the Web, Push Notifications, and In-App environment. For more info please [click here](https://sites.google.com/inuxu.media/adgebra-api-integration/home)!


# Overview

RTB is a way of buying and selling ads through real-time auctions, meaning transactions are made in the time it takes to load a webpage around 100 ms.

This specification contains a detailed explanation of a real-time bidding interface. Not all objects are required, and each object may contain a number of optional parameters.

To assist a first-time reader of the specification, we have indicated which fields are essential to support a minimum viable real-time bidding interface for Native Ads.

A minimal viable interface should include the required parameters.

Optional parameters may be included to ensure the parties derive maximum value.

<figure><img src="https://lh7-rt.googleusercontent.com/slidesz/AGV_vUfO4kPFXaj_BwPGfeRovIHjfsnx53QtV70AUDWUUS63mYm_1XmklkdjnDoC5A0fj1zbO_uQ6Y0xJ4vdlw4ipIV3cFom4BptYbqpk6nlPYCeCEgGHJNBVzrQ6dJpVgHfgWg48mQ7-mYCexDrYisdwyGUEsr9r_4=nw?key=jP2NKdD2eg5wGGrzRllcQw" alt=""><figcaption><p><strong>Figure 1: Example of how Required and Optional attributes are presented.</strong></p></figcaption></figure>

<br>


# Terminology

The following terms are used throughout this document specifically in the context of the RTB Interface and this specification.

**Term Definition**

> **RTB** - Bidding for individual impressions in real-time (i.e., while a consumer is waiting).
>
> **Exchange** - A service that conducts an auction among bidders per impression.
>
> **Bidder - An entity that competes in real-time auctions to acquire impressions**&#x20;
>
> **Seat** - An entity that wishes to obtain impressions and uses bidders to act on their behalf.
>
> **Publisher** - An entity that operates one or more sites.
>
> **Site** - Ad-supported content including web and applications unless otherwise specified.

<br>

<br>


# RTB Ecosystem

The mission of the RTB project is to spur greater growth in the Real-Time Bidding (RTB) marketplace by providing open industry standards for communication between buyers of advertising and sellers of publisher inventory. There are several aspects to these standards including but not limited to the actual real-time bidding protocol, information taxonomies, offline configuration synchronization, and many more. This document specifies a standard for the Real-Time Bidding Interface.&#x20;

These protocol standards aim to simplify the connection between suppliers of publisher inventory (i.e., exchanges, networks working with publishers, and sell-side platforms) and competitive buyers of that inventory (i.e., bidders, demand side platforms, or networks working with advertisers). The overall goal of RTB is to create a lingua franca for communicating between buyers and sellers.&#x20;

The intent is not to regulate exactly how each business operates. As a project, we aim to make integration between parties easier, so that innovation can happen at a deeper level at each of the businesses in the ecosystem.

<figure><img src="https://lh7-rt.googleusercontent.com/slidesz/AGV_vUdCIQlLrWYGkco8P61y_uMTzo1_WgAgdssnYTopZOrC2XpYkXXAGw3pflWMI3C4TN_htGY09lF1e9-wAg99v_JIqntikQz4itfhzPRtECQiYXR3w0rcSO3Xw4N55cw5hEfWpHz8SOIiFPgFgnNxWIDR7UkSdZ1A=nw?key=jP2NKdD2eg5wGGrzRllcQw" alt=""><figcaption></figcaption></figure>

<br>


# RTB Basics

The following figure illustrates the OpenRTB interactions between an exchange and its bidders. Ad requests originate at publisher sites. For each inbound ad request, bid requests are broadcast to bidders, responses are evaluated under prevailing auction rules, the winner is notified, and ad markup is returned.&#x20;

The win notice URL and ad markup can contain any of several standard macros that enable the exchange to communicate critical data to the bidder (e.g., clearing price)

<br>

<figure><img src="https://lh7-rt.googleusercontent.com/slidesz/AGV_vUdiztAcRr5CGdb5M6Ys-q5-pudRxdm4HOEP7Q2FCOoPHfUi9AviNhMmEx_Su_Q58DwRfk8aFc_GaNBY8wbvnbt8jkHhwG-gfAUS8Y4QZ34zLOMcBlpbeCpBXBpEK9v9oZ1wS3mv04yRVEa2v5ktiMdy3-5FqY1_=nw?key=jP2NKdD2eg5wGGrzRllcQw" alt=""><figcaption></figcaption></figure>

<br>


# Win Notifications & User Syncing

The platform supports two OpenRTB implementations:

1\. OpenRTB without “nurl” (default). In this scenario, “nurl” field is absent in bid responses and the system will record wins

automatically when impression happens. SSP has to replace ${AUCTION\_PRICE} before the ad markup is being rendered.

2\. OpenRTB with “nurl”. Win URL is represented as a separate bid response field. In case of 2nd price auction usage, “nurl” has

to be called before the actual impression happens.

**SSP Initiated User Matching**

\
To sync a particular user with AdKernel, the SSP should initiate the user to call for image or iframe pixel using the following URLs:

\
Image: \<img src='//sync.adkernel.com/user-sync?zone={zone\_id}\&t=image\&r=SSP\_REDIR\_URL' style ='display:none' width='0' height='0'>\</img>

Iframe: \<iframe src='//sync.adkernel.com/user-sync?zone={zone\_id}\&r=SSP\_REDIR\_URL' style ='display:none' width='0' height='0' frameborder='0'>\</iframe>

Where:

\- SSP\_REDIR\_URL is URL-encoded redirect URL to SSP that shall include macro {UID} which will be replaced with buyer’s userId;

\- {zone\_id} - SSP-specific zone id.

After performing successful user sync, SSP needs to sent DSP’s user id in user.buyeruid bid request field.<br>


# Object Specification

**Object Specification: Bid Request (p. 1)**

\
The top-level bid request object contains a globally unique bid request or auction ID. This id attribute is required as is at least one impression object. Other attributes in this top-level object establish rules and restrictions that apply to all impressions being offered.

<table data-header-hidden><thead><tr><th width="128"></th><th width="261"></th><th></th></tr></thead><tbody><tr><td><strong>Attribute</strong></td><td><strong>Type</strong></td><td><strong>Description</strong></td></tr><tr><td>id</td><td>string; required</td><td>Unique ID of the bid request, provided by the exchange.</td></tr><tr><td>imp</td><td>required</td><td>Representing the impressions offered. At least 1 Imp object is required.</td></tr><tr><td>site</td><td>either site or app is required</td><td>The publisher’s website.</td></tr><tr><td>app</td><td>either site or app is required</td><td>The publisher’s application (i.e., non-browser applications).</td></tr><tr><td>device</td><td>required</td><td>The user’s device to which the impression will be delivered.</td></tr><tr><td>user</td><td>optional</td><td>The human user of the device; the advertising audience.</td></tr><tr><td>at</td><td>integer; optional</td><td>Auction type, where 1 = First Price, 2 = Second Price. Default: at=2.</td></tr><tr><td>tmax</td><td>integer; optional</td><td>Maximum time in milliseconds to submit a bid to avoid timeout. This value is commonly communicated offline if it is set up on a pub zone.</td></tr></tbody></table>

**Object Specification: Bid Request**&#x20;

| **Attribute** | **Type**     | **Description**                                                 |
| ------------- | ------------ | --------------------------------------------------------------- |
| cur           | string array | Only USD is supported.                                          |
| bcat          | string array | Blocked advertiser categories using the IAB content categories. |
| badv          | string array | Block list of advertisers by their domains (e.g., “ford.com”).  |

**Object Specification: Impression**

<table data-header-hidden><thead><tr><th width="156"></th><th width="251"></th><th></th></tr></thead><tbody><tr><td><strong>Attribute</strong></td><td><strong>Type</strong></td><td><strong>Description</strong></td></tr><tr><td>id</td><td>string; required</td><td>A unique identifier for this impression within the context of the bid request (typically, starts with 1 and increments).</td></tr><tr><td>banner</td><td>either banner,native or video required</td><td>A Banner object.</td></tr><tr><td>native</td><td>either banner,native or video required</td><td>A Native object.</td></tr><tr><td>video</td><td>either banner,native or video required</td><td>A Video object.</td></tr><tr><td>bidfloor</td><td>optional; float; default 0</td><td>Minimum bid for this impression expressed in CPM</td></tr><tr><td>secure</td><td>optional; integer</td><td>Flag to indicate if the impression requires secure HTTPS URL creative assets and markup, where 0 = non-secure, 1 = secure.</td></tr></tbody></table>

**Object Specification: Banner**

<table data-header-hidden><thead><tr><th width="127"></th><th width="211"></th><th></th></tr></thead><tbody><tr><td><strong>Attribute</strong></td><td><strong>Type</strong></td><td><strong>Description</strong></td></tr><tr><td>w</td><td>integer; required</td><td>Width of the impression in pixels.</td></tr><tr><td>h</td><td>integer; required</td><td>Height of the impression in pixels.</td></tr><tr><td>battr</td><td>integer array; optional</td><td>Blocked creative attributes.</td></tr><tr><td>pos</td><td>integer; optional</td><td>Ad position on screen.</td></tr><tr><td>btype</td><td>integer array; optional</td><td>Blocked banner ad types.</td></tr><tr><td>mimes</td><td>string array; optional</td><td><p>Content MIME types supported. Popular MIME types may include:</p><p>“application/x-shockwave-flash”, ”image/jpeg” and “image/gif”</p></td></tr></tbody></table>

**Object Specification: Native, User**

“Native” as an object represents a native-type impression. Native ad units are intended to blend seamlessly into the surrounding content. As such, the response must be well-structured to afford the publisher fine-grained control over rendering.

&#x20;“User” as an object contains information known or derived about the human user of the device (i.e., the audience for advertising).

<table data-header-hidden><thead><tr><th width="121"></th><th width="108"></th><th width="198"></th><th></th></tr></thead><tbody><tr><td><strong>Object</strong></td><td><strong>Attribute</strong></td><td><strong>Type</strong></td><td><strong>Description</strong></td></tr><tr><td>Native</td><td>request</td><td>required</td><td>Request payload complying with the Native Ad Specification as a string.</td></tr><tr><td>Native</td><td>battr</td><td>integer array; optional</td><td>Blocked creative attributes.</td></tr><tr><td>User</td><td>id</td><td>string; optional</td><td>Exchange-specific ID for the user.</td></tr><tr><td>User</td><td>buyeruid</td><td>string; optional</td><td>Buyer-specific ID for the user as mapped by the exchange for the buyer.</td></tr><tr><td>User</td><td>yob</td><td>string; optional</td><td>Year of birth as a 4-digit integer.</td></tr></tbody></table>

**Native Request Markup Object**

Native request Markup is an escaped JSON document that should be included to a Native Object’s attribute - request. “User” as an object contains information known or derived about the human user of the device (i.e., the audience for advertising). The Default column dictates how optional parameters should be interpreted if explicit values are not provided.&#x20;

<table data-header-hidden><thead><tr><th width="120"></th><th width="145"></th><th width="131"></th><th width="88"></th><th></th></tr></thead><tbody><tr><td><strong>Field</strong></td><td><strong>Scope</strong></td><td><strong>Type</strong></td><td><strong>Default</strong></td><td><strong>Description</strong></td></tr><tr><td>ver</td><td>optional</td><td>string</td><td>1</td><td>Version of the Native Markup version in use.</td></tr><tr><td>layout</td><td>recommended</td><td>integer</td><td>-</td><td>The Layout ID of the native ad unit.</td></tr><tr><td>adunit</td><td>recommended</td><td>integer</td><td>-</td><td>The Ad unit ID of the native ad unit.</td></tr><tr><td>plcmtcnt</td><td>optional</td><td>integer</td><td>1</td><td>The number of identical placements in this Layout.</td></tr><tr><td>seq</td><td>optional</td><td>integer</td><td>0</td><td>0 for the first ad, 1 for the second ad, and so on.</td></tr><tr><td>assets</td><td>optional</td><td><p>an array of</p><p>Asset Objects</p><p><br></p></td><td>-</td><td>Any bid must comply with the array of elements expressed by the Exchange.</td></tr></tbody></table>

**Object Specification: Site**

\
This object should be included if the ad-supported content is a website as opposed to a non-browser application.

<table data-header-hidden><thead><tr><th width="157"></th><th width="215"></th><th></th></tr></thead><tbody><tr><td><strong>Attribute</strong></td><td><strong>Type</strong></td><td><strong>Description</strong></td></tr><tr><td>pagecat</td><td>string array; optional</td><td>Array of IAB content categories that describe the current page or view of the site.</td></tr><tr><td>domain</td><td>string; optional</td><td>Domain of the site (e.g., “mysite.foo.com”).</td></tr><tr><td>page</td><td>string; optional</td><td>URL of the page where the impression will be shown.</td></tr><tr><td>cat</td><td>string array; optional</td><td>Array of IAB content categories of the site.</td></tr><tr><td>sectioncat</td><td>string array; optional</td><td>Array of IAB content categories that describe the current section of the site.</td></tr></tbody></table>

**App Object**

\
This object should be included if the ad-supported content is a non-browser application (typically in mobile) as opposed to a website.

<table data-header-hidden><thead><tr><th width="149"></th><th width="206"></th><th></th></tr></thead><tbody><tr><td><strong>Attribute</strong></td><td><strong>Type</strong></td><td><strong>Description</strong></td></tr><tr><td>id</td><td>string; optional</td><td>Exchange-specific app ID.</td></tr><tr><td>name</td><td>string; optional</td><td>App name (may be aliased at the publisher’s request)</td></tr><tr><td>bundle</td><td>string; required</td><td>Application bundle or package name (e.g., com.foo.mygame for Android apps and 123456 for Apple apps).</td></tr><tr><td>domain</td><td>string; optional</td><td>Domain of the app (e.g., “mygame.foo.com”).</td></tr><tr><td>storeurl</td><td>string; optional</td><td>App store URL for an installed app.</td></tr><tr><td>cat</td><td>string array; optional</td><td>Array of IAB content categories of the app.</td></tr><tr><td>sectioncat</td><td>string array; optional</td><td>Array of IAB content categories that describe the current section of the app.</td></tr><tr><td>pagecat</td><td>string array; optional</td><td>Array of IAB content categories that describe the current page or view of the app.</td></tr></tbody></table>

This object should be included if the ad-supported content is a non-browser application (typically in mobile) as opposed to a website.

<table data-header-hidden><thead><tr><th width="149"></th><th width="157"></th><th></th></tr></thead><tbody><tr><td><strong>Attribute</strong></td><td><strong>Type</strong></td><td><strong>Description</strong></td></tr><tr><td>ver</td><td>string; optional</td><td>Application version.</td></tr><tr><td>privacypolicy</td><td>integer; optional</td><td>Indicates if the app has a privacy policy, where 0 = no, 1 = yes.</td></tr><tr><td>paid</td><td>integer; optional</td><td>0 = app is free, 1 = the app is a paid version.</td></tr><tr><td>keywords</td><td>string; optional</td><td>Comma separated list of keywords about the app.</td></tr></tbody></table>

**Device Object**

This object provides information pertaining to the device through which the user is interacting. Device information includes its hardware, platform, location, and carrier data. The device can refer to a mobile handset, a desktop computer, set-top box, or other digital device. For desktop devices only “ua” and “ip” attributes are required. Mobile devices require “ifa” or “ifa” hashes to be present.

<table data-header-hidden><thead><tr><th width="150"></th><th width="154"></th><th></th></tr></thead><tbody><tr><td><strong>Attribute</strong></td><td><strong>Type</strong></td><td><strong>Description</strong></td></tr><tr><td>ua</td><td>string; optional</td><td>Browser user agent string.</td></tr><tr><td>geo</td><td>integer; optional</td><td>Location of the device assumed to be the user’s current location defined by a Geo object.</td></tr><tr><td>ip</td><td>integer; optional</td><td>IPv4 address.</td></tr><tr><td>devicetype</td><td>string; optional</td><td>The general type of device.</td></tr><tr><td>make</td><td>string; optional</td><td>Device make (e.g., “Apple”).</td></tr><tr><td>model</td><td>string; optional</td><td>Device model (e.g., “iPhone”).</td></tr><tr><td>os</td><td>string; optional</td><td>Device operating system (e.g., “iOS”).</td></tr></tbody></table>

<table data-header-hidden><thead><tr><th width="151"></th><th width="154"></th><th></th></tr></thead><tbody><tr><td>hwv</td><td>string; optional</td><td>Hardware version of the device (e.g., “5S” for iPhone 5S).</td></tr><tr><td>h</td><td>integer; optional</td><td>Physical height of the screen in pixels.</td></tr><tr><td>w</td><td>integer; optional</td><td>Physical width of the screen in pixels.</td></tr><tr><td>ppi</td><td>integer; optional</td><td>Screen size as pixels per linear inch.</td></tr><tr><td>pxratio</td><td>float; optional</td><td>The ratio of physical pixels to device independent pixels.</td></tr><tr><td>flashver</td><td>string; optional</td><td>Version of Flash supported by the browser.</td></tr><tr><td>language</td><td>string; optional</td><td>Browser language using ISO-639-1-alpha-2.</td></tr><tr><td>carrier</td><td>string; optional</td><td>Carrier or ISP (e.g., “VERIZON”). “WIFI” is often used in mobile to indicate high bandwidth.</td></tr><tr><td>connectiontype</td><td>integer; optional</td><td>Network connection type.</td></tr><tr><td>js</td><td>integer; optional</td><td>Support for JavaScript, where 0 = no, 1 = yes.</td></tr></tbody></table>

<table data-header-hidden><thead><tr><th width="151"></th><th width="159"></th><th></th></tr></thead><tbody><tr><td>ifa</td><td>string; at least 1 must be present; optional</td><td>ID sanctioned for advertiser use in the clear (i.e., not hashed). “Apple ID for Advertising” or “Android Advertiser Id”.</td></tr><tr><td>didsha1</td><td>string; at least 1 must be present; optional</td><td>Hardware device ID (e.g., IMEI); hashed via SHA1.</td></tr><tr><td>didmd5</td><td>string; at least 1 must be present; optional</td><td>Hardware device ID (e.g., IMEI); hashed via MD5.</td></tr><tr><td>dpidsha1</td><td>string; at least 1 must be present; optional</td><td>Platform device ID (e.g., Android ID); hashed via SHA1.</td></tr><tr><td>dpidmd5</td><td>string; at least 1 must be present; optional</td><td>Platform device ID (e.g., Android ID); hashed via MD5.</td></tr><tr><td>macsha1</td><td>string; optional</td><td>MAC address of the device; hashed via SHA1.</td></tr><tr><td>macmd5</td><td>string; optional</td><td>MAC address of the device; hashed via MD5.</td></tr></tbody></table>

**Geo Object**&#x20;

This object encapsulates various methods for specifying a geographic location.

<table data-header-hidden><thead><tr><th width="124"></th><th width="158"></th><th></th></tr></thead><tbody><tr><td><strong>Attribute</strong></td><td><strong>Type</strong></td><td><strong>Description</strong></td></tr><tr><td>lat</td><td>float; optional</td><td>Latitude from -90.0 to +90.0, where negative is south.</td></tr><tr><td>lon</td><td>float; optional</td><td>Longitude from -180.0 to +180.0, where negative is west.</td></tr><tr><td>type</td><td>integer; optional</td><td>Source of location data; recommended when passing lat/lon. type=1: GPS/Location Services, type=2: IP Address, type=3: User provided (e.g., registration data).</td></tr><tr><td>country</td><td>string; optional</td><td>Country code using ISO-3166-1-alpha-3.</td></tr><tr><td>region</td><td>string; optional</td><td>Region code using ISO-3166-2; 2-letter state code if USA.</td></tr><tr><td>city</td><td>string; optional</td><td>City from MaxMind geo database.</td></tr><tr><td>zip</td><td>string; optional</td><td>Zip or postal code.</td></tr><tr><td>utcoffset</td><td>string; optional</td><td>Local time as the number +/- of minutes from UTC.</td></tr></tbody></table>

**Asset Object**

\
The main container object for each asset requested or supported by Exchange on behalf of the rendering client. Any object that is required is to be flagged as such. Only one of the {title, image, data, video} objects should be present in each object. All others should be null/absent. The id is to be unique within the Asset Object array so that the response can be aligned.

&#x20;

<table data-header-hidden><thead><tr><th width="109"></th><th width="130"></th><th width="115"></th><th width="89"></th><th></th></tr></thead><tbody><tr><td><strong>Field</strong></td><td><strong>Scope</strong></td><td><strong>Type</strong></td><td><strong>Default</strong></td><td><strong>Description</strong></td></tr><tr><td>id</td><td>required</td><td>integer</td><td>-</td><td><p>Unique asset ID, assigned by exchange. Typically a counter for the</p><p>array.</p></td></tr><tr><td>required</td><td>optional</td><td>integer</td><td>0</td><td><p>Set to 1 if asset is required (exchange will not accept a bid</p><p>without it).</p></td></tr><tr><td>title</td><td><p>one of the</p><p>{title, img,</p><p>data, video}<br></p></td><td>object</td><td>-</td><td>Title object for title assets.</td></tr><tr><td>data</td><td><p>one of the</p><p>{title, img,</p><p>data, video}</p></td><td>object</td><td>-</td><td>Data object for ratings, prices etc.</td></tr><tr><td>img</td><td><p>one of the</p><p>{title, img,</p><p>data, video}</p></td><td>object</td><td>-</td><td>Image object for image assets.</td></tr><tr><td>video</td><td><p>one of the</p><p>{title, img,</p><p>data, video}</p></td><td>object</td><td></td><td>Video object for video assets.</td></tr></tbody></table>

**Title Object**

The Title object is to be used for the title element of the Native ad.

<table data-header-hidden><thead><tr><th width="103"></th><th width="112"></th><th width="101"></th><th width="96"></th><th></th></tr></thead><tbody><tr><td><strong>Field</strong></td><td><strong>Scope</strong></td><td><strong>Type</strong></td><td><strong>Default</strong></td><td><strong>Description</strong></td></tr><tr><td>len</td><td>required</td><td>integer</td><td>-</td><td>Maximum length of the text in the title element.</td></tr></tbody></table>

**Image Asset Object**

<table data-header-hidden><thead><tr><th width="111"></th><th width="144"></th><th width="117"></th><th width="116"></th><th></th></tr></thead><tbody><tr><td><strong>Field</strong></td><td><strong>Scope</strong></td><td><strong>Type</strong></td><td><strong>Default</strong></td><td><strong>Description</strong></td></tr><tr><td>type</td><td>optional</td><td>integer</td><td>-</td><td>Type ID of the image element supported by the publisher.</td></tr><tr><td>w</td><td>optional</td><td>integer</td><td>-</td><td>Width of the image in pixels.</td></tr><tr><td>wmin</td><td>recommended</td><td>integer</td><td>-</td><td>The minimum requested width of the image in pixels.</td></tr><tr><td>h</td><td>optional</td><td>integer</td><td>-</td><td>Height of the image in pixels.</td></tr><tr><td>hmin</td><td>recommended</td><td>integer</td><td>-</td><td>The minimum requested height of the image in pixels.</td></tr><tr><td>mimes</td><td>optional</td><td>array of strings</td><td>All types allowed</td><td><p>Whitelist of content MIME types supported. Popular MIME types</p><p>include, but are not limited to “image/jpg” “image/gif”.</p></td></tr></tbody></table>

**Video Asset Object**

The video object to be used for all video elements supported in the Native Ad.

<table data-header-hidden><thead><tr><th width="146"></th><th width="118"></th><th width="142"></th><th width="103"></th><th></th></tr></thead><tbody><tr><td><strong>Field</strong></td><td><strong>Scope</strong></td><td><strong>Type</strong></td><td><strong>Default</strong></td><td><strong>Description</strong></td></tr><tr><td>mimes</td><td>required</td><td>array of strings</td><td>-</td><td>Content MIME types supported. Popular MIME types include,but are not limited to “video/x-ms-wmv” for Windows Media, and “video/x-flv” for Flash Video.</td></tr><tr><td>minduration</td><td>required</td><td>integer</td><td>-</td><td>Minimum video ad duration in seconds.</td></tr><tr><td>maxduration</td><td>required</td><td>integer</td><td>-</td><td>Maximum video ad duration in seconds.</td></tr><tr><td>protocols</td><td>required</td><td>array of integers</td><td>-</td><td>An array of video protocols the publisher can accept in the bid response.</td></tr></tbody></table>

**Data Asset Object**

<table data-header-hidden><thead><tr><th width="111"></th><th width="121"></th><th width="93"></th><th width="96"></th><th></th></tr></thead><tbody><tr><td><strong>Field</strong></td><td>Scope</td><td><strong>Type</strong></td><td><strong>Default</strong></td><td><strong>Description</strong></td></tr><tr><td>type</td><td>required</td><td>integer</td><td>-</td><td>Type ID of the element supported by the publisher. The publisher can display this information in an appropriate format.</td></tr><tr><td>len</td><td>optional</td><td>integer</td><td>-</td><td><p>Maximum length of the text in the element’s response.</p><p><br></p></td></tr></tbody></table>


# Adgebra API Reports

A Reporting API is an application programming interface (API) that enables applications to collect, manage, and display reports or metrics based on specific data or user interactions. Reporting APIs are widely used to gather performance metrics, errors, or usage statistics and generate reports in an organized format, often for analytics, compliance, or monitoring purposes.

Here’s a breakdown of key aspects of Reporting APIs:

#### 1. **Common Use Cases**:

* **Analytics and Insights**: Collecting user behavior, engagement, or performance metrics.
* **Error and Event Logging**: Monitoring errors or specific events within applications or websites.
* **Security and Compliance**: Tracking security incidents, user access patterns, and compliance with regulations.
* **System Monitoring**: Keeping tabs on system health, server metrics, and other operational data.

#### 2. **How It Works**:

Reporting APIs typically follow a **request-response model**:

* **Data Collection**: The API gathers data from specified sources (user interactions, error logs, etc.).
* **Data Aggregation**: Collected data is aggregated and processed into a usable format.
* **Data Reporting**: The processed data can then be accessed through API endpoints, which provide the data in JSON format for external processing or display in dashboards.


# Account Report API

Adgebra Report API integration guideline

The Adgebra Report API integration guidelines will be able to fetch numbers from adgebra reports in real-time by sending the required parameters in an API call. In response, adgebra will send data as per the below mentioned format.

### API Format&#x20;

{% stepper %}
{% step %}
**Request Format**

{% code overflow="wrap" %}

```
https://login.adgebra.in/AdgebraUI/GetASSReportWS_v4.do?p1=[AccountID]&p2=[AdvertiserId]&p3=[Start-Date]&p4=[End-Date]&p5=[Uniwque-Pin]&p6=[Currency]
```

{% endcode %}

**`Request Parameters`**

<pre data-overflow="wrap"><code>p1=Account Id of which the reports need to be fetched ex:'432'.
<strong>
</strong><strong>p2=Advertiser ID of which reports need to be fetched. By default, it will be 'All' and will fetch all advertiser reports associated with the account ID. Here you can also fetch by only a particular advertiser just by entering the advertiser id ex:'4122'.
</strong>
p3: This Parameter is the start date of the report that needs to be fetched. The Date format for this field is "DD-MMM-YYYY" Ex: 01-Nov-2023

p4: This Parameter is the end date of the report that needs to be fetched. The Date format for this field is "DD-MMM-YYYY" Ex: 02-Nov-2023

p5: This Parameter is the unique pin associated with the account. Here you need to contact your account manager to get the unique pin. Ex : z8Sgxc82Mnxrb9me

p6: This parameter is the currency format that you wish to fetch in the report. The default is 'inr'. You can change it to 'usd'.
</code></pre>

1.

**Request Example:**

{% code overflow="wrap" %}

```
https://login.adgebra.in/AdgebraUI/GetASSReportWS_v4.do?p1=498&p2=all&p3=01-nov-2023&p4=02-nov-2023&p5=z8Sgxc82Mnxrb9me&p6=inr
```

{% endcode %}

{% endstep %}

{% step %}
**Response Format**

```
[
{
  "Advertiser Name": [
    {
      "CTR": "[Count]",
      "impression": "[Count]",
      "clicks": "[Count]",
      "conv": "[Count]",
      "expense": "[Count]"
    }
  ],
  
Response Example:
{
  "Golfland Vanaha": [
    {
      "CTR": "0.11",
      "impression": "1574228",
      "clicks": "1704",
      "conv": "5",
      "expense": "5599.27"
    }
  ],
  "HOH Thane": [
    {
      "CTR": "0.17",
      "impression": "2355951",
      "clicks": "4089",
      "conv": "6",
      "expense": "12110.50"
    }
  ],
  "Tyrrop_kine": [
    {
      "CTR": "0.54",
      "impression": "1462774",
      "clicks": "7870",
      "conv": "0",
      "expense": "26326.70"
    }
  ]
}
```

{% endstep %}
{% endstepper %}

#### Note:

* At any point in time, if the response is blank or invalid, then it should be handled at the client's end. At times when planned/unplanned adgebra maintenance activity may be scheduled.
* If any reponse is blank, please check the values entered in the parameters. The response will also be blank in case there is no data.


# Partner Report API

Adgebra Report API integration guideline

The Adgebra Report API integration guidelines will be able to fetch numbers from adgebra reports in real-time by sending the required parameters in an API call. In response, adgebra will send data as per the below-mentioned format.

### API Format&#x20;

{% stepper %}
{% step %}
**Request Format**

{% code overflow="wrap" %}

```
https://adgebra.co.in/pssreport/GetPSSReportWS?p1=[PartnerID]&p2=[Date]&p3=[SiteName]&p4=[Uniwque-Pin]&p7=[Geo]&p8=[Currency]
```

{% endcode %}

**`Request Parameters`**&#x20;

<pre data-overflow="wrap"><code><strong>p1=Partner Id of which the reports need to be fetched ex:'432'.
</strong>
p2: This Parameter is the date of the report that needs to be fetched. The Date format for this field is "DD-MMM-YYYY" Ex: 01-Nov-2023

p3: This parameter represents the site name. The default is 'all'. If you need data on any particular site you can enter the site name in p3 parameter.

p4: This Parameter is the unique pin associated with the partner. Here you need to contact your partner manager to get the unique pin. Ex : z8Sgxc82Mnxrb9me

p7: This Parameter is the Geo field. The default is 'All'. Hence your report will be shown for all geos. Removing this parameter will run your reports by site instead of geo.

p8: This parameter is the currency format that you wish to fetch in the report. The default is 'USD'. You cannot change it to any other currency at this time.
</code></pre>

**Request Example:**

{% code overflow="wrap" %}

```
https://adgebra.co.in/pssreport/GetPSSReportWS?p1=490&p2=02-Nov-2023&p3=all&p4=z8Sgxc82Mnxrb9r3&p7=all&p8=usd
```

{% endcode %}

{% endstep %}

{% step %}
**Response Format**

```
{
  "Site_Device": [
    {
      "Geo": "[Country]",
      "CTR": "[Count]",
      "Rev": "[Count]",
      "Impression": "[Count]",
      "Clicks": "[Count]"
    }
  ],
```

**Response Example:**

```
{
  prfd-sarkaryojana.in_Mobile": [
    {
      "Geo": "Bahrain",
      "CTR": "0.00",
      "Rev": "0.00",
      "Impression": "9",
      "Clicks": "0"
    },
    {
      "Geo": "India",
      "CTR": "0.21",
      "Rev": "2.65",
      "Impression": "176608",
      "Clicks": "364"
    },
    {
      "Geo": "Kuwait",
      "CTR": "0.00",
      "Rev": "0.00",
      "Impression": "109",
      "Clicks": "0"
    },
    {
      "Geo": "Oman",
      "CTR": "0.00",
      "Rev": "0.00",
      "Impression": "19",
      "Clicks": "0"
    },
    {
      "Geo": "United Arab Emirates",
      "CTR": "0.00",
      "Rev": "0.00",
      "Impression": "142",
      "Clicks": "0"
    },
    {
      "Geo": "Qatar",
      "CTR": "0.00",
      "Rev": "0.00",
      "Impression": "44",
      "Clicks": "0"
    }
  ],
  "prfd-biharhelp.in_Mobile": [
    {
      "Geo": "Pakistan",
      "CTR": "0.00",
      "Rev": "0.00",
      "Impression": "1",
      "Clicks": "0"
    },
    {
      "Geo": "India",
      "CTR": "0.13",
      "Rev": "4.91",
      "Impression": "496712",
      "Clicks": "643"
    },
}
```

{% endstep %}
{% endstepper %}

#### Note:

* At any point in time, if the response is blank or invalid, then it should be handled at the client's end. At times when planned/unplanned adgebra maintenance activity may be scheduled.
* If any reponse is blank, please check the values entered in the parameters. The response will also be blank in case there is no data.